
BY ORDER OF THE SECRETARY
OF THE AIR FORCE
AIR FORCE MANUAL 24-306
30 JULY 2020
Transportation
OPERATION OF AIR FORCE
GOVERNMENT MOTOR VEHICLES
COMPLIANCE WITH THIS PUBLICATION IS MANDATORY
ACCESSIBILITY: Publications and forms are available on the e-Publishing website at
www.e-Publishing.af.mil for downloading or ordering
RELEASABILITY: There are no releasability restrictions on this publication
OPR: AF/A4LR
Supersedes: AFMAN 24-306,
30 April 2020
Certified by: AF/A4L
(Brig Gen Linda S. Hurry)
Pages: 151
This publication implements Air Force Policy Directive (AFPD) 24-3, Management, Operation
and Use of Transportation Vehicles, and supports Air Force Instruction (AFI) 24-301, Ground
Transportation, for the use of Air Force (owned, rented or leased) government motor vehicles
(GMVs). It is a guide to everyday operations, as well as driving under difficult conditions. For
the purposes of this document, GMV refers to owned, rented, or leased tactical or non-tactical
vehicles operated on or off-highway. When more information is needed for a specific vehicle,
check the Manufacturer’s Operators Manual, Technical Order (TO), or Qualification Training
Package (QTP) written for that vehicle. It applies to all organizations and personnel, including
Air Force civilian employees and members of the Civil Air Patrol, when conducting missions for
the Air Force as the official Air Force Auxiliary, that use GMVs in any way, including the Air
Force Reserve (AFR), and Air National Guard (ANG), except where noted otherwise. Send
comments and suggested improvements on AF Form 847, Recommendation for Change of
Publication through Air Force Installation and Mission Support Center (AFIMSC) functional
managers to United States Air Force, Directorate of Logistics (USAF/A4LR), Deputy Chief of
Staff (DCS)/Logistics, Engineering & Force Protection, 1030 Air Force Pentagon, Washington
DC 20330-1030. This publication may be supplemented at any level, but all Supplements must
be routed to the OPR of this publication for coordination prior to certification and approval.
MAJCOM supplements must also be routed to USAF/A4LR prior to certification and approval
for implementation. The authorities to waive wing/unit level requirements in this publication are
identified with a Tier (“T-0, T-1, T-2, T-3”) number following the compliance statement. See
AFI 33-360, Publications and Forms Management, for a description of the authorities associated
with the Tier numbers. Submit requests for waivers through the chain of command to the
appropriate Tier waiver approval authority, or alternately, to the requestor’s commander for non-
2 AFMAN24-306 30 JULY 2020
tiered compliance items. Ensure all records created as a result of processes prescribed in this
publication are maintained in accordance with AFMAN 33-363, Management of Records, and
disposed of in accordance with the Air Force Records Disposition Schedule located in the Air
Force Records Information Management System.
SUMMARY OF CHANGES
This document has been substantially revised and must be completely reviewed. Significant
changes include the reduction of duplicative guidance, choosing instead to direct the reader to
the most appropriate guidance. There was also a significant reduction in acronyms and
abbreviations throughout the manual. Where appropriate, waiver authority has been lowered and
directive statements removed to afford greater installation-level latitude in application of ground
transportation services. Previously consisting of 16 chapters; the rewritten manual now consists
of 14 chapters. Major changes include the removal of general driving information and operation
of motor vehicles on military air fields.
AFI 36-2651, Air Force Training Program is now obsolete and has been updated to reflect AFI
36-2670, Total Force Development. Added to the definition of Direct Mission Support to
include Aircrew. Removed paragraph 1.7.4 (misuse reporting) to deconflict with AFI 24-301.
Updated UDI definition to deconflict with AFI 24-301 Para 3.16.3. Updated verbiage for
maintaining log of misuse cases. They are to be kept on file for three years IAW 24-301.
Chapter 1—ROLES AND RESPONSIBILITIES 15
Section 1A—Introduction 15
1.1. Introduction. ............................................................................................................. 15
Section 1B—Roles and Responsibilities 15
1.2. USAF/A4LR - Headquarters USAF Logistics Readiness Division ......................... 15
1.3. AFIMSC, NGB and AFRC ...................................................................................... 15
1.4. Installation Commanders and Directors (or equivalent). ......................................... 15
1.5. Logistics Readiness Squadron Commanders and Directors (or equivalent) ............ 16
1.6. Unit Commanders .................................................................................................... 16
1.7. LRS - Ground Transportation .................................................................................. 16
1.8. Vehicle Control Officials ......................................................................................... 17
Chapter 2—OFFICIAL USE OF GOVERNMENT MOTOR VEHICLES 18
Section 2A—Official Use Requirements 18
2.1. Official Use of GMVs. ............................................................................................. 18
AFMAN24-306 30 JULY 2020 3
Section 2B—General Use Responsibilities 18
2.2. General Use Responsibilities. .................................................................................. 18
2.3. Making Official Use Determinations. ...................................................................... 19
2.4. Priority of Transportation Services. ......................................................................... 19
2.5. Vehicle Misuse Reporting. ...................................................................................... 19
2.6. Penalties for Misuse of DoD Motor Vehicles. ......................................................... 20
Section 2C—Authorized Uses of GMVs for Temporary Duty Support 20
2.7. Temporary Duty. ...................................................................................................... 20
Section 2D—Standard Authorized Uses of GMVs for Permanent Party Mission Support 20
2.8. Permanent Party. ...................................................................................................... 20
2.9. Event Participation. .................................................................................................. 21
Section 2E—Special Authorized Uses of GMVs for Permanent Party Mission Support 22
2.10. Mission-Specific Authorizations. ............................................................................ 22
2.11. MAJCOM, Numbered Air Force, and Installation Commanders. ........................... 22
2.12. Operations Group Commanders (OG/CCs). ............................................................ 23
2.13. Domicile to Duty (DTD). ......................................................................................... 23
Section 2F—Dependent and Pet or Service Animal Transportation Support 23
2.14. General Dependent Transportation Support. ........................................................... 23
2.15. Invitational Travel Authorization Special Dependent Transportation Support. ...... 23
2.16. Pet and Service Animal Transportation Support. ..................................................... 24
Section 2G—DoD Agency Transportation Support (non-inclusive) 24
2.17. Civil Air Patrol Support. .......................................................................................... 24
Section 2H—General Unauthorized uses of Air Force Vehicles (Note: This is not an exclusive
list) 24
2.18. Miscellaneous Event Support. ................................................................................. 24
2.19. Personal or Social Engagements. ............................................................................. 24
2.20. Household Goods Movement. ................................................................................. 24
2.21. GMV Parking Locations. ......................................................................................... 25
2.22. Permissive TDY Status. ........................................................................................... 25
4 AFMAN24-306 30 JULY 2020
Chapter 3—LICENSING AND TRAINING 26
Section 3A—Operator Records and Licensing (OR&L) General Information and Administration 26
3.1. Policy. ...................................................................................................................... 26
3.2. OR&L Office. .......................................................................................................... 26
3.3. Driver Records. ........................................................................................................ 26
3.4. Military and Civilian Employee Licensing. ............................................................. 27
Section 3B—Licensing for Military Personnel 29
3.5. Military Personnel. ................................................................................................... 29
Section 3C—Licensing for Non-US Citizens 29
3.6. Qualifying a Non-US Citizen. .................................................................................. 29
Section 3D—Commercial Drivers License Requirements 29
3.7. Commercial Drivers License (CDL). ....................................................................... 30
3.8. Military Exemption. ................................................................................................. 30
Section 3E—Licensing for Federal Civilian Employees, Contractor Personnel, and Federal Prison
Camp Inmates 30
3.9. Licensing Federal Civilian Employees. ................................................................... 30
3.10. Licensing Contractor Personnel. .............................................................................. 31
3.11. Requirements for Contingency and Remote Areas. ................................................. 32
Section 3F—Administrative Control of USAF Licensing 32
3.12. Suspension for Substance Abuse. ............................................................................ 32
3.13. Reinstatement of a State Operator’s Permit. ............................................................ 32
Section 3G—Operator Certification and Administrative Responsibility 32
3.14. Operator Certification. ............................................................................................. 32
Section 3H—Vehicle Training Aid Requirements 32
3.15. Air Force Qualification Training Packages (AFQTPs). ........................................... 32
Section 3I—Unit Vehicle Training and Vehicle Control Official (VCO) Responsibilities 34
3.16. Policy. ...................................................................................................................... 34
3.17. TDY Vehicle Training and Qualifications. .............................................................. 35
AFMAN24-306 30 JULY 2020 5
Chapter 4—BASIC OPERATING PROCEDURES AND MANEUVERS 36
Section 4A—General Information 36
4.1. Objective. ................................................................................................................. 36
4.2. Basic Responsibilities. ............................................................................................. 36
Section 4B—Basic Unit/VCO Responsibilities 36
4.3. Unit/VCO Responsibilities. ..................................................................................... 36
4.4. Toll Tickets/Transponders. ...................................................................................... 37
Section 4C—Operator of Air Force GMVs Health and Well-Being 37
4.5. Operator Health and Well-Being. ............................................................................ 37
Section 4D—Manual and Semi-automatic Transmissions Operation 37
4.6. Starting. .................................................................................................................... 37
4.7. General Information. ................................................................................................ 37
4.8. Clutch Operation. ..................................................................................................... 37
4.9. Manual Shifting Purpose. ........................................................................................ 38
4.10. Clutch Shifting Procedure. ....................................................................................... 38
4.11. Double-Clutch Shifting Procedure. .......................................................................... 39
4.12. Spark Ignition Engine Braking Operation. .............................................................. 39
Section 4E—Backing 40
4.13. Backing. ................................................................................................................... 40
Section 4F—Spotter Safety 40
4.14. Spotter Safety. .......................................................................................................... 40
4.15. Air Force Standard Spotting Hand and Arm Signals. .............................................. 41
Figure 4.1. Standard Spotting Hand and Arm Signals – Come Towards the Spotter. ............... 42
Figure 4.2. Standard Spotting Hand and Arm Signals – Move Away from the Spotter. ........... 42
Figure 4.3. Standard Spotting Hand and Arm Signals. .............................................................. 43
Figure 4.4. Standard Spotting Hand and Arm Signals. .............................................................. 43
Figure 4.5. Standard Spotting Hand and Arm Signals – Slow Down. ....................................... 44
Figure 4.6. Standard Spotting Hand and Arm Signals – Stop. ................................................... 44
Figure 4.7. Standard Spotting Hand and Arm Signals – Shut Down. ........................................ 45
6 AFMAN24-306 30 JULY 2020
Section 4G—Parking 45
4.16. General. .................................................................................................................... 45
Figure 4.8. Parking Parallel to a Curb. ....................................................................................... 47
4.17. Diagonal or Angle Parking. ..................................................................................... 47
Figure 4.9. Parking on a Hill. ..................................................................................................... 48
Chapter 5—PROCEDURES FOR TRANSPORTING PERSONNEL 49
Section 5A—General Information and Procedures 49
5.1. General Information. ................................................................................................ 49
5.2. General Procedures. ................................................................................................. 49
Section 5B—Special Situations 49
5.3. Distinguished Visitors (DVs). .................................................................................. 49
5.4. Emergency Vehicles. ............................................................................................... 50
Chapter 6—MAINTAINING SAFE VEHICLES 51
Section 6A—General Maintenance Responsibilities 51
6.1. General Information. ................................................................................................ 51
6.2. Fuel-Efficient Operations......................................................................................... 51
6.3. DOD Fleet Card Program. ....................................................................................... 51
6.4. Use Overview. ......................................................................................................... 51
Section 6B—Armored Vehicle and Preventative Maintenance 52
6.5. Armored Vehicle Maintenance. ............................................................................... 52
Section 6C—Operation Inspections 52
6.6. Overview Operation Inspections. ............................................................................. 52
Section 6D—Air Force Equipment and Maintenance Forms and Records 52
6.7. Air Force Equipment and Maintenance Forms and Records. .................................. 52
6.8. Defects. .................................................................................................................... 52
Chapter 7—HAZARDS AND SAFETY INFORMATION 54
Section 7A—General Hazards and Safety Information 54
7.1. General. .................................................................................................................... 54
AFMAN24-306 30 JULY 2020 7
Section 7B—Hazards and Safety Measures 54
7.2. Vehicle Hazards. ...................................................................................................... 54
7.3. Pedestrians. .............................................................................................................. 54
7.4. Bicyclists. ................................................................................................................. 55
7.5. Motorcyclists. .......................................................................................................... 55
7.6. Animals. ................................................................................................................... 55
7.7. School Buses. ........................................................................................................... 55
Figure 7.1. Stopping for a School Bus. ...................................................................................... 56
7.8. Emergency Vehicles. ............................................................................................... 56
7.9. Weather Hazards. ..................................................................................................... 56
7.10. Secondary Roads. ..................................................................................................... 61
7.11. Overloading and Overcrowding. .............................................................................. 61
Section 7C—Off-Road Driving 62
7.12. General Information. ................................................................................................ 62
7.13. Off-Road Driving Terrain Types. ............................................................................ 62
7.14. Vehicle Care. ........................................................................................................... 66
Chapter 8—ROADSIDE EMERGENCY AND ACCIDENT RESPONSE 67
Section 8A—General Information 67
8.1. General Information. ................................................................................................ 67
Section 8B—Roadside Emergencies 67
8.2. Tire Blowouts. ......................................................................................................... 67
8.3. Skids. ....................................................................................................................... 67
Figure 8.1. Recovering from a Skid. .......................................................................................... 68
8.4. Running Off the Pavement. ..................................................................................... 68
8.5. Brake Failure. ........................................................................................................... 69
8.6. Breakdowns. ............................................................................................................ 69
Section 8C—Vehicle Fires 69
8.7. Preventing Vehicle Fires. ......................................................................................... 69
8.8. Fighting Vehicle Fires. ............................................................................................ 70
8 AFMAN24-306 30 JULY 2020
Section 8D—Roadside Tool Kits 71
8.9. Spare Tire and Tool Kit. .......................................................................................... 71
8.10. Highway Warning Kit. ............................................................................................. 71
Figure 8.2. Use of Highway Warning Kits. ................................................................................ 72
8.11. Use of Highway Warning Kit. ................................................................................. 72
Section 8E—Off-Base Repair Service 73
8.12. Off-Base Repair Service. ......................................................................................... 73
Section 8F—Accident Response 73
8.13. Initial Accident Response Procedures. .................................................................... 73
8.14. Precautions Against Further Accidents. ................................................................... 74
8.15. Removal of Vehicle From Accident Scene. ............................................................. 74
Section 8G—Preparation of Accident Forms 75
8.16. Preparation of Accident Forms. ............................................................................... 75
Figure 8.3. DD Form 518. .......................................................................................................... 75
Figure 8.4. Sample Form of SF 91 (Page 1). .............................................................................. 77
Figure 8.5. Sample Form of SF 91 (Page 2). .............................................................................. 78
Figure 8.6. SF Form 91 (Page 3). ............................................................................................... 79
Figure 8.7. SF Form 91 (Page 4). ............................................................................................... 80
Figure 8.8. SF Form 94. ............................................................................................................. 81
Chapter 9—LOADING AND TIE-DOWN PROCEDURES 82
Section 9A—Loading and Tie-down Procedures General Information 82
9.1. General Information. ................................................................................................ 82
Section 9B—Cargo Responsibility and Distribution 82
9.2. Responsibility for Cargo. ......................................................................................... 82
9.3. Distribution of Cargo. .............................................................................................. 83
Figure 9.1. Load Distribution. .................................................................................................... 84
Figure 9.2. Load Distribution (Continued). ................................................................................ 85
Figure 9.3. Load Distribution (continued). ................................................................................. 85
9.4. Loading and Tie-down Safety. ................................................................................. 85
AFMAN24-306 30 JULY 2020 9
9.5. Vehicle Safety Standards. ........................................................................................ 86
9.6. Types of Loads. ........................................................................................................ 86
9.7. Special Loads. .......................................................................................................... 87
9.8. Load Compatibility. ................................................................................................. 87
9.9. Load Configuration. ................................................................................................. 87
9.10. Perishable Cargo. ..................................................................................................... 88
9.11. Types of Tie-down Devices. .................................................................................... 88
9.12. Load binders. ........................................................................................................... 89
9.13. Chains. ..................................................................................................................... 89
Table 9.1. Chain Characteristics. .............................................................................................. 90
Figure 9.4. Types of Load binders. ............................................................................................ 90
9.14. Wire Rope. ............................................................................................................... 90
Figure 9.5. Wire Rope. ............................................................................................................... 91
9.15. U-Bolts (Clamps). .................................................................................................... 91
Figure 9.6. U-Clamps. ................................................................................................................ 91
Table 9.2. Wire Rope Characteristics. ...................................................................................... 92
9.16. Turnbuckles. ............................................................................................................ 92
Figure 9.7. Turnbuckle Types. ................................................................................................... 92
9.17. Chain-Hoist and Cable Grippers. ............................................................................. 93
9.18. Web-Style Ratchet and Strap Assemblies. ............................................................... 93
Figure 9.8. Cable Grippers and Chain Hoist. ............................................................................. 93
Figure 9.9. Web-Style Strap and Ratchet Assemblies. ............................................................... 93
Figure 9.10. Strap-Secured Load. ................................................................................................. 94
Figure 9.11. Strap or Banded Load. ............................................................................................. 94
9.19. Steel Banding. .......................................................................................................... 95
Figure 9.12. Crimp Type Joints. ................................................................................................... 95
Figure 9.13. Load Secured by Steel Banding. ............................................................................. 96
9.20. Inspection of the Load. ............................................................................................ 96
9.21. Inspection of Tie-down Equipment. ........................................................................ 97
10 AFMAN24-306 30 JULY 2020
Table 9.3. Load binder Inspection Criteria. .............................................................................. 97
9.22. Transferring the Load. ............................................................................................. 98
9.23. Blocking and Bracing. ............................................................................................. 99
Figure 9.14. Bracing a Load of Barrels. ....................................................................................... 99
Figure 9.15. Load Arrangement of Ammunition. ........................................................................ 100
9.24. General Rules for Blocking and Bracing. ................................................................ 100
9.25. Securing the Load. ................................................................................................... 100
9.26. Using Web Straps. ................................................................................................... 101
9.27. Chains and Load binders. ......................................................................................... 101
9.28. Load Lashing. .......................................................................................................... 101
Figure 9.16. Load Lashing. .......................................................................................................... 102
Chapter 10—DANGEROUS/HAZARDOUS CARGO AND MATERIALS 103
Section 10A—Transporting Dangerous/Hazardous Cargo 103
10.1. General Information. ................................................................................................ 103
10.2. Necessary Forms. ..................................................................................................... 103
Section 10B—General Safety Measures 103
10.3. General Safety Measures. ........................................................................................ 103
Section 10C—Rules for Transporting Dangerous/Hazardous Cargo 104
10.4. Rules for Transporting Dangerous/Hazardous Cargo. ............................................. 104
Figure 10.1. DD Form 2890 (Page 1). .......................................................................................... 106
Figure 10.2. DD Form 2890 (Page 2). .......................................................................................... 107
Figure 10.3. DD Form 626 (Page 1). ............................................................................................ 108
Figure 10.4. DD Form 626 (Page 2). ............................................................................................ 109
Figure 10.5. DD Form 626 (Page 3). ............................................................................................ 110
Figure 10.6. Placarding a Vehicle. ............................................................................................... 111
10.5. HAZMAT Routes. ................................................................................................... 111
10.6. Operator Responsibilities. ........................................................................................ 111
Section 10D—Load Custody 111
10.7. Load Custody. .......................................................................................................... 111
AFMAN24-306 30 JULY 2020 11
10.8. Parking. .................................................................................................................... 112
10.9. Missiles. ................................................................................................................... 112
10.10. Ammunition and Explosives. ................................................................................... 112
10.11. Chemical Agents. ..................................................................................................... 113
Section 10E—Transporting HAZMAT by Highway 113
10.12. Transporting HAZMAT by Highway. ..................................................................... 113
Section 10F—Detecting Fuel Leakage Occurring On a Public Highway 114
10.13. Detecting Fuel Leakage Occurring On a Public Highway. ...................................... 114
Section 10G—Detecting Fuel Leakage Occurring Off the Road 114
10.14. Detecting Fuel Leakage Occurring Off the Road. ................................................... 114
10.15. Petroleum Tank Vehicles Safety Procedures. .......................................................... 115
Chapter 11—VEHICLE RECOVERY OVERVIEW 116
Section 11A—Vehicle Recovery General Information 116
11.1. General Information. ................................................................................................ 116
Section 11B—Recovery Safety 116
11.2. Recovery Safety. ...................................................................................................... 116
Section 11C—Common Tools for Recovery 116
11.3. Common Tools for Recovery................................................................................... 116
Section 11D—Spotters for Recovery 117
11.4. Spotters for Recovery. ............................................................................................. 117
Section 11E—Towing Vehicles With Bars 117
11.5. Towing Statement. ................................................................................................... 117
11.6. General Rules for Towing. ....................................................................................... 117
Section 11F—Anchoring Vehicles 118
11.7. Anchoring Vehicles. ................................................................................................ 118
Section 11G—Winch Recovery 118
11.8. Winch Recovery. ..................................................................................................... 118
12 AFMAN24-306 30 JULY 2020
Chapter 12—CONTINGENCY OPERATIONS OVERVIEW 119
Section 12A—Motor Marches and Convoys General Information 119
12.1. General Information. ................................................................................................ 119
Section 12B—Motor Marches and Convoys Overview 119
12.2. Rate-of-Speed and Interval. ..................................................................................... 119
12.3. Vehicle Failures. ...................................................................................................... 120
12.4. Vehicle Halts. ........................................................................................................... 120
12.5. Convoy Security. ..................................................................................................... 120
12.6. Convoy Control Signals. .......................................................................................... 120
12.7. NATO Convoy Flags and Signals. ........................................................................... 120
Section 12C—Vehicle Camouflage Operations 121
12.8. Camouflage Operations. .......................................................................................... 121
12.9. Stationary Vehicle Camouflage and Concealment. ................................................. 121
12.10. Camouflage Screen System. .................................................................................... 121
12.11. Erecting of Camouflage Screens Over Vehicle. ...................................................... 121
Section 12D—Vehicle Operations Using Night Vision Devices and Operations Under Blackout
(BO) Conditions 121
12.12. General Information. ................................................................................................ 121
12.13. Night Vision Goggles Introduction. ......................................................................... 121
12.14. Single Color Vision. ................................................................................................ 122
12.15. Color Adaptation. ..................................................................................................... 122
12.16. Considerations When Driving With Night Vision Goggles. .................................... 122
Table 12.1. NVG Lighting Countermeasures. ............................................................................ 124
12.17. Driving Techniques With Night Vision Goggles. .................................................... 125
12.18. Role of the Assistant GMV Operator. ...................................................................... 125
12.19. Parking Vehicles. ..................................................................................................... 126
12.20. Operations Under Blackout Conditions Without Night Vision Devices. ................ 126
12.21. Blackout Marker Lights. .......................................................................................... 126
Figure 12.1. Rear BO Marker Lights. .......................................................................................... 127
AFMAN24-306 30 JULY 2020 13
Chapter 13—LAND NAVIGATION 128
Section 13A—Navigation Considerations 128
13.1. Navigation Considerations. ...................................................................................... 128
Section 13B—Land Navigation Overview 128
13.2. Maps. ....................................................................................................................... 128
13.3. Military Grid Reference System. ............................................................................. 128
13.4. Grid Squares. ........................................................................................................... 128
13.5. Determining Coordinates. ........................................................................................ 128
Figure 13.1. Grid Square. ............................................................................................................. 129
Figure 13.2. Point on a Grid Square. ............................................................................................ 130
Figure 13.3. Coordinate Scales. ................................................................................................... 130
Figure 13.4. Determining Coordinates of a Point Using a Coordinate Scale. .............................. 131
Figure 13.5. Locating a Point on a Grid Square. .......................................................................... 132
Figure 13.6. Coordinate Scale. ..................................................................................................... 132
Figure 13.7. Grid Reference Box. ................................................................................................ 133
Figure 13.8. Strip Map. ................................................................................................................ 133
13.6. Estimating the Distance. .......................................................................................... 134
13.7. Unit Measurements. ................................................................................................. 134
13.8. Estimating the Time. ................................................................................................ 134
13.9. Recognizing Military Signs. .................................................................................... 134
Figure 13.9. Strip Map Symbols. ................................................................................................. 134
13.10. Using a Strip Map. ................................................................................................... 135
Section 13C—Prepare Before Movement 135
13.11. Movement Preparation. ............................................................................................ 135
Section 13D—Terrain Association Navigation 135
13.12. Terrain Association. ................................................................................................. 135
Figure 13.10. Primary Route. ......................................................................................................... 137
Section 13E—Electronic Navigation Equipment 137
13.13. Precision Lightweight Global Positioning System (GPS) Receiver (PLGR). ......... 137
14 AFMAN24-306 30 JULY 2020
13.14. Defense Advanced Global Positioning System (GPS) Receiver (DAGR). ............. 137
Chapter 14—CHEMICAL, BIOLOGICAL, RADIOLOGICAL, AND NUCLEAR (CBRN)
OPERATIONS 138
Section 14A—Operations in CBRN Environment 138
14.1. General Information. ................................................................................................ 138
Section 14B—Practices for Operating Vehicle in Contaminated Area 138
14.2. Operating a Vehicle in a Contaminated Area. ......................................................... 138
14.3. Vehicle Operation While Wearing Protective Mask. ............................................... 138
14.4. Marker Descriptions. ............................................................................................... 139
Figure 14.1. Standard CBRN and Unexploded Ordnance Hazard Markers. ................................ 139
14.5. Vehicle and Equipment Decontamination. .............................................................. 139
14.6. Pre/Post- Attack Preparation. ................................................................................... 141
Table 14.1. Mission Criticality Level Codes. ............................................................................. 143
Attachment 1—GLOSSARY OF REFERENCES AND SUPPORTING INFORMATION 145
AFMAN24-306 30 JULY 2020 15
Chapter 1
ROLES AND RESPONSIBILITIES
Section 1A—Introduction
1.1. Introduction. Military and civilian operators of Air Force GMVs must meet specific
qualifications to be certified. (T-0). The term operator denotes a level of competence in the safe
operation as well as an understanding of the vehicle’s capabilities and limitations. This includes
an understanding of current sub-components such as technologically advanced communications,
navigation, intercom systems, on-board material handling cranes, self-recovery winches,
integrated night-vision devices, weapons support systems, onboard electronic diagnostic systems,
and load responsibility.
Section 1B—Roles and Responsibilities
1.2. USAF/A4LR - Headquarters USAF Logistics Readiness Division
1.2.1. Develops policy for effective operation and official use of GMVs.
1.2.2. Liaises between Department of Defense (DoD) and components on operation of
GMVs and official use considerations.
1.3. AFIMSC, NGB and AFRC
1.3.1. AFIMSC, NGB and AFRC will validate and manage enrollment for the Ground
Transportation NCOIC Course by selecting Technical Sergeant selects, Technical Sergeants,
and Master Sergeants with 18 or less years in service when filling seat allocations. (T-1).
NOTE: Ground Transportation personnel meeting the above criteria who recently returned to
the career field from a Developmental Special Duty or are currently serving in a one-deep
positions will be given priority during the selection process.
1.3.2. Identify personnel attending Training, Validation, and Operations Examiner Course.
1.3.3. Air Force Domicile to Duty (DTD) requests will be coordinated through AFIMSC,
NGB or AFRC, as appropriate, prior to submission to AF/A4LR. (T-1). AFIMSC, National
Guard Bureau and Air Force Reserve Command are not the action officer for DTD requests,
but will conduct a Subject Matter Expert (SME) technical assessment of the request and
provide a concur/non-concur recommendation to the decision authority.
1.3.4. Create, review and approve standardized vehicle Qualification Training Packages, as
applicable.
1.4. Installation Commanders and Directors (or equivalent). Ensures the official use of
GMVs and enforces GMV policy in favor of strict compliance with rules outlined in this manual,
AFI 24-301 and DoDM 4500.36, Acquisition, Management, and Use of DoD Non-Tactical
Vehicles to preclude improper use of appropriations. (T-0).
16 AFMAN24-306 30 JULY 2020
1.5. Logistics Readiness Squadron Commanders and Directors (or equivalent)
1.5.1. Administer the installation Vehicle Misuse Reporting and Investigation Program in
accordance with (IAW) AFI 24-301, Ground Transportation. (T-1).
1.5.2. Using the parameters in para 1.3.1, identify to AFIMSC/XZTE the members
attending the Ground Transportation NCOIC course.
1.6. Unit Commanders
1.6.1. Appoint Vehicle Control Officials IAW AFI 24-302, Vehicle Management.
1.6.2. Oversee unit’s GMV qualification program to include periodic medical review
requirements for civilian personnel who operate GMVs.
1.6.3. When notified by the Logistics Readiness Squadron (LRS) Commander, investigate
GMV misuse and respond to the LRS Commander’s assessment and identify actions taken to
prevent further occurrences (if appropriate) within 15 calendar days of notification. NOTE:
At AFR installations, if the commander is a Traditional Reservist, replies should be by the
next scheduled Unit Training Assembly.
1.6.4. Be familiar with GMV use restrictions and what constitutes official use.
1.6.5. Restrict use of all GMVs, including those rented or leased, for official purposes only,
i.e., in support of authorized DoD functions, activities, or operations only.
1.6.6. Notify the LRS/Operator Records and Licensing (OR&L) section of all suspension
and reinstatement actions IAW AFI 24-301, Ground Transportation. (T-1).
1.6.7. Ensure unit personnel are briefed annually on Air Force policy regarding official use,
accident reporting procedures, vehicle abuse, vehicle misuse, discrepancy reporting, proper
backing, use of spotters and use of DD Form 518, Accident Identification Card, SF 91, Motor
Vehicle Accident Report, and SF 94, Statement of Witness. (T-1). Briefings should be
documented and tracked by the Vehicle Control Officer or commander in a central location
(Vehicle Control binder, electronic database, individual training record, etc.).
1.6.8. Support the installation Accident and Abuse Program to include reimbursements IAW
AFI 24-302, Vehicle Management.
1.7. LRS - Ground Transportation
1.7.1. Serves as the functional experts on GMV Official Use determinations.
1.7.2. Ensures each unit that utilizes the Online Vehicle Interactive Management System
Dispatch Module (OLVIMS) has a base site code loaded into the module. If there is a
requirement to add a base and or site code to OLVIMS Dispatch Module, a request must be
submitted through AFIMSC, NGB or AFR, and then submitted to the Air Force Program
Executive Office ESC/HGGJV Program Management Office. (T-1).
1.7.3. National Guard Bureau and Air Force Reserve units operating their own LRS or
transportation functions will maintain separate OLVIMS Dispatch Module Site Codes to de-
conflict National Guard Bureau, Air Force Reserve, and Regular Air Force Duty Ground
Transportation manpower and license data collection. (T-1).
AFMAN24-306 30 JULY 2020 17
1.8. Vehicle Control Officials
1.8.1. Ensure unit personnel are briefed annually on Air Force policy regarding official use,
accident reporting procedures, vehicle abuse, vehicle misuse, discrepancy reporting, proper
backing, use of spotters and use of DD Form 518, Accident Identification Card, SF 91, Motor
Vehicle Accident Report, and SF 94, Motor Vehicle Accident Statement of Witness. (T-1).
Briefings will be documented and tracked by the unit Vehicle Control Official or commander
in a central location (Vehicle Control Official binder, electronic database, individuals
training record, etc.). (T-1).
1.8.2. Serve as the certifying official on the AF Form 171, Request for Driver Training and
Addition to U.S. Government Driver’s License. (T-1).
1.8.3. Support the installation Accident and Abuse Program to include reimbursements IAW
AFI 24-302, Vehicle Management.
18 AFMAN24-306 30 JULY 2020
Chapter 2
OFFICIAL USE OF GOVERNMENT MOTOR VEHICLES
Section 2A—Official Use Requirements
2.1. Official Use of GMVs. GMVs are closely controlled because of their easy accessibility,
high visibility and potential for misuse. DoDM 4500.36, implements federal law (e.g., 31 United
States Code (U.S.C) §1344 and 40 U.S.C §601-611) and prescribes the limited use of GMVs to
official governmental purposes. Unauthorized use of GMVs results in unneeded expenditure of
funds and creates public criticism. Commanders, operators of GMVs, and the base populace
must be familiar with GMV use restrictions and what constitutes official use of government
vehicles. (T-0).
2.1.1. Initial and Annual Training Requirement. Annually, the unit Vehicle Control
Official, or commanders with permanently assigned GMVs, will brief their personnel on Air
Force policy IAW para. 1.6.7 This training will be documented and tracked by the unit
Vehicle Control Official or commander in a central location (Vehicle Control Official binder,
electronic database, individuals training record, etc.). (T-1).
2.1.1.1. Operators of Air Force GMVs will operate GMVs for official use only and in
compliance with this manual, federal and state law, as wells as DoD and Air Force
guidance as they apply to the proper, safe, and efficient operation of Air Force GMVs.
(T-0). Unit members are required to contact their unit’s VCO for training prior to initial
operation of a GMV.
2.1.2. Restrict use of all GMVs, including those rented or leased, for official purposes only,
i.e., in support of authorized DoD functions, activities, or operations only. (T-0).
2.1.3. Transportation by a GMV shall not be provided when the justification is based
principally on reasons of rank, position, prestige or personal convenience. (T-0).
2.1.4. When questions arise about the official use of a GMV, they will be resolved in favor
of strict compliance with statutory provisions and AFI 24-301 and DODM 4500.36. (T-0).
Refer requests which appear to conflict with governing directives to the Ground
Transportation Noncommissioned Officer in Charge (NCOIC) for review.
Section 2B—General Use Responsibilities
2.2. General Use Responsibilities.
2.2.1. All personnel responsible for operating GMVs in any capacity and those developing
vehicle-related training plans should remain current with this manual and related installation
policy and or instructions.
2.2.2. Alcoholic beverages will not be consumed in GMVs. (T-0). Operators will not
consume alcohol eight hours prior to duty or prior to operating any GMVs. (T-0). Operators
are ultimately responsible for exercising good judgment by imposing additional time
constraints as needed.
AFMAN24-306 30 JULY 2020 19
2.2.3. Personal or government-issued hand-held wireless devices (e.g., phones or text
messaging equipment) or any other type of electronic devices will not be used while
operating a GMV. (T-0). Hands-free communication equipment (blue-tooth enabled
vehicles, speakerphones, single-bud earphones, mounted phones, etc.) may be used IAW
applicable state or local laws.
2.2.4. Tobacco or alcohol products will not be used in GMVs. (T-0).
2.2.5. Food will not be consumed while operating a GMV. (T-0).
2.3. Making Official Use Determinations. When guidance does not specifically fit a request
for transportation support, commanders must consider the following prior to approving the use of
a GMV: (T-0).
2.3.1. The purpose of the vehicle use must be essential to the successful completion of a
DoD function, activity, or operation. (T-0).
2.3.2. The purpose of the vehicle use must be consistent with the purpose for which the
GMV was acquired. (T-0).
2.3.3. If provided, GMV transportation used must be the most cost effective method of
satisfying the requirement, consistent with AFI 24-301. (T-0).
2.4. Priority of Transportation Services. When vehicle transportation is essential to the
performance of official business, the following methods shall be considered in the order shown
to the extent they are available and capable of meeting mission requirements: (T-0).
2.4.1. Scheduled DoD bus service.
2.4.2. DoD specially scheduled leased or owned bus service.
2.4.3. Van pools.
2.4.4. GMV centrally dispatched “taxicab” operation. (Example: Operator and vehicle
support requested from Ground Transportation).
2.4.5. GMV individually dispatched to licensed service member or civilian employee.
(Example: Unit assigned vehicle or U-Drive-It from Ground Transportation).
2.5. Vehicle Misuse Reporting. Report all suspected misuses to LRS-Ground Transportation
utilizing the AF Form 870, U.S. Government Motor Vehicle Suspected Misuse Report. Ground
Transportation conducts an initial technical assessment of the incident to determine if regulatory
official use guidance may have been violated. NOTE: AF/A4LR serves as the primary point-of-
contact for misuses or reckless vehicle operation allegations reported to General Services
Administration.
20 AFMAN24-306 30 JULY 2020
2.5.1. Ground Transportation collects the information and conducts a technical assessment
for review IAW AFI 24-301. Ground Transportation then forwards the AF Form 870, U.S.
Government Motor Vehicle Suspected Misuse Report to the LRS commander and then who
will forward the documentation onto the appropriate unit commander. Commanders have 15
calendar days to respond to the LRS commander's assessment and identify actions taken to
prevent further occurrences (if appropriate). Unit commander responses should address
requirements identified in paragraph 2.3 NOTE: At Air Force Reserve installations, if the
commander is a Traditional Reservist, replies will be by the next scheduled Unit Training
Assembly.
2.5.2. Ground Transportation maintains a log of reported misuse cases IAW AFI 24-301.
The misuse log with technical assessments and unit responses will be kept on file for three
years (RDS: T24-03R10.00).
2.6. Penalties for Misuse of DoD Motor Vehicles. The negligent or willful misuse of a GMV
may be cause for disciplinary action as described in DoDM 4500.36., Enclosure 5. (T-0). This
includes action against military members for violation of Article 92 of the Uniform Code of
Military Justice.
2.6.1. Misuse, acts or omissions resulting in misuse of GMVs (owned, rented, or leased)
may result in disciplinary action; refer to AFI 90-301, The Inspector General Complaint
Program, for guidance on fraud, waste and abuse.
Section 2C—Authorized Uses of GMVs for Temporary Duty Support
2.7. Temporary Duty. Transportation may be provided between lodgings and duty stations for
personnel on temporary duty when public or commercial resources are inadequate or
nonexistent. The temporary duty status of an individual does not necessarily justify the use of a
GMV or its use for personal convenience. Use of the vehicle will always be predicated on need,
distance involved, and other conditions that justify its use to further the DoD and Air Force
mission. (T-0). When an adequate DoD or commercial bus system is available or can be
provided, the use of any GMV or commercial rental car is prohibited.
Section 2D—Standard Authorized Uses of GMVs for Permanent Party Mission Support
2.8. Permanent Party. Official use by Regular Air Force personnel includes transportation to
or from Air Force scheduled appointments on- or off-base, e.g., Military Personnel Section
records check, dental appointments, commander’s calls (special consideration must be taken to
prevent transportation that circumvent official use rules for purposes of morale or personal
convenience), urinalysis testing and hospital outpatient appointments. (T-1). GMV travel is not
authorized for elective surgery, procedures or treatments where the member would otherwise not
be entitled to government travel. Use transportation priorities specified in paragraph 2.4
AFMAN24-306 30 JULY 2020 21
2.8.1. Permanent party personnel conducting official off-base duties are authorized to stop at
off-base eating establishments in the immediate vicinity or direct route of the off-base work
site. Stopping at (on- or off-base) private quarters for any reason or stopping for shopping or
personal convenience purposes is prohibited. The intent is to allow for those personnel
working away from their duty location, for extended periods, the opportunity to obtain meals
without incurring an additional time and fuel cost of returning to the installation. This is not
to be taken as authority to stop as a matter of personal convenience when in transit between
sites, whether on- or off-base.
2.8.2. Personnel conducting official off-base duties are authorized to respond to personal
emergencies that may arise while they are conducting off-base duties in a GMV. Personal
emergencies are defined as notification of a life threatening or serious injury to a dependent,
family member, or substantial damage to personal property, such as a home fire.
2.8.3. Commercial Terminal Transportation. Use of resources to support administrative
activities, for which sufficient public transportation or commercial services exist to fulfill the
need, detracts from direct mission support and should be avoided. Use of GMVs for travel to
transportation terminal are location and/or instance specific. Contact the servicing Ground
Transportation office and refer to AFI 24-301, and DODM 4500.36, Enclosure 5 for more
information.
2.8.3.1. National Capitol Region. Terminal transportation is not authorized in the
National Capital Region and Pentagon Area IAW DoD Administrative Instruction 109
unless necessary because of emergency situations, to meet security requirements or
unusual circumstances. Approval authority for services provided under this exemption is
Air Force District of Washington (AFDW)/A4. All requests must contain a detailed
explanation of why the exemption is required under one of the above noted clauses.
2.8.4. Mortuary Affairs. GMV support may be authorized IAW AFI 34-501, Mortuary
Affairs Program.
2.9. Event Participation.
2.9.1. Public Ceremonies. The use of GMVs may be authorized for military and civilian
personnel officially participating in public ceremonies, military field demonstrations, and
parades directly related to official activities. “Official participation” are activities similar to
and including: serving as a presiding officer, host, chaplain, master of ceremonies, guest
speaker or a proffer. Merely attending does not constitute “officially participating” even if
the public ceremony has been established as an alternate duty location.
2.9.2. General shuttle support from one official location to another official location may be
used as a mitigation measure IAW a vulnerability assessments IAW DoDI O-2000.16V1,
DoD Antiterrorism Program Implementation.
2.9.3. The use of GMVs is authorized to transport immediate family members (i.e., spouse,
children, and parents) of the sponsor in situations involving a sponsor’s death. The LRS
Commander is the approval authority. (T-0).
22 AFMAN24-306 30 JULY 2020
Section 2E—Special Authorized Uses of GMVs for Permanent Party Mission Support
2.10. Mission-Specific Authorizations. Certain mission-specific allowances are authorized if
incident to the performance of duty. Units will submit requests and justification to Ground
Transportation for SME review/recommendation. (T-1). The consolidated package with the
LRS Commander’s recommendations will be coordinated thru the Office of the Staff Judge
Advocate and then onto the Installation Commander for review and final determination. (T-1).
Approval determinations will be provided to each requesting unit commander. (T-1). Mission-
specific authorizations will not be extended to activities other than those listed in this section.
2.10.1. Emergency Response Forces. Travel to on base eating establishments and base
gymnasium by Emergency Response Forces when on alert status is approved. This approval
includes the use of Military Dining Facilities and NAF/AAFES/ Defense Commissary
Agency operated eating establishments to include commissary and shoppette. The intent is to
allow personnel to remain on duty and maintain the ability for immediate response while
securing meals for health and sustenance. Leadership within units authorized to travel to on-
base eating establishment must ensure personnel do not abuse or cause negative public
perception by frequenting establishments for reasons other than obtaining meals. (T-1).
Personnel are prohibited from using GMVs for travel to and from their private quarters under
this provision.
2.10.2. Bulk Meals/Flight Kitchens. Unit commanders may approve use of GMVs for the
purposes of securing carry-out meals in bulk from on-base military dining facilities or flight
kitchens. Examples include: Aircrew, Passenger Terminal, and Mobility and/or Contingency
Support. Do not grant any of the above authorities for the personal convenience of personnel.
Bulk Meals/Flight Kitchen support will be approve in accordance with the above mission
specific authorization guidance. (T-1).
2.10.3. Unless specifically authorized in another section of this instruction, Air Force GMVs
will not be used to transport personnel or equipment to or from base housing areas or other
private quarters located either on or off the installation. (T-0).
2.10.4. Mission-specific authorizations will not be extended to activities other than those
listed in paragraph 2.10.1 (T-0).
2.11. MAJCOM, Numbered Air Force, and Installation Commanders. When a permanently
assigned vehicle is authorized, Installation, Numbered Air Force, and MAJCOM commanders
may use that GMV for on-base travel to locations and tasks related to personal health and
sustenance (except member’s residence). This authorization accommodates the commander's
responsibility to ensure an immediate response capability and to facilitate travel to meet official
responsibilities. Permanent party official use rules (paragraph 2.8) apply for off-base travel and
stops. All other official use constraints as described in this chapter, including the provisions on
dependent and family member travel, apply.
2.11.1. This authorization shall not be interpreted as authority to use the GMV for stops at
their residence or other domicile-to-duty transportation. (T-0).
AFMAN24-306 30 JULY 2020 23
2.12. Operations Group Commanders (OG/CCs). When a telecommunications-equipped,
permanently assigned GMV is authorized, OG/CCs may drive that GMV to on-base eating
establishments (Military Dining Facilities and Non-appropriated Funds/AAFES/ Defense
Commissary Agency operated eating establishments to include commissary and shoppette) while
performing their duties in connection with official business. The intent of the policy is to allow
OG/CCs to use the assigned GMV for these activities while maintaining access to mounted
telecommunications equipment. This shall not to be interpreted as authority to use the GMV for
stops at their residence or other domicile-to-duty transportation. (T-0).
2.13. Domicile to Duty (DTD). Transport of individuals in GMVs from their domicile to place
of employment or home-to-work is not transportation for official purposes, except as specifically
identified or approved in accordance with DoDM 4500.36.
2.13.1. Air Force DTD requests will be coordinated through AFIMSC, National Guard
Bureau or Air Force Reserve Command for technical assessment and recommendation prior
to submission to AF/A4L. (T-1)
Section 2F—Dependent and Pet or Service Animal Transportation Support
2.14. General Dependent Transportation Support. Transportation of family members is the
responsibility of the sponsor. Spouses are not considered representatives of the United States,
DoD, or Air Force, except when traveling on an approved invitation travel authorization (see
paragraph 2.15).
2.14.1. A military dependent may accompany their military or civilian employee sponsor
when the GMV is being used to accomplish official business, the military or civilian sponsor
will participate in an official capacity for the function and there is space available.
2.14.1.1. On a space available basis, accompanying the military member or civilian
personnel in the GMV to meet the Air Force member’s dependent at the event for which
the use of the vehicle has already been authorized to accomplish the official business.
Transportation will be provided at no additional cost to the government. (T-0). The
vehicle must be no larger than required for the official business. (T-0). Such
transportation will be included in annual accounting and reporting of domicile-to-duty
transportation for the Air Force member spouse.
2.14.1.2. On a space available basis, dependents may use publicized, regularly scheduled
shuttle buses or mass transportation services. Space available basis may not be utilized to
circumvent travel to support events such as: breakfasts, luncheons, dinners, icebreakers,
socials, holiday parties, fini-flights and homecomings etc. The events listed in this
paragraph are examples and do not constitute an all-inclusive list.
2.14.1.3. Dependents of personnel who are authorized by DoD to receive domicile-to-
duty transportation may proceed independently to or from an official function in a GMV
when the dependent's presence at the function is in the best interest of the government.
2.15. Invitational Travel Authorization Special Dependent Transportation Support.
2.15.1. Spouses on official ITA orders are authorized ground transportation in direct support
of the invitation only, e.g., travel to and from transportation terminal, billets, and event
site(s). Contact LRS-Ground Transportation for more information.
24 AFMAN24-306 30 JULY 2020
2.16. Pet and Service Animal Transportation Support.
2.16.1. The use of GMVs for the transportation of family pets is authorized for Permanent
Change of Station (PCS) (i.e., only PCS moves at austere locations where public or private
transportation is not available), execution of Installation Emergency Management Plan, Non-
Combatant Evacuation Operation, SAFEHAVEN, etc. The pet must always be under the
control of the owner, either leashed or caged, in order to ensure the safety of the operator and
passengers. (T-1). Owners will be held responsible for the behavior of their pets and any
costs associated to damage caused by the pet. (T-1).
2.16.2. Service animals are authorized to accompany the individual requiring support in
GMVs. The service animal must always be under the control of the owner, either leashed,
harnessed or caged, to ensure the safety of the operator and passengers. (T-1). Owners will
be held responsible for the behavior of their service animal and any cost associated to
damage caused by the animal. (T-1). Failure to do so will result in the immediate
termination of support. (T-1).
Section 2G—DoD Agency Transportation Support (non-inclusive)
2.17. Civil Air Patrol Support. Civil Air Patrol is authorized Air Force transportation support
when performing Air Force assigned missions as a volunteer civilian auxiliary of the Air Force
IAW AFI 10-2701, Organization and Function of the Civil Air Patrol. Air Force Installation
Commanders may provide government transportation and equipment to Civil Air Patrol units on
a temporary basis. When providing transportation or equipment to Civil Air Patrol units, the
Installation Commander must also provide a sufficient number of qualified personnel to operate
the vehicles or equipment. (T-1). If requested by Civil Air Patrol, the Air Force may provide
licensed and qualified operators for Civil Air Patrol ground transportation support. Civil Air
Patrol members are not authorized to drive GMVs. (T-1). Refer to AFI 10-2701 for questions
regarding authorized Civil Air Patrol support.
Section 2H—General Unauthorized uses of Air Force Vehicles (Note: This is not an exclusive
list)
2.18. Miscellaneous Event Support. Breakfasts, luncheons, dinners, icebreakers, socials,
holiday parties, fini-flights, picnics, wing/unit booster clubs, other private organizations, fridge
funds, fundraisers or activities resulting in fundraising, TOP 3 or 4, company grade officers or
enlisted councils, Air Force Balls and similar events, shopping, sightseeing, clubs or functions
on- or off-base are not official. As such, they are not authorized for GMV support. The events
listed in this paragraph are examples and do not constitute an all-inclusive list.
2.19. Personal or Social Engagements. Members and their dependents will not use GMV
transportation for personal social engagements or personal business. (T-0). Members and their
dependents may use publicized, regularly scheduled transportation services on a space-available
basis. Larger vehicles will not be provided to accommodate space-available passengers. (T-0).
2.20. Household Goods Movement. Do not use GMVs for personal or government-directed
household goods moves. (T-0).
AFMAN24-306 30 JULY 2020 25
2.20.1. Members are not authorized GMV support for moves related to dormitory renovation
or commander-directed relocations. Members facing such moves are authorized to receive
all appropriate personal property shipping entitlements. Refer requests for household goods
moves to LRS-Personal Property Element. (T-0).
2.21. GMV Parking Locations. Unless incident to the performance of official duty, do not use
or park GMVs at commissaries, base exchanges (including concessions), bowling centers, officer
and enlisted clubs, gymnasiums or any Non-appropriated Fund activity (i.e., golf courses, rod &
gun clubs) unless authorized as set forth in Chapter 2.
2.22. Permissive TDY Status. Members traveling in Permissive Temporary Duty status are not
authorized dedicated appropriated funded GMV transportation support. Permissive Temporary
Duty status is authorized at no cost to the government. Members in this duty status may use
publicized, regularly scheduled transportation services (e.g., shuttle buses, airport transportation
service) on a space-available basis. Do not provide a larger vehicle to accommodate space-
available passengers. (T-0).
26 AFMAN24-306 30 JULY 2020
Chapter 3
LICENSING AND TRAINING
Section 3A—Operator Records and Licensing (OR&L) General Information and
Administration
3.1. Policy. Air Force GMVs shall only be operated by military personnel, civilian employees,
approved civilian contractors and Non-appropriated Fund employees who meet all criteria of this
manual and criteria found in AFI 24-301. (T-0). All personnel operating a GMV will be
licensed IAW AFI 24-301 and this manual. Ground Transportation Leadership is the installation
authentication officials.
3.1.1. United States Air Force Academy cadets are authorized to operate Air Force vehicles.
3.1.2. Reserve Officer Training Candidate (ROTC) cadets under an enlistment contract and
issued a military identification card are considered active duty military and are authorized to
operate Air Force GMVs IAW AFI 24-301, Ground Transportation.
3.1.3. Military or government civilians assigned to, or detailed to provide support to, Civil
Air Patrol may operate GMVs.
3.1.4. Junior Reserve Officer Training Candidate (JROTC) instructors are employees of their
local school districts and not the Air Force. Therefore, they are not authorized to operate
GMVs. (T-1).
3.1.5. Foreign military personnel may operate Air Force vehicles when on official orders
performing temporary duty or deployed to an Air Force installation. The individual must
present an international license and/or applicable military license issued by their military
service. (T-0). Before operating any Air Force vehicle, the vehicle operator must
demonstrate proficiency and be briefed by the sponsoring unit on official use policies,
accident reporting, vehicle abuse and operator care responsibilities. (T-1). Additionally,
members must receive Local Conditions Course IAW AFI 91-207, The U.S. Air Force
Traffic Safety Program, if in Temporary Duty status more than 30 days. (T-1). Permanently
assigned foreign military personnel may operate Air Force vehicles provided such support is
approved by the Installation Commander, often by Memorandum of Understanding or
Memorandum of Agreement and are in compliance with other licensing requirements in this
chapter. (T-1).
3.2. OR&L Office. This office is responsible for licensing and maintaining motor vehicle
operator records for those military and civilian personnel authorized to operate Air Force owned,
rented or leased motor vehicles requiring additional training and certification.
3.3. Driver Records. The OR&L staff maintains active records (AF Form 2296, Operator
Qualification Record) for all authorized operators requiring additional licensing assigned to the
installation. Operator records will be retained in the Online Vehicle Interactive Management
System (OLVIMS) Dispatch Module. (T-1).
AFMAN24-306 30 JULY 2020 27
3.3.1. When personnel transfer from one unit or installation to another, their driver record
must be updated by the gaining unit’s servicing Operator Records and Licensing (OR&L)
office prior to operating a GMV at their new unit/installation. (T-1).
3.3.2. Vehicle Control Officials coordinate with assigned personnel and the OR&L office for
renewal and/or out-processing of personnel with expired licenses, as appropriate.
3.4. Military and Civilian Employee Licensing. Operation of Air Force GMVs requires
possession of a valid Department of Defense issued Common Access Card and valid state motor
vehicle operator’s license.
3.4.1. Operation of non-tactical Air Force GMVs where the gross vehicle weight rating
(GVWR) is less than 26,000 pounds, designed to transport 8 passengers or less and does not
have a standardized AFQTP, requires a valid state motor vehicle operator’s license and a
valid DoD issued Common Access Card. No further licensing is required.
3.4.2. Operation of all other Air Force GMVs (to include tactical vehicles and material
handling equipment) requires additional training, certification, and licensing.
3.4.3. Completion of additional training and certification will be documented on the AF
Form 2293. (T-1). Operation of GMVs is limited to those vehicles identified on the AF
Form 2293 and those that can be operated with only a state motor vehicle operator’s license.
3.4.4. International drivers’ licenses cannot be used in lieu of the AF Form 2293, U.S. Air
Force Motor Vehicle Operator Identification Card. The Air Force will honor validated sister
service licenses such as the Optional Form (OF) 346, U.S. Government Motor Vehicle
Operator’s Identification Card. (T-1).
3.4.5. Special Licensing considerations. Due to mission and type, specific vehicles have
been given a special licensing consideration. Vehicle training and certifications for those
vehicles designated in paragraph 3.4.5.1 will be documented in personnel records. (T-0).
The owning unit must ensure proper training to include lesson plan development/use and/or
special certifications are maintained as required for the applicable vehicle(s). (T-1).
3.4.5.1. Water vessels do not require licensing on the AF Form 2293.
3.4.6. Remote processing. OR&L may have remote processing available for licensing
actions. VCOs should contact the servicing OR&L office for more information.
3.4.7. When operation of a GMV requiring an AF Form 2293 is needed, the unit VCO
checks the individual’s state motor vehicle operator’s license for medical or physical
restrictions and notes them on the AF Form 171, if applicable. Any restrictions are annotated
on the AF Form 2296 and printed on the AF Form 2293. Unit commanders are the
authorized signatory for AF Form 171 for units without a VCO program. This authority may
be delegated by identifying an authorized alternate in writing to the OR&L office. This
designation will be locally administered. (T-1).

28 AFMAN24-306 30 JULY 2020
3.4.7.1. Personnel who receive training and a signed AF Form 171, Request for Driver’s
Training and Addition to U.S. Government Driver’s License, on GMVs while deployed
or TDY are authorized to have their AF Form 2293 and AF Form 2296 annotated to
reflect training for that vehicle(s). Current unit commander’s or VCO’s signature on the
AF Form 171 will be sufficient certification. (T-1). Additional certification by the TVO
section IAW this manual and AFI 24-301 is still required on applicable GMVs prior to
licensing.
3.4.7.1.1. The member presents the AF Form 171 to the OR&L staff who establishes
or updates an AF Form 2296 and issues AF Form 2293 to the member. The AF Form
171 is returned to the unit VCO for filing purposes. VCOs will electronically file
returned AF Form 171 for a minimum of six months (See RDS: T24-03R10.00; Note
214). (T-1).
3.4.7.1.2. Issuance of an AF Form 2293 to personnel requires possession of a valid
state motor vehicle operator’s license issued in any of the 50 United States, the
District of Columbia, Puerto Rico, or a similar licensing jurisdiction for operation of
GMVs. Personnel must obtain an AF Form 2293 to operate any Air Force GMV
requiring additional training and/or certification. (T-1).
3.4.7.1.3. For the transfer of all existing qualifications, VCOs will annotate
“REVIEW OF QUALIFICATIONS COMPLETED, TRANSFER ALL
QUALIFICATIONS” in Block 13 of the AF Form 171. (T-1). Only the unit
commander or VCO can authorize a partial transfer of qualifications. Each vehicle
management code for transfer will be listed separately on the AF Form 171. (T-1).
3.4.7.1.4. Duplicate AF Form 2293. A duplicate AF Form 2293 may be issued to
replace an AF Form 2293 misplaced, damaged, or stolen. A verification of the
individual’s AF Form 2296 and Security Forces base driving privilege revocation list
is required to issue a duplicate license without re-certification.
3.4.8. Powered forklift trucks and Materiel Handling Equipment (MHE) certification is
required initially and every three years thereafter IAW Occupational Safety and Health
Administration (OSHA) 29 CFR 1910.178, Powered Industrial Trucks. Recertification
requirement applies to all operators, regardless of military or civilian employment. A trainer
will conduct the recertification training and administer a performance test IAW the vehicle
qualification training package. (T-0). OSHA specific information can be found at
http://www.osha.gov.
3.4.8.1. In addition to initial training and certification, a qualified instructor will evaluate
each operator at least once every three years and provide refresher training in relevant
topics anytime there is reason to believe there is a need. (T-0). The evaluation shall
include, but not be limited to, changes in types of equipment in use, change in operating
environment, direct observation of performance, reportable mishaps, and reports of near-
misses, complaints regarding an operator’s bad driving habits, physical fitness and other
indications that an operator is not capable of safely performing assigned duties. (T-0). A
record of each operator’s evaluation will be kept on file for review. (T-0). OSHA
recertification will be annotated in the operator’s training record or in Training Business
Area, when available.
AFMAN24-306 30 JULY 2020 29
3.4.9. Powered Industrial Truck Operation Training Standard. AFMAN 91-203, Air
Force Consolidated Occupational Safety Instruction, provides a list of mandatory training
requirements.
3.4.10. Removal of qualifications from AF Form 2293. Qualifications will only be
removed upon request of the unit VCO or commander or in the case of expiration, such as
MHE training and certification. (T-1). Lack of a GMV type assigned at current duty
location will not be the sole basis of removal. (T-1).
Section 3B—Licensing for Military Personnel
3.5. Military Personnel.
3.5.1. When military personnel transfer from Regular Air Force to active reserve status, the
AF Form 2293 remains valid.
3.5.2. Basic Military Training School or Technical Training School students whose valid
state issued motor vehicle operator’s license expires during training, may be issued a
temporary AF Form 2293 for a period not to exceed 45 days. A technical training instructor
conducts vehicle training on government property. A temporary license will not be issued to
a student with a suspended or revoked state or commercial license. (T-1). Ensure the
expiration date of the temporary permit is entered in the AF Form 2296.
3.5.2.1. Technical Training School students receiving training on GMVs as part of
technical training course requirements will be issued an AF Form 171 while in training
status and will have it with them while conducting vehicle training. (T-1). An AF Form
171 issued during technical training will not be used as authorization to issue an AF Form
2293 upon arrival at their permanent duty station. (T-1). Students must receive
additional training and certification once arriving at their permanent duty station. (T-1).
3.5.3. Span of Control. Trainees may operate vehicles in a controlled environment (ranges
or obstacle courses not open for public use) without an instructor inside the vehicle. The
trainer or instructor must be present in the immediate area and maintain communication with
student operator at all times. (T-1).
Section 3C—Licensing for Non-US Citizens
3.6. Qualifying a Non-US Citizen. Unit instructors must prepare bilingual, written or verbal
tests to cover foreign country driving laws and regulations for non-US citizens employed by the
Air Force. (T-1). Treaties, arrangements, Status of Forces Agreements and laws of host
countries apply.
Section 3D—Commercial Drivers License Requirements
30 AFMAN24-306 30 JULY 2020
3.7. Commercial Drivers License (CDL).
3.7.1. Federal civilian employees who operate commercial-equivalent vehicles (bus, tractor-
trailer, tanker etc.), but never on a public road, while participating in field exercises, combat,
or tactical situations do not require a CDL. NOTE: Military facilities are open to public
travel and therefore CDL requirements apply to federal civilians who operate a CMV in
interstate, foreign or intrastate commerce. Driving a CMV on a road, street or way which is
open to public travel, even though privately-owned or subject to military control, is prima
facie evidence of operation in commerce.
3.7.2. The use of GMVs by federal civilian employees for CDL qualification and re-
qualification may be authorized by the LRS commander. This authority will only be used
when such transportation is clearly in the interest of the Air Force. (T-1). This authority is
not to be used to satisfy an initial employment prerequisite. Intent is to allow currently
employed civilians to upgrade current CDL (i.e., Class B to Class A). Federal civilian
employees may purchase subsequent renewals at their own expense. (T-1).
3.7.3. Federal civilian employee vehicle operators who possess a CDL and applicable
endorsements for a specific class of vehicle must possess an AF Form 2293, but are not
required to meet remaining certification requirements in this section for those same classes of
vehicles. (T-1). NOTE: Employees must be familiar with vehicle Air Force Qualification
Training Packages (AFQTPs) prior to issuance of AF Form 2293. The VCO will verify that
the civilian qualifications/endorsements on the CDL match the respective Air Force
management code(s). (T-1). Employees exempted from obtaining a CDL under this
provision will comply with the licensing and qualification requirements outlined in this
chapter. (T-1).
3.8. Military Exemption.
3.8.1. All Regular Air Force military vehicle operators were waived from the CDL
requirements by the Federal Highway Administrator. However, military GMV training,
qualification and certification will remain equivalent to civilian counterparts. (T-0).
3.8.2. The use of GMVs by military personnel to obtain a CDL to enhance proficiency of an
assigned duty may be authorized by the LRS Commander. The commander may fund CDLs
and obtain any subsequent renewals at the squadron’s expense.
Section 3E—Licensing for Federal Civilian Employees, Contractor Personnel, and Federal
Prison Camp Inmates
3.9. Licensing Federal Civilian Employees. Civilian employees are required to undergo
medical fitness assessments every four years IAW 5 CFR, Part 930, Subpart A and 49 CFR
Subparts 391.41 through 391.49. to operate a GMV. The OF 345, Physical Fitness Inquiry for
Motor Vehicle Operators, will be used to review and certify a civilian employee’s medical
qualification. (T-0). The OF 345 is not Protected Health Information but does contain Privacy
Act information and must be filed IAW Privacy Act of 1974 requirement and local file plans
updated to indicate Personally Identifiable Information. (T-0).
AFMAN24-306 30 JULY 2020 31
3.9.1. When a civilian employee self-discloses a medical condition by an affirmative
response to OF 345, Section 6, the commander will automatically refer the civilian
employees to the appropriate medical authorities for further evaluation to determine if they
are physically or mentally qualified to operate GMVs. (T-0).
3.9.2. Civilian employees with medical restrictions that would limit their ability to operate
GMVs or equipment are responsible for reporting these restrictions and must notify their
commander or VCO as soon as they are known. (T-0).
3.9.3. Civilian employees may still be qualified to drive if, in the opinion of the medical
authorities, identified condition(s) may be corrected or compensated for with counseling or
other corrective measures prior to licensing. These provisions will not be used to disqualify
civilian operators who meet the standards for civilian motor vehicle operators and incidental
operators listed in the 5 CFR, Part 930. (T-0).
3.9.4. OF 345 review and maintenance is a unit responsibility. Commanders or VCOs will
keep a record or documentation of whose OF 345 was reviewed, when it was reviewed and
results of the review. (T-1). Questions regarding the OF 345 or applicable Office of
Personnel Management (OPM) guidance (5 CFR) should be referred to the servicing civilian
personnel office. Destroy six months after separation of employee. (See RDS: T24-
03R10.00). (T-0).
3.9.5. Although base maintenance, construction and materiel handling vehicles are excluded
from the OPM motor vehicle definition and operator requirements, civilian operators of these
vehicles will comply with licensing requirements in this chapter. (T-0).
3.10. Licensing Contractor Personnel. Contracts and agreements will require that operators
comply with licensing requirements of the state and local motor vehicle laws. (T-0). DoD
contractor employees shall not be issued the OF 346, U.S. Government Motor Vehicle
Operator’s Identification Card, AF Forms 2293 or 2296, or AF Form 171 For Maintenance
Purposes Only. (T-1). DoD contractor employees assigned to operate either government owned
or leased equipment in performance of their contract shall be certified by the contractor and at
the contractor’s expense as being fully qualified to operate the vehicles and/or equipment to
which they are assigned. (T-0). The prime contractor shall document all operator qualifications.
(T-0). This documentation shall be provided to the administrative contracting officer before any
contract employee engages in any mode of equipment operation. (T-0). This letter will be
updated as necessary and remain on file with OR&L and the administrative contracting officer.
(T-0).
3.10.1. For ANG, state government employees, with the concurrence of The Adjutant
General, are authorized to operate GMVs while preforming official duties in support of
cooperative agreements IAW National Guard Regulation 5-1, National Guard Grants and
Cooperative Agreements. These employees will adhere to licensing requirements as stated in
paragraph 3.10 (T-1).
3.10.2. Ground Transportation contractor personnel records may be captured in OLVIMS
Dispatch Module for administrative and workload collection purposes only. Contractor
vehicle operator certification will remain the responsibility of the contractor at the
contractor’s expense. (T-0).
32 AFMAN24-306 30 JULY 2020
3.11. Requirements for Contingency and Remote Areas. Certain personnel assigned to
contingency and remote areas are required to have an AF Form 2293 before they report for duty,
since facilities for examining and training operations at these sites may be limited or nonexistent.
The parent or losing command will ensure that licenses and qualification records are issued to
these personnel. (T-1).
Section 3F—Administrative Control of USAF Licensing
3.12. Suspension for Substance Abuse. The unit commander determines if a person involved
in substance abuse will have their GMV operating privileges suspended and reinstated. (T-1).
The commander must notify the OR&L office of all suspension and reinstatement actions per
AFI 24-301. (T-1).
3.13. Reinstatement of a State Operator’s Permit. GMV driving privileges are automatically
reinstated unless deemed inadvisable by competent command authority.
Section 3G—Operator Certification and Administrative Responsibility
3.14. Operator Certification. Public Law 99-570, Title XII, The Commercial Motor Vehicle
Safety Act of 1986, established minimum national standards for licensing commercial motor
vehicle drivers. The act requires testing and licensing standards for Commercial Motor Vehicles
to ensure operators have a working knowledge to safely operate those vehicles. The Ground
Transportation, TVO section serves as the sole commercial equivalent vehicle certification
authority on the installation. TVO ensures Air Force licensed operators comply with the
previously mentioned standards and provides certification services for all personnel assigned to
the installation. Members with a CDL license do not require further TVO certification for
vehicles covered on the member’s CDL. NOTE: Members must be familiar with vehicle
AFQTPs prior to issuance of AF Form 2293. TVO manages the installation certification
program and should not be confused with the unit’s training program. Vehicle operator training
remains a unit responsibility.
3.14.1. A trainee will possess an AF Form 171, which serves as a learner’s permit, and be
accompanied by a vehicle trainer while driving. (T-1). The AF Form 171 becomes a valid
learner’s permit only after completing Section I, Trainee Information. Block 13 of the AF
Form 171 must specify the vehicle types (by management code) the trainee is being trained
to operate. (T-1).
Section 3H—Vehicle Training Aid Requirements
3.15. Air Force Qualification Training Packages (AFQTPs). Vehicle AFQTPs will be
developed and maintained for all GMVs that require a military license IAW AFI 24-301. (T-1).
3.15.1. Training Packages. AFIMSC is the OPR for standardized published vehicle
AFQTPs. Vehicle AFQTPs originate by the functional communities with the greatest
applicability and submitted to AFISMC for approval.
3.15.1.1. Items included in the vehicle AFQTPs are applicable technical orders, owner’s
manuals, and any other documentation to support publication of the package.
AFMAN24-306 30 JULY 2020 33
3.15.1.2. Upon publication, standardized vehicle lesson and qualification training plans
will take precedence over locally produced lesson plans and will be the curriculum used
for training and certification on the identified vehicle. (T-1).
3.15.1.3. Only functional and locality specific supplements may be made to standardized
AFQTPs. No deletions or additional changes may be made without approved. (T-1).
3.15.2. Standardized and locally produced lesson plans must consist of the following items:
(T-1).
3.15.2.1. List of references.
3.15.2.2. Student learning objectives. Outline exactly what the trainee is to learn in
order to be able to pre-inspect, operate, and post-inspect the vehicle. Specify the number
of hours required to normally complete the training.
3.15.2.3. Task breakdown. List of step-by-step procedures for performing a specific
task. It includes important steps, key points and stresses safety throughout.
3.15.2.4. Forms and documentation. Specify the steps of using the AF Form 171,
adding qualifications to the license and recertification procedures.
3.15.2.5. Training tools. List the tools and aids to be used (i.e., manufacturer’s
operator’s manual, videos, written test).
3.15.2.6. Safety considerations. Specify required personal protective equipment and
operational safety requirements.
3.15.2.7. Vehicle inspection. Identify the vehicle components requiring inspection pre-,
during- and post- operation. Include a walk-around inspection guide for reference.
3.15.2.8. Vehicle operation. Identify vehicle operational procedures needed for the
operator of the GMV to safely and proficiently operate the vehicle.
3.15.2.9. Vehicle operation demonstration. Specify inspection and operational
procedures that should be demonstrated by the trainer as instruction for the trainee.
3.15.2.10. Identifying certification procedures. If applicable, specify the procedures
and criteria for the written evaluation and/or performance examination.
3.15.3. VCOs will coordinate functional and locality specific vehicle AFQTP supplements
for validation through the Ground Transportation NCOIC then Vehicle Fleet Manager. (T-
1). NOTE: AFQTP supplements for vehicles with the potential to become explosive laden
vehicles will require additional coordination IAW AFMAN 91-201, Explosives Safety
Standards. (T-1).
3.15.3.1. OR&L will review and verify all unit vehicle AFQTP supplements meet
requirements IAW this chapter. (T-1).
3.15.3.2. Once the Ground Transportation NCOIC, Host Installation Safety office, and
Vehicle Fleet Manager approves and signs-off on the vehicle AFQTP supplement, the
owning unit commander may then sign as the final approver for the package supplement.
34 AFMAN24-306 30 JULY 2020
3.15.3.3. OR&L will retain a unit listing of all approved AFQTP supplement and
approval date (for revalidation purposes). (T-1). Actual copies of lesson plan supplement
are not required to be maintained in OR&L.
Section 3I—Unit Vehicle Training and Vehicle Control Official (VCO) Responsibilities
3.16. Policy. The using organization conducts all required vehicle training. When initial driver
training is required, training may be accomplished by contract with a commercial driver training
agency at unit expense.
3.16.1. Trainers. Unit commanders will designate in writing (using the AF Form 170,
Appointment of Vehicle Trainer) unit vehicle training instructors by vehicle type and
management code and submit the request to the OR&L office. (T-1).
3.16.1.1. Units will ensure trainer candidates meet requirements in AFI 36-2670, Total
Force Development, and ensure the candidate is licensed on the vehicle type prior to
being nominated as a trainer. (T-1).
3.16.2. Training Certification. When a student operator demonstrates competency in
operating and servicing on a specific vehicle type, certification will be accomplished by: (T-
1).
3.16.2.1. Unit trainer certifies completion by marking and signing the AF Form 171.
3.16.2.2. Trainee acknowledges training by marking and signing the AF Form 171.
3.16.2.3. By completing the AF Form 171, the appropriate authority certifies that
training was provided by a qualified vehicle trainer using an approved AFQTP. NOTE:
The trainer and certifier may not be the same individual.
3.16.2.4. The trainee presents the AF Form 171 to OR&L staff as the source document
for updating their AF Form 2293.
3.16.3. Emergency Response Training. Additional training is required for vehicles used
for emergency response purposes. Training will be documented in personnel training records
(if applicable). (T-1). Units will develop and implement emergency vehicle operator
training requirements IAW DoDI 6055.04 and DoD 6055.06-M. (T-0).
3.16.4. Explosives and Hazardous Material (HAZMAT) Transport. Operators of Air
Force GMVs must be qualified to operate the vehicle and be knowledgeable of the cargo
being transported IAW AFMAN 91-201, the host nation guidance, AFQTP 24-3-HAZMAT
and this manual. (T-0). The unit trainer will document this additional training and instruction
in applicable documents. (T-1).
3.16.5. Pintle Hook, Ball Hitch, and Combination Hitch. Train IAW AFQTP 24-3-
PTLHK.
3.16.6. Rollover Risk Vehicles. Units will ensure training packages for vehicles with a
gross vehicle weight of 20,000 lbs or greater include a rollover risk warning. (T-0).
Rollover risk training packages may be included in each vehicle’s AFQTP or as a separate
training package. Training packages will address at a minimum; safety, speed control, high
gross-weight/center of balance, handling and braking, weather, road traffic and cargo
conditions. (T-0).
AFMAN24-306 30 JULY 2020 35
3.16.7. Air Field Training. AFI 13-213, Airfield Driving, provides guidance on driver
training.
3.17. TDY Vehicle Training and Qualifications.
3.17.1. Operator Training in TDY Status. Training and certification must be
accomplished by a designated vehicle trainer and documented on the AF Form 171. (T-1).
The trainer certifies completion of training by completing the AF Form 171. The student
operator will retain the AF Form 171 to certify the training received. (T-1). The completed
AF Form 171 may be used in-lieu-of an AF Form 2293 when accompanied by official TDY
orders.
3.17.1.1. Upon return to home station, the member’s home station VCO must validate
the member’s qualifications by signing the AF Form 171. (T-1). The member will
present the AF Form 171 to the OR&L office as prescribed in AFI 24-301 for addition of
the qualification to their AF Forms 2293 and 2296 prior to operating the vehicle captured
on the AF Form 171. (T-1).
36 AFMAN24-306 30 JULY 2020
Chapter 4
BASIC OPERATING PROCEDURES AND MANEUVERS
Section 4A—General Information
4.1. Objective. The objective of training an operator of an Air Force GMV is to teach him/her
how to perform the job efficiently with maximum safety, comfort, and economy. Good driving
habits are attained through constant practice. During daily driving, review the techniques
discussed below.
4.2. Basic Responsibilities. Operators of Air Force GMVs are responsible for the following:
4.2.1. Safely operating the vehicle and complying with applicable federal, state, local, and
host nation laws and regulations.
4.2.2. While operating a military vehicle, use of personal or government-issued hand-held
wireless phones or text messaging equipment or any other type of electronic devices will not
be used. (T-0). The use of hands-free communication equipment (blue-tooth enabled
vehicles, speakerphones, single-bud earphones, mounted phones, etc.) is authorized if
allowed by local law.
4.2.3. Following all operator maintenance outlined in the appropriate technical order.
4.2.4. Caring for and cleaning the vehicle and its equipment at all times.
4.2.5. Ensuring the safety and comfort of passengers (includes ensuring that seat and
shoulder belts are safely fastened). The GMV operator will ensure that passengers comply
before operating the vehicle. (T-0).
4.2.6. Ensuring the security of the vehicle and cargo.
4.2.7. Notify supervision of any change in status that may affect his/her ability to operate a
vehicle (for example, inability to drive due to physical condition or withdrawal of your state
drivers license).
4.2.8. Operators of GMVs are subject to corrective action by commanders for incidents of
abuse, misuse, and damage to unit-assigned vehicles.
4.2.9. Operators of GMVs may be required to operate two-way radio equipment. Do not
attempt to operate the two-way radio equipment in the vehicle unless instruction has been
given to do so. Supervisors should determine who is qualified to efficiently operate
equipment and furnish local standard procedures, codes and so forth.
Section 4B—Basic Unit/VCO Responsibilities
4.3. Unit/VCO Responsibilities. The unit will provide the operator with required items for off-
base travel. (T-1). All necessary vehicle forms will be included with the vehicle e.g., SF 91,
Motor Vehicle Accident Report, AF Form 1800, DD Form 518, Accident Identification Card, and
SF 94, Statement of Witness. (T-1).
AFMAN24-306 30 JULY 2020 37
4.4. Toll Tickets/Transponders. When off-base routes include locations where passage would
require a toll, prepaid toll tickets or transponders may be furnished (if available) at the time of
travel. If not, follow local policy for being reimbursed for tolls and parking fees. Always ask
the toll keeper for a receipt. Upon returning, submit any toll receipts and/or unused toll tickets
and/or transponder to the dispatcher.
Section 4C—Operator of Air Force GMVs Health and Well-Being
4.5. Operator Health and Well-Being. The ability to operate a vehicle is not the only
consideration of a safe operator.
4.5.1. No operator will be under the influence of alcohol or narcotics while operating a
vehicle. (T-0).
4.5.2. Operators are ultimately responsible for exercising good judgment by imposing
additional time constraints as needed.
4.5.3. Adequate Rest. Operators work/rest cycle will be monitored and must be in
compliance with DoDI 6055.4, DoD Traffic Safety Program. (T-0). It is the operator’s
responsibility to inform his/her supervisor if they have not had adequate sleep, and feel
his/her driving will be unsafe. (T-1).
Section 4D—Manual and Semi-automatic Transmissions Operation
4.6. Starting. Instructions on starting manual and automatic shift vehicles are found in this
chapter. However, the following points are given on specific starting conditions:
4.6.1. On Hills. When starting a vehicle on an upgrade, engage the parking brake to keep
the vehicle from rolling backward. Keep the parking brake on while shifting into low gear
and begin to release the clutch pedal slowly. When the vehicle begins to pull against the
brake, release the brake slowly. This allows the operator to start the vehicle without the
danger of rolling back and losing control. Although it may not be necessary to use the
parking brake in vehicles equipped with automatic transmission or special devices that
prevent rolling back on hills, it is a safety precaution that an operator should take.
4.6.2. Slippery Surfaces. When starting a vehicle on a slippery surface (such as ice, sand,
loose dirt, or so forth) use second or a higher gear instead of low gear. Feed the gas and
release the clutch pedal very slowly to avoid spinning the rear wheels (manual transmission
only).
4.7. General Information. An operator of GMVs should be prepared to drive vehicles with
either manual, semiautomatic, or automatic transmissions. Each transmission type requires
specific methods to ensure smooth operation.
4.8. Clutch Operation. A clutch provides the means to apply engine power to the wheels
smoothly and gradually. The operator must learn the following: Where the clutch starts to
engage, how far the pedal moves to become fully engaged, how much free play the pedal has,
how fast they should engage the clutch.
38 AFMAN24-306 30 JULY 2020
4.8.1. The GMV operator’s foot should not be on the clutch pedal except when actually
starting, stopping, or shifting gears. Even a slight constant pressure on the clutch pedal
causes excessive wear. For this reason, when stopped on a hill, never slip the clutch to keep
from rolling backward; instead use the brakes. While waiting in a long line at traffic lights or
when halted for other reasons, press the clutch pedal and move the transmission shift lever
into neutral. Release the clutch after shifting into neutral.
4.8.2. When slowing a vehicle in order to stop or to turn, reduce the speed to 15 mph or less
before pressing the clutch pedal. Coasting a vehicle at a high-speed with the clutch pedal
pressed is dangerous. Vehicle control becomes more difficult and the clutch may be
damaged. Damage resulting from this practice is considered vehicle abuse.
4.9. Manual Shifting Purpose.
4.9.1. Skill in manual shifting is a requirement of good driving. Poor manual shifting results
in poor vehicle performance and can damage the vehicle. The operator of the GMV should
be so familiar with the gearshift lever positions that they can shift to any gear without
looking at the shift lever.
4.9.2. The gearshift pattern is usually diagramed on the vehicle caution plate. Never move
the gearshift lever from one position to another while the engine is running (until the clutch
pedal has been fully pressed with the left foot).
4.9.3. To shift gears smoothly and quietly, keep the pedal fully pressed until the shift has
been completed.
4.9.4. When shifting gears in a 1 ½-ton or larger truck, the operator may be required to use
the double-clutching instructions.
4.9.5. When shifting gears in rough terrain and on hills, always maintain positive momentum
in order to avoid causing the engine to labor or jerk before shifting into a lower gear ratio.
Always anticipate the need for extra power and shift gears accordingly.
4.9.6. When descending a hill, with or without a heavy cargo, always drive with the vehicle
in gear and the clutch pedal out.
4.10. Clutch Shifting Procedure. After becoming acquainted with the vehicle’s instruments
and controls, the operator is ready to begin driving operations. Start and warm the engine with
the transmission in neutral. Perform the following steps to start moving the vehicle in low or
first gear:
4.10.1. Press the clutch pedal and shift into low gear.
4.10.2. Check the inside and outside rearview mirrors.
4.10.3. Check blind spots.
4.10.4. Let the clutch pedal up slowly, pausing at friction point or when the clutch feels like
it is taking hold. Hesitate; then check mirrors again for traffic.
4.10.5. Release the parking brake.
4.10.6. Slowly release the clutch pedal and at the same time slightly press the accelerator.
AFMAN24-306 30 JULY 2020 39
4.10.7. When driving operation is underway, the left foot should be completely removed
from the clutch pedal.
4.11. Double-Clutch Shifting Procedure. Good driving practice in trucks (1 ½-ton or larger)
often requires the operator to double-clutch to properly engage the gears and to prevent loss of
momentum. Do the following to shift to a lower gear by double-clutching:
4.11.1. Release pressure from the accelerator and begin pressing the clutch pedal.
4.11.2. When the clutch pedal is fully pressed, move the gearshift lever to the neutral
position.
4.11.3. Release the clutch pedal and at the same time press the accelerator to speed up the
engine.
4.11.4. Let up on the accelerator and press the clutch pedal.
4.11.5. While the clutch pedal is pressed, move the gearshift lever to the next lower gear
speed.
4.11.6. Release the clutch pedal and at the same time press the accelerator to maintain
engine speed as the load is again connected to the engine.
4.11.7. The procedure is the same for shifting to a higher gear speed, except that the engine
is not accelerated while the gear is in neutral.
4.12. Spark Ignition Engine Braking Operation. If the hill is steep enough to require using
brakes to reduce speed, shift into the next lower gear at the crest of the hill and use the engine
compression as a brake.
4.12.1. Take extreme care to prevent excessive engine speed while descending a hill. Judge
the necessary gear and shift, if necessary, at the crest of the hill before speed has increased
from downhill movement.
4.12.2. Ordinarily, the gear required to ascend a hill is proper to use to descend it. Gearing
down after engine speed has increased may extensively damage the engine. Except when
used to compensate for brake failure, damage resulting from this practice is considered
vehicle abuse. With proper gear selection, intermittent application of brakes can reduce the
speed of the vehicle to safe limits.
4.12.3. The operator of a GMV, when preparing to stop the vehicle, should remove his/her
foot from the accelerator and use the engine compression as a brake to help stop the vehicle.
4.12.4. Do not press the clutch pedal until the motor is operating at low speed and is no
longer serving as a brake. Then press the clutch pedal before the engine begins to labor from
slow speed. Apply the foot brake to help this braking action.
4.12.5. When preparing to turn or stop, avoid downshifting above 20 mph.
4.12.6. The above rules apply to most vehicles. To meet the military’s transportation needs
for moving heavy equipment and traveling over rough terrain, new vehicles are constantly
being developed. These vehicles may have more complicated transmissions (such as multi-
gear ranges and dual-speed axles or other special features). To understand how a new
vehicle may operate, read the Manufacturer’s Operator’s Manual and respective qualification
training package written for that vehicle before attempting to operate it.
40 AFMAN24-306 30 JULY 2020
Section 4E—Backing
4.13. Backing.
4.13.1. Before backing even a short distance, ensure that there are no people or objects
behind the vehicle.
4.13.2. Backing is more dangerous than going forward. Visibility is limited and the vehicle
is harder to control. When possible always park vehicle with limited visibility to the rear so
pulling out without backing isn’t necessary.
4.13.3. Never back long distances, unless absolutely necessary. It is much safer to turn
around and cover the distance going forward.
4.13.4. When parking in areas with perpendicular parking, use the following safety tips:
4.13.4.1. Stay alert and scan the area - use mirrors or rear-view cameras.
4.13.4.2. Look for pedestrians.
4.13.4.3. Drive slow - obey posted speed limits and signs.
4.13.4.4. When parking, keep distance between your vehicle and others.
4.13.4.5. Reverse park into the parking space. NOTE: Parking in reverse is a simple way
to reduce the risk of accidents. By reverse parking, you avoid backing out blindly into
oncoming traffic or into the path of pedestrians
Section 4F—Spotter Safety
4.14. Spotter Safety. Spotters will be required when operator visibility is obscured or in
question, when backing a vehicle, and prior to beginning aircraft up/downloading (with pre-
positioned chock in place). (T-1). When using a spotter, the following guidance will be
followed: (T-1).
4.14.1. The following safety items will be required for spotters during hours of darkness or
periods of reduced visibility: reflective belt and flashlight or luminous wands. (T-1).
4.14.2. Spotters must be trained in standard hand and arm signals and flashlight signals
before guiding a vehicle. (T-0). Hand and arm signals are the basic method used for ground
guiding.
4.14.3. Operators and spotters must coordinate signals before vehicle movement. (T-0).
Voice signals between a spotter and operator can be misunderstood. Therefore, they will not
be used except in an emergency. (T-1).
4.14.4. The number of spotters used is determined by the availability of personnel and
visibility restrictions (cargo, darkness, etc.). In most cases only one spotter is required. The
spotter will be positioned so he/she will be seen by the operator at all times. (T-1).
4.14.5. Spotters will never spot between the tires of an All-terrain Forklift. (T-1). Spotters
should maintain a minimum distance of 12 inches out from the front vehicle tire within the
area of the forward rim.
AFMAN24-306 30 JULY 2020 41
4.14.6. In the event that more than one spotter is required, only one spotter will be
designated as the primary spotter to give signals to the operator. (T-1). Everyone involved
(the operator and spotters) must understand who will give the signal and who will receive it
before any movement is executed. (T-0).
4.14.7. Before a vehicle is started for movement, a member of the crew or the operator (if no
spotter is available) must walk completely around the vehicle to ensure that no personnel or
property are in danger from the vehicle's movement. (T-0).
4.14.7.1. Will verify clearance: (T-1). Determine visual clear distance with a ground
reference point from the cab of the vehicle.
4.14.7.2. Will mount the vehicle, sound the horn (if tactical situation allows), and back to
the rear of the pre-selected ground reference point. (T-1). Stop and repeat the process, as
necessary, until the desired vehicle position is obtained.
4.14.8. Spotters should avoid walking backwards while guiding a vehicle. If it is necessary
for a spotter to walk backwards, he/she must first check to ensure there are no potential
hazards that may cause the spotter to slip, trip, or fall. (T-1).
4.14.9. The GMV operator will not put the vehicle into motion until visual contact is made
with the spotter. (T-1). To ensure the safety of the GMV operator and the spotter, spotters
must maintain visual contact with vehicle at all times. (T-1).
4.14.10. The spotters keep a reasonable and safe distance between themselves and the
vehicle front, rear, and corners. They will never be directly in front of or behind the vehicle.
(T-1).
4.14.11. Spotters will not position themselves between the vehicle (and trailer, if applicable)
being guided and another object, trailer, or fixed/portable loading ramp where an inadvertent
engine surge or momentary loss of vehicle control could cause injury or death. (T-1).
4.14.12. If visual contact of the spotter is lost or if the GMV operator notices that the guide
is dangerously positioned, the operator must immediately stop the vehicle. (T-1). The GMV
operator will secure their vehicle, dismount, and make an on-spot correction before
continuing operations. (T-1).
4.14.13. At night, a spotter should use two luminous wands (if not available, flashlights with
clear or colored lenses are permitted) to give the proper signal for the vehicle to move.
4.15. Air Force Standard Spotting Hand and Arm Signals. Standard hand and arm signals,
known by all Airmen, are needed to ensure safe and effective spotting while guiding a vehicle.
Described below are the Air Force Standardized Basic Hand and Arm Signals (IAW TO 36M-1-
141, 463L Material Handling Equipment System), which must be used by all operators of GMVs
and spotters. (T-1).
4.15.1. Come towards the spotter. Bend both elbows, palms or night wands facing up. In
unison, move forearms forward. Signal either above your head, or to the sides of your body
to ensure hand movements are clearly seen.
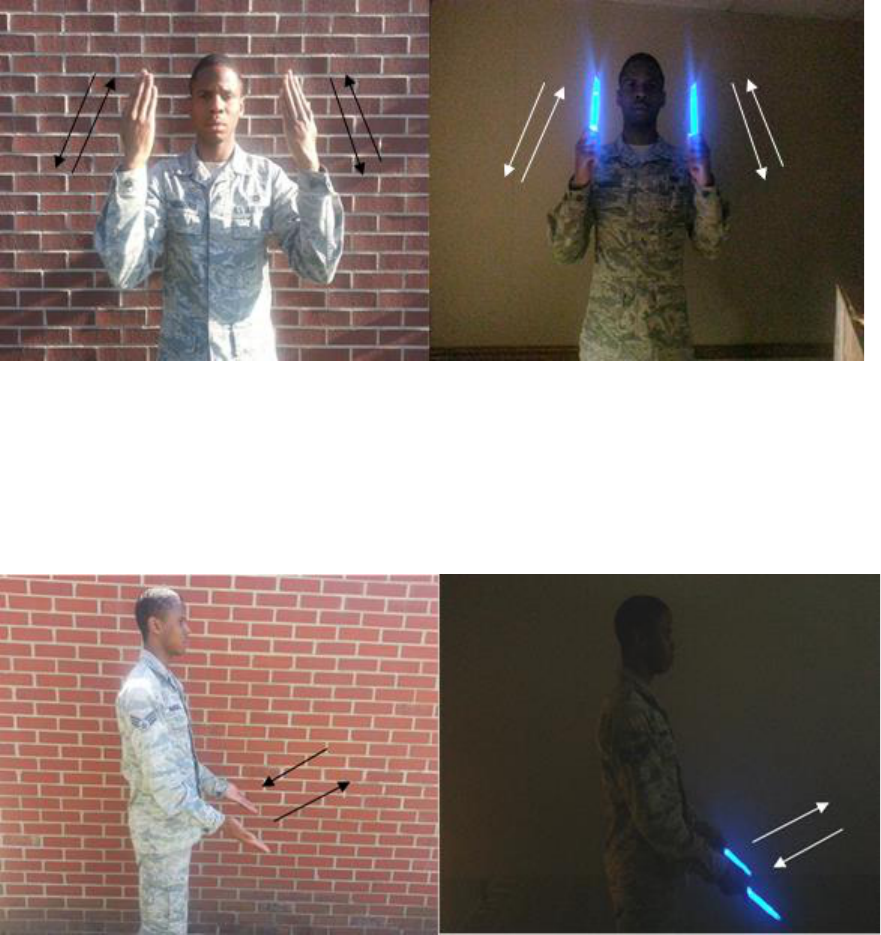
42 AFMAN24-306 30 JULY 2020
Figure 4.1. Standard Spotting Hand and Arm Signals – Come Towards the Spotter.
4.15.2. Move away from the spotter. Extend both arms downward with palms facing away
or wands pointing down. In unison, move arms forward and back. At no time should hands
be above waist height. Repeat this movement until the operator is required to stop the
vehicle. NOTE: Picture shows motion only. Proper positions should be facing the GMV
operator.
Figure 4.2. Standard Spotting Hand and Arm Signals – Move Away from the Spotter.
4.15.3. Right Turn/Left Turn. Dependent on the placement of the spotter (forward or rear
of the vehicle), the spotter should point to the direction that the vehicle needs to move with
one hand, and raise the opposite arm, bent at the elbow. The hand or wand is be pointing up.
Motion the hand in the direction that the vehicle should move. (See Figure 4.11 and 4.12)

AFMAN24-306 30 JULY 2020 43
Figure 4.3. Standard Spotting Hand and Arm Signals.
Figure 4.4. Standard Spotting Hand and Arm Signals.
4.15.4. Slow Down. Raise both arms, bend elbows. Position palms or wands facing down,
in front of your body. Move both hands or wands in an up and down motion.
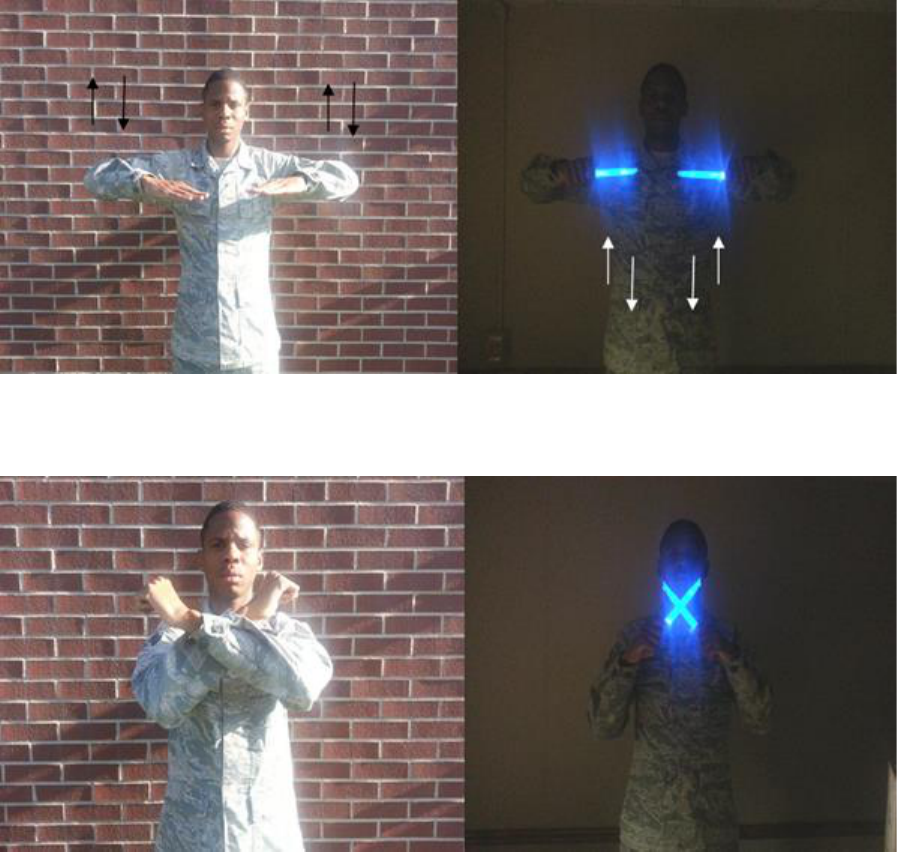
44 AFMAN24-306 30 JULY 2020
Figure 4.5. Standard Spotting Hand and Arm Signals – Slow Down.
4.15.5. Stop. Extend and raise both arms. Cross arms or wands in front of body.
Figure 4.6. Standard Spotting Hand and Arm Signals – Stop.
4.15.6. Shut Down. Position palm or wand facing down, horizontally across your neck.
Move your hand, or wand in a sweeping motion from left to right.
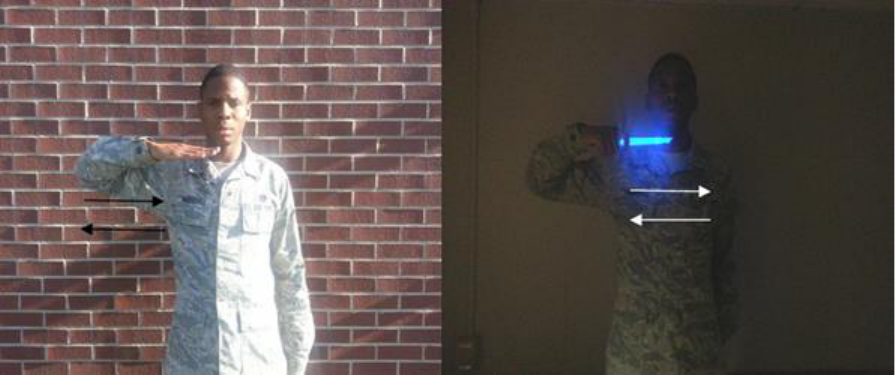
AFMAN24-306 30 JULY 2020 45
Figure 4.7. Standard Spotting Hand and Arm Signals – Shut Down.
Section 4G—Parking
4.16. General. Except on one-way streets, always park on the right side of the street in
jurisdictions where operators are required to operate the GMV on the right-side of the road,
except when local law states otherwise. In jurisdictions where operators are required to operate
the GMV on the left-side of the road, always park on the left side of the street, except when local
law states otherwise. Remember to lock the ignition switch on vehicles of commercial design
and remove the key. Turn-off the master switch on tactical vehicles. Exceptions may be
directed by local commanders.
4.16.1. Parallel Parking. Parallel parking to the curb between vehicles is difficult for
many, if not most, operators. If followed, this step-by-step method can make parallel parking
easier (see Figure 4.8):
4.16.1.1. Select a large enough space.
4.16.1.2. Give the proper hand signal for stopping. Pull up alongside the vehicle parked
in the space ahead of the vacant parking space. The vehicle being parked should be one
to two feet away from the parked vehicle and the rear bumpers of both vehicles should be
even.
4.16.1.3. For jurisdictions where operators are required to operate the GMV on the right-
side of the road, except when local law states otherwise:
4.16.1.4. Start backing slowly. Turn the steering wheel as hard as possible to the right as
soon as the vehicle starts moving. With the steering wheel all the way over to the right,
continue backing until the vehicle is at a 45-degree angle to the curb. At this point the
right front door is opposite the rear bumper of the other vehicle.
4.16.1.5. Straighten the front wheels. Go straight back a short distance until the right
end of the front bumper of the vehicle being parked is opposite the left end of the rear
bumper of the parked vehicle.
46 AFMAN24-306 30 JULY 2020
4.16.1.6. Pause a moment. Now turn the steering wheel hard to the left and back slowly
into the space, straightening the front wheels just as they approach the curb. If unable to
get all the way into the space, usually the best thing to do is to drive all the way out, get
the vehicle ahead of the space, and start again.
4.16.1.7. Pull forward. A vehicle being parked should divide the parking space, leaving
as much distance between the vehicle and the parked vehicles both ahead and to the rear.
The front and rear wheels should be an equal distance from the curb and no more than a
foot away.
4.16.1.8. Turn-off the engine. Before leaving the vehicle, set the parking brake and put
the vehicle in reverse gear. If the vehicle has an automatic transmission, place the lever
in the PARK position. When parking on a downgrade, if there is a curb, turn the wheels
so that the front right tire is against the curb and chock the front of the rear wheels.
When parking on an upgrade, turn the wheels left and away from the curb so that the
back of the right front tire locks against the curb and chock the back of the rear wheels.
Doing this ensures that the vehicle does not roll. When parking uphill without a curb, the
operator will use chocks behind the rear tires. (T-1). When parking downhill without a
curb, the operator will place chocks in front of the front tires (see Figure 4.9). (T-1).
4.16.1.9. The parking brake is the primary safety item. Only use chock blocks as a
secondary safety item in conjunction with the parking brake. Using chock blocks alone is
not enough or effective. The parking brake must be set at all times when the vehicle is
parked. (T-0).
4.16.1.10. For jurisdictions where operators are required to operate the GMV on the left-
side of the road, except when local law states otherwise:
4.16.1.11. Start backing slowly. Turn the steering wheel as hard as possible to the left as
soon as the vehicle starts moving. With the steering wheel all the way over to the left,
continue backing until the vehicle is at a 45-degree angle to the curb. At this point the
left front door is opposite the rear bumper of the other vehicle.
4.16.1.12. Straighten the front wheels. Go straight back a short distance until the left end
of the front bumper of the vehicle being parked is opposite the right end of the rear
bumper of the parked vehicle.
4.16.1.13. Pause a moment. Now turn the steering wheel hard to the right and back
slowly into the space, straightening the front wheels just as they approach the curb. If
unable to get all the way into the space, usually the best thing to do is to drive all the way
out, get the vehicle ahead of the space, and start again.
4.16.1.14. Pull forward. A vehicle being parked should divide the parking space, leaving
as much distance between the vehicle and the parked vehicles both ahead and to the rear.
The front and rear wheels should be an equal distance from the curb and no more than a
foot away.
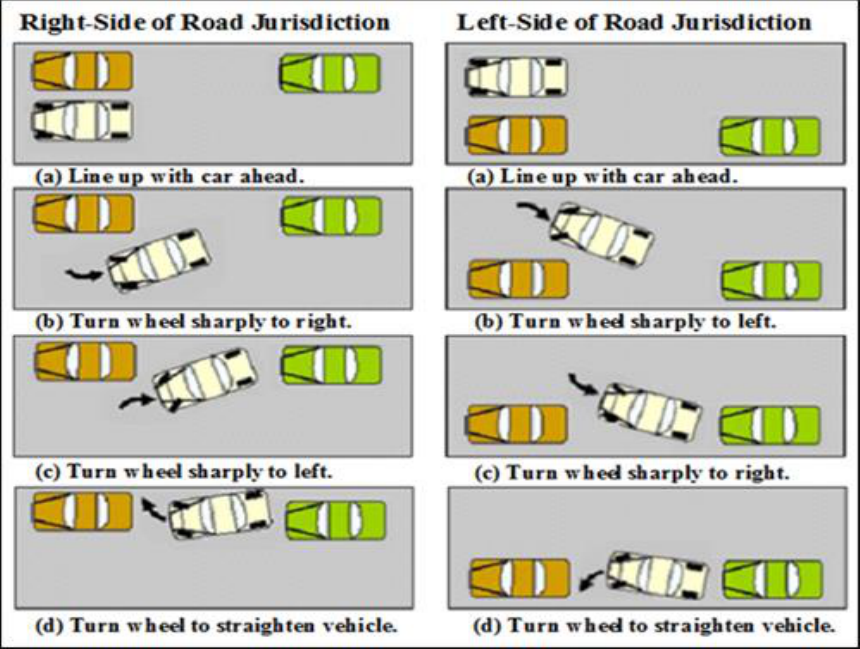
AFMAN24-306 30 JULY 2020 47
4.16.1.15. Turn-off the engine. Before leaving the vehicle, set the parking brake and put
the vehicle in reverse gear. If the vehicle has an automatic transmission, place the lever
in the PARK position. When parking on a downgrade, if there is a curb, turn the wheels
so that the front left tire is against the curb and chock the front of the rear wheels. When
parking on an upgrade, turn the wheels right and away from the curb so that the back of
the left front tire locks against the curb and chock the back of the rear wheels. Doing this
ensures that the vehicle does not roll. When parking uphill without a curb, the operator
will use chocks behind the rear tires. (T-1). When parking downhill without a curb, the
operator will place chocks in front of the front tires (see Figure 4.9). (T-1).
4.16.1.16. The parking brake is the primary safety item. Only use chock blocks as a
secondary safety item in conjunction with the parking brake. Using chock blocks alone is
not enough or effective. The parking brake must be set at all times when the vehicle is
parked. (T-0).
Figure 4.8. Parking Parallel to a Curb.
4.17. Diagonal or Angle Parking. Diagonal or angle parking is easy enough for most
operators. However, remember the following:
4.17.1. Give the hand signal for stopping.
4.17.2. Begin turning into the parking space from a position about five feet from the row of
parked vehicles.
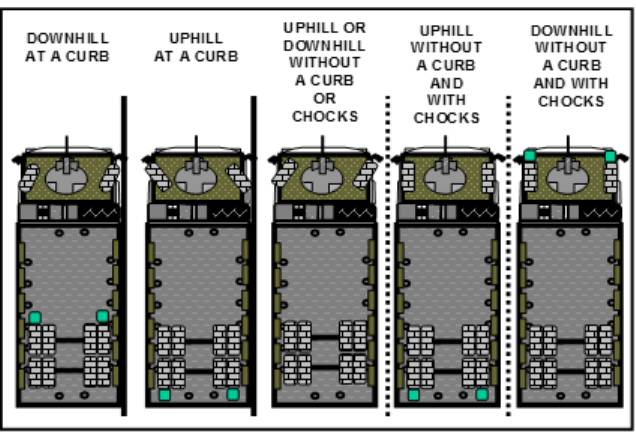
48 AFMAN24-306 30 JULY 2020
4.17.3. Turn the steering wheel in the direction of the space and enter the space with the
vehicle as straight as possible with the angle of the space.
4.17.4. For jurisdictions where operators are required to operate the GMV on the right-side
of the road, except when local law states otherwise:
4.17.4.1. Use the parked vehicle or line marking on the left as a guide. However, be very
careful to allow enough clearance between the moving vehicle and those parked on either
side.
4.17.4.2. When coming out of a diagonal parking space, back very slowly until far
enough to see traffic that may be coming and stop if necessary. Turn the steering wheel
sharply when the left front wheel is opposite the rear bumper of the vehicle parked to the
left. In turning too soon, it is possible to sideswipe the other vehicle while backing out.
4.17.5. For jurisdictions where operators are required to operate the GMV on the left-side of
the road, except when local law states otherwise:
4.17.5.1. Use the parked vehicle or line marking on the right as a guide. However, be
very careful to allow enough clearance between the moving vehicle and those parked on
either side.
4.17.5.2. When coming out of a diagonal parking space, back very slowly until far
enough to see traffic that may be coming and stop if necessary. Turn the steering wheel
sharply when the right front wheel is opposite the rear bumper of the vehicle parked to
the right. In turning too soon, it is possible to sideswipe the other vehicle while backing
out.
Figure 4.9. Parking on a Hill.
AFMAN24-306 30 JULY 2020 49
Chapter 5
PROCEDURES FOR TRANSPORTING PERSONNEL
Section 5A—General Information and Procedures
5.1. General Information. The operator of an AF Government Motor Vehicle transporting
personnel has a special obligation to their passengers. These responsibilities are in addition to
the previously described responsibilities for operating a vehicle.
5.2. General Procedures. Many passengers transported may be visiting dignitaries. The
visitor’s first impression is the one they remember most. The way an operator performs his/her
duties when transporting personnel directly reflects upon their motor transportation operation.
Regardless the grade or status of a passenger (officer, enlisted or civilian), an operator should
always:
5.2.1. Report promptly to the person requesting transportation.
5.2.2. Show courtesy to all passengers regardless of grade.
5.2.3. Open and close the vehicle door for passengers of senior grades.
5.2.4. See that all passengers have secured seat and shoulder belts (if installed).
5.2.5. Park the vehicle so passengers are able to load and unload on the curbside.
Section 5B—Special Situations
5.3. Distinguished Visitors (DVs). As a military operator, the opportunity may arise to
transport DVs (such as high-ranking officers or civilians, dignitaries, and so on) who visit the
base. Generally, a DV is assigned one operator for their entire visit. The length of the visit
varies, but is usually one to three days. A group of DVs normally consists of three to eight
persons. The group generally has one person who acts as a liaison between the operator and the
guests. This designated person is who the operator should report to and from whom they will
also receive their orders.
5.3.1. The liaison will have the itinerary for the DVs and should be able to tell the operator
when and where they need to be available with their vehicle.
5.3.2. Between runs, be sure that the vehicle is ready for further service. Keep the vehicle
wiped-off, windows clean, and floor swept. The operator and vehicle should be neat and
clean at all times. If the operator and vehicle are needed past normal duty hours, a change of
uniform may be required.
5.3.3. Salute when reporting to an officer to inform them their transportation is available.
When the officer arrives at the vehicle, the operator must stand at attention, open the door,
and salute. (T-1). Additional officers must be saluted upon arriving at the vehicle. (T-1).
Stand at parade rest by the vehicle door the officer may enter. NOTE: Once the DV is in the
vehicle, the operator should walk around the rear of the vehicle as to not require an additional
salute while the DV is in the vehicle.
50 AFMAN24-306 30 JULY 2020
5.3.4. When transporting general officers, display the appropriate star plates and flags. When
a general officer is not present, plates and flags will be cased. (T-1). When reveille or
retreat is sounded, stop the vehicle and remain seated.
5.4. Emergency Vehicles. Personnel may be designated as an operator of an ambulance or
other emergency vehicle. However, the person designated must still conform to normal traffic
regulations unless otherwise directed by their supervisor or as required by an emergency
situation. Emergency runs will be restricted to actual emergencies.
5.4.1. The speed of emergency vehicles should be reasonable and proper with due regard for
actual and potential hazards. Ambulances and police vehicles may exceed the posted speed
limits only in emergencies and as directed by the provost marshal or security police
directives.
5.4.2. Certain emergency vehicles are equipped with warning devices (usually a siren and/or
a red or blue flashing light). These warning devices should be used to get other vehicles to
yield the right-of-way. Under no circumstances will the operator assume that these signals
give full clearance to operate the vehicle without suitable regard for life, property, and traffic
laws.
5.4.3. Unless ordered otherwise, by the medical officer in charge, do not use the sirens on
ambulances. Except when responding to an emergency call, observe all traffic laws carefully
during the transfer of patients.
5.4.4. When responding to an emergency, emergency vehicles may proceed through a stop
sign or light (if not in violation of local law), only after slowing down or stopping to assure
safe operation.
5.4.5. Police vehicles responding to emergency calls use sirens and flashing lights according
to local directives or as directed by the provost marshal or the Chief of Security Forces.
5.4.6. The foregoing provisions do not relieve emergency vehicle operators from the
responsibility to drive with regard for the safety of all persons and property. Nor do any of
these provisions protect the operator from the consequence of any reckless disregard for the
safety and wellbeing of others.
5.4.7. As an emergency vehicle operator, personnel will receive additional operator training
and must be licensed IAW this manual (See Chapter 3) and DoDI 6055.04 to operate
emergency vehicles. (T-1).
AFMAN24-306 30 JULY 2020 51
Chapter 6
MAINTAINING SAFE VEHICLES
Section 6A—General Maintenance Responsibilities
6.1. General Information. This chapter contains the general maintenance responsibilities of an
operator of an Air Force GMV to keep the vehicle in a safe operating condition, including
preventative maintenance, necessary equipment, pre-operation inspection, and the necessary
forms.
6.2. Fuel-Efficient Operations. A qualified operator of an Air Force GMV should operate a
vehicle in the most fuel-efficient manner. To do so, he/she should adopt a fuel-conservation
attitude. Apply the following tips to help develop this attitude:
6.2.1. Plan trips to avoid unnecessary "cold starts."
6.2.2. Consolidate short trips whenever possible.
6.2.3. Reduce vehicle's cool-down time and select a route with consideration for terrain,
weather, and type of vehicle.
6.2.4. Maintain the vehicle with particular attention to proper tire inflation, brakes grabbing
or pulling, oil and lubrication specifications, tune-ups, and required vehicle service schedule.
6.3. DOD Fleet Card Program. Ensure program is IAW AFI 24-302, Attachment 6.
6.4. Use Overview. When required, the following items and services may be procured with the
credit card. NOTE: Operators of government vehicles will use self-service pumps when
available at commercial service stations to purchase the fuels noted below: (T-1).
6.4.1. Gasoline (regular unleaded).
6.4.2. Gasoline (unleaded for boats, diesel marine fuel oil, and aviation turbine fuel).
6.4.3. Gasohol.
6.4.4. Diesel fuels.
6.4.5. Diesel Exhaust Fluids.
6.4.6. Lubricating service and lubricants (including differential and transmission lubricant).
6.4.7. Oil filter elements and servicing.
6.4.8. Ethylene Glycol Antifreeze.
6.4.9. Brake fluid.
6.4.10. Air filters (replacement of throwaway type only, cleaning of permanent type).
6.4.11. Battery charging.
6.4.12. Tire and tube repairs.
6.4.13. Mounting and dismounting snow tires or chains.
52 AFMAN24-306 30 JULY 2020
6.4.14. Emergency replacement of spark plugs, fan and generator belts, windshield wiper
arms and blades, lamps, and so forth.
6.4.15. Other emergency repairs, known in the automobile trade as “road repairs.”
Section 6B—Armored Vehicle and Preventative Maintenance
6.5. Armored Vehicle Maintenance. Refer to Air Force Qualification Training Package 24-3-
B212.
Section 6C—Operation Inspections
6.6. Overview Operation Inspections. The operator must perform before-, during-, and after-
operation inspections. (T-1). The operator must also provide routine service and repairs on their
assigned vehicle. (T-1). An operator could be held liable for damages to their vehicle if they fail
to properly inspect for and annotate discrepancies, refer to Technical Order 36-1-191 for further
guidance.
6.6.1. The operator will notify their supervisor as soon as possible of any problem with a
vehicle and keep them informed of its status. (T-1). Unusual noises, vibrations, and changes
in engine performance detected in route, but not identified, should be reported to the
supervisor.
Section 6D—Air Force Equipment and Maintenance Forms and Records
6.7. Air Force Equipment and Maintenance Forms and Records. Use the information below
to perform required inspections and maintenance. In addition, perform and document inspection
and maintenance using AF Form 1800. Refer to AFI 24-302 for specific guidance on AF Form
1800 items to be checked. Ensure that all records created as a result of processes prescribed in
this publication are maintained and disposed of IAW the AFRIMS, RDS.
6.8. Defects. If no defects are found during the before-operation checks and all cleaning and
servicing requirements have been met, the operator is ready to start operating the vehicle. If
vehicle defects are found, enter the details in the appropriate space on the operator’s inspection
guide and trouble report.
6.8.1. When correction of these defects exceeds the operator’s responsibility, take the AF
Form and the vehicle to the Vehicle Management Customer Service Center for corrective
action.
6.8.2. In some cases, required maintenance of the vehicle may be delayed by maintenance
control due to the type of defect or to maintenance work backlog.
6.8.2.1. When maintenance is deferred, maintenance control personnel will enter the
status code and initial the driver’s form to show that defects have been reported and
maintenance delayed. (T-1). This form must be retained in the vehicle as a record of
defects that have been reported to maintenance control. (T-1).
AFMAN24-306 30 JULY 2020 53
6.8.2.2. Any new maintenance defects not previously reported and identified as delayed
maintenance, must be reported to maintenance control. (T-1). Maintenance control will
update the inspection guide when delayed maintenance items have been completed. Refer
to AFI 24-302 for more specific information on reporting a vehicle for maintenance.
54 AFMAN24-306 30 JULY 2020
Chapter 7
HAZARDS AND SAFETY INFORMATION
Section 7A—General Hazards and Safety Information
7.1. General. This chapter contains general hazards and safety information pertaining to all
operators of Air Force GMVs who can face many hazardous driving situations. Hazards may be
the result of weather, time of day, or season of the year. They may be caused by conditions of
the road, the vehicle being driven, or vehicles driven by others.
Section 7B—Hazards and Safety Measures
7.2. Vehicle Hazards. Pedestrians, bicyclists, motorcyclists, and animals pose special problems
for operators. Many times they are difficult to see and an operator should be alert at all times in
order to avoid a collision with them.
7.3. Pedestrians. In the United States, about 40,000 people are killed in traffic accidents each
year. When pedestrians are involved in collisions, speeds of no greater than 15 or 20 mph often
prove fatal. By being alert and aware of his/her surroundings, an operator can avoid fatal
accidents with pedestrians.
7.3.1. An operator should inform pedestrians of his/her intentions by using the proper
signals.
7.3.2. The operator should also anticipate the pedestrian’s intentions. A pedestrian’s actions
are not always predictable, so be prepared at all times.
7.3.2.1. If a person is in the street or driving near pedestrians, slow down the vehicle and
be ready to stop.
7.3.2.2. Never pass a stopped vehicle that is permitting a pedestrian to cross traffic.
7.3.2.3. Watch people on the sidewalks and at the side of the road. They may not stay
there.
7.3.2.4. The operator should allow enough space between his/her vehicle and the row of
parked vehicles in case a pedestrian steps from between them.
7.3.2.5. When approaching a pedestrian from the rear, carefully pass them allowing
plenty of room between them and the vehicle.
7.3.3. School Zones.
7.3.3.1. In school zones, slow down to the posted speed limit and watch for pedestrians.
7.3.3.2. Obey the directions given by members of the school safety patrol or by the
school crossing guards.
7.3.3.3. When stopped by the stop signal of a school bus, do not move until the bus is
placed in motion and the roadway is clear of students.
7.3.4. Intersections. Observe the following rules at intersections:
AFMAN24-306 30 JULY 2020 55
7.3.4.1. Pedestrians have the right-of-way where there are no traffic lights.
7.3.4.2. Pedestrians should obey the same traffic light signals, at intersections, as
operators. Pedestrians also obey special crossing lights at intersections (instead of traffic
lights) where present. However, it will always be the operator’s responsibility to yield if
they do not. (T-0).
7.3.4.3. When crossing on a green light, pedestrians will have the right-of-way. (T-0).
If a light changes to yellow or red while crossing, operators must allow them to complete
crossing safely. (T-0).
7.3.4.4. Pedestrians crossing on a special pedestrian signal have the right-of-way just as
they do when crossing on a green light.
7.3.4.5. A blind pedestrian is entitled, by law, to special consideration at intersections
with no traffic lights. When a blind pedestrian enters an intersection, all approaching
vehicles must stop and must remain stopped until the blind pedestrian has completed
crossing. (T-0).
7.4. Bicyclists. Bicyclists are expected to obey the same traffic rules and regulations as GMV
operators. However, many individuals may not obey or even know the rules. Another major
problem for operators, especially at night, is their inability to see bicyclists.
7.4.1. Be cautious because a bicyclist could be in the blind spot of the vehicle. Keep on the
lookout and slow down when approaching bicyclists.
7.4.2. Give bicyclists plenty of room when passing and be prepared to stop suddenly.
7.5. Motorcyclists. It is often difficult to see motorcyclists, especially when they are coming up
from behind, coming from the side streets, and around curves. Always look out for them when
approaching an intersection.
7.5.1. When passing motorcyclists, give them plenty of room. If they look over their
shoulder, it could indicate that they intend to change lanes. Give them time and space to do
so.
7.5.2. Motorcyclists may suddenly need to avoid uneven road surfaces and obstacles such as
drain covers or oily, wet, or icy patches on the road. Give riders sufficient room to react.
7.6. Animals. An operator should always be alert to the possibility of a collision with an
animal. A collision with even a small animal can cause serious vehicle damage and endanger
human life. Operators should remain highly observant for local wildlife and domestic animals.
Be thoroughly familiar with and obey all local laws. Exercise good judgment and drive
defensively at all times to avoid endangering not only animals, but also human life and property.
7.7. School Buses.
7.7.1. Except on highways with a physical median, all traffic in both directions must come to
a complete stop whenever a school bus stops to pick up or discharge passengers (Figure 7.1).
(T-0).
7.7.1.1. In some localities, this rule applies to certain other vehicles (such as city or
church buses).
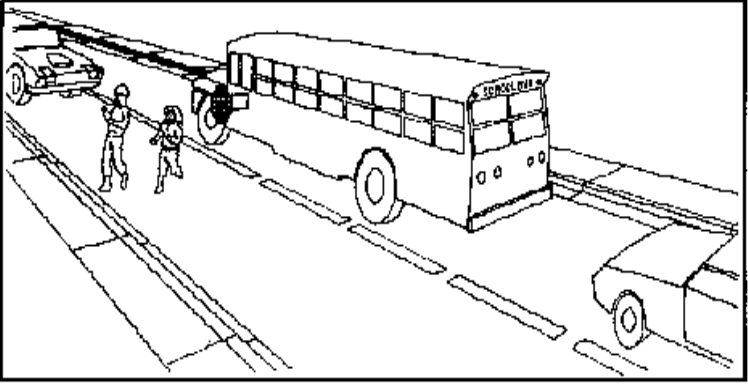
56 AFMAN24-306 30 JULY 2020
7.7.2. Traffic must remain stopped until the bus driver turns off the special “stop lights” on
the front and rear and/or withdraws the special stop sign located on the left side of the bus.
(T-0).
Figure 7.1. Stopping for a School Bus.
7.8. Emergency Vehicles. Emergency vehicles including, but not limited to, police cars,
ambulances, and fire trucks will be entitled to the right-of-way whenever they give an audible or
visual warning of their approach. (T-0).
7.8.1. This warning is usually a siren. Additional warnings may be given by using a bell or
flashing red or blue lights.
7.8.2. The law requires that GMV operators must pull to the right-hand curb or edge of the
road and come to a complete stop. (T-0). They must remain stopped until the emergency
vehicle has passed or until they are directed to proceed by a police officer. (T-0).
7.8.2.1. Though laws and regulations require that an operator pull to the right side of the
road, they do not require them to do it carelessly or without regard to consequences.
7.8.2.2. Look before turning the steering wheel. Turning suddenly to the right without
looking, may cause a collision with the emergency vehicle, another driver, a pedestrian,
or a bicyclist.
7.8.3. Never follow within 500 feet of a fire truck or other emergency vehicle.
7.8.4. Never drive into or park in a block where an emergency vehicle has stopped in answer
to an alarm. Doing so exposes the operator to unnecessary dangers and may hinder the work
of the emergency workers.
7.8.5. Never drive over a fire hose unless directed to do so by a fireman or police officer.
7.9. Weather Hazards. Bad weather means poor driving conditions. Rain, snow and ice, and
fog reduce visibility and make driving dangerous. Visibility may be limited to only a few feet
ahead of the vehicle. While operating a vehicle in any inclement weather, GMV operators
should maintain proper tire inflation, and reduce speed as necessary to avoid accidents and
ensure safety on the road.
AFMAN24-306 30 JULY 2020 57
7.9.1. Rain. Most operators slow down or pull-off the road in a heavy downpour. However,
many do not realize that roads are likely to be especially slick just after rain or drizzle begins.
The first few drops of rain should act as danger signals to the safe operator.
7.9.1.1. On wet pavements, allow at least two times the normal following distance.
7.9.1.2. In wet weather, extra caution is necessary on mountain roads. Rocks, loosened
by water seepage, may fall onto the road. Water beneath the pavement may freeze during
a cold snap and cause the pavement to buckle.
7.9.1.2.1. Operators may suddenly find broken pavement or rocks in their path as
they round a curve. Operators rounding a curve should drive slowly and with caution
to avoid broken pavement or possible obstructions.
7.9.1.3. Wet roads may also cause hydroplaning, a condition in which directional control
is partially or totally lost as the tires on the vehicle lose traction with the road.
7.9.2. Snow and Ice. Roads covered in snow and ice reduce traction, require three to eleven
times more stopping distance, and may not be easily identifiable by the operator. Fresh snow
may conceal an icy road surface, or isolated patches of ice may be on an otherwise clear
road, especially in shaded areas. An operator should use extreme caution to maintain traction
to avoid skidding when attempting to stop or turn.
7.9.2.1. Visibility. Good visibility is the first requirement for safe driving.
7.9.2.1.1. Keep windshields, windows, mirrors, headlights, spotlights, and body
clearance lights clean and free of snow and ice.
7.9.2.1.2. If defrosters are not available, keep windshields clean by using the
windshield wiper, wedging the rear of the hood open so motor heat is vented toward
the windshield (for rear-opening hoods) or thoroughly ventilating inside the vehicle.
7.9.2.1.3. Cover windshields of vehicles parked in open lots with cardboard or
canvas to prevent overnight frosting.
7.9.2.1.4. Use low-beam headlights to warn other vehicles when visibility is low.
Stop, park off of the road, and wait for conditions to improve if there is zero
visibility.
7.9.2.2. Operating Procedures.
7.9.2.2.1. Start driving in second or third gear rather than first or low. Engage the
clutch gradually (or in D2, high, with automatic transmission), and accelerate no
more than necessary to keep from stalling.
7.9.2.2.2. Descend moderate grades in the gear normally used to climb the same
grade. On steep or very slippery grades, use at least one gear lower and go slower.
7.9.2.2.3. If unsure about a difficult stretch of road, bring the vehicle to a stop and
inspect the road carefully before going across. Select a gear that can allow the
vehicle to pass safely. If following a vehicle, wait until it crosses. This allows the
GMV operator the ability to render assistance to the lead vehicle if it gets stuck. It
also ensures that the lead vehicle may be able to render assistance to the second
vehicle if it gets stuck.
58 AFMAN24-306 30 JULY 2020
7.9.2.2.4. To drive through heavy slush, downshift before entering and keep moving.
If wheels begin to spin, disengage the clutch at once, back-up, and try again. If
necessary try rocking the vehicle by shifting rapidly between forward and reverse
gears.
7.9.2.2.5. On roads that slope toward side ditches, straddle the center or crown to
avoid sliding to the side. Watch carefully for approaching traffic.
7.9.2.2.6. Avoid vehicle tracks, rocks, and other objects that might throw the vehicle
sideways causing a skid. Also avoid sharp turns that may make a vehicle skid.
7.9.2.2.7. Drive at reduced speeds. This allows the GMV operator to bring the
vehicle to a stop more quickly. Avoid quick acceleration on slick roads to avoid
skidding.
7.9.2.2.8. Slow down before coming to bridges and shaded places. Be especially
careful in the late afternoon and at night. Melting snow running down from the upper
side of a banked curve may freeze on the pavement as the sun sets. Since bridges
cool much more rapidly than other road surfaces, moisture often condenses on them
and freezes quickly into thin sheets of ice when the temperature drops.
7.9.2.2.9. Give turn signals sooner than usual, and pump the brakes to give others an
early warning of the intention to stop. This gives other operators more time to react.
NOTE: If the vehicle is equipped with an Anti-lock Brake System, do not pump the
brakes; hold firm on the brakes.
7.9.2.2.10. Maintain at least double the normal distance from the vehicle ahead.
7.9.2.2.11. After driving through slush or water, test the brakes while moving at a
reduced speed. If the brakes do not operate normally, continue at a slow speed while
maintaining moderate pressure on the brake pedal to create a slight drag. The heat
generated by friction between the brake shoe and brake drum may dry the brakes.
7.9.2.2.12. Keep the cab door open when crossing frozen streams. This ensures that
the GMV operator can exit the vehicle if the ice thins and they are in danger of falling
through the ice.
7.9.2.3. Parking.
7.9.2.3.1. Place brush, boards, or other suitable material beneath wheels when
parking for an extended period on wet, slushy, or muddy surfaces. This keeps the
tires from sinking, freezing to the ground, or being “pocketed” in ice.
7.9.2.3.2. Do not set the parking brake. During cold weather conditions, applying the
parking brake may cause the linings to freeze to the brake drums.
7.9.2.3.3. Instead, block the wheels and place the transmission in the appropriate gear
for parking as directed by the vehicle Manufacturer’s Operator’s Manual, TO and/or
respective lesson plan.
AFMAN24-306 30 JULY 2020 59
7.9.2.4. Vehicle Care.
7.9.2.4.1. Carbon Monoxide Poisoning. This poisoning, from inhaling the exhaust
fumes of the vehicle, usually results in death. To avoid the possibility of inhaling
these fumes:
7.9.2.4.1.1. Never sleep in the cab of the vehicle with the engine or heater
running. Whenever the heater is used while driving, leave a window open
slightly.
7.9.2.4.1.2. Inspect the vehicle exhaust manifold, muffler and tail pipe for
serviceability and tightness daily.
7.9.2.4.1.3. Never leave the engine running while working on the vehicle in a
closed building.
7.9.2.4.2. Keep all fuel tanks and containers as nearly full as possible to keep
moisture from condensing inside the fuel tanks and containers. Moisture not only
contaminates the gasoline, but also may freeze in the fuel lines.
7.9.2.4.3. Drain the air tanks in the vehicle each time it is stopped (long enough for
the tanks to become cold). This procedure reduces the chance of moisture collecting
in the tanks, entering the brake lines, freezing, and making the brakes inoperative.
7.9.2.4.4. On brief halts during extremely cold weather, let the engine run at a fast
idle so that the ammeter shows a charge. Fast idle results in better burning of fuel and
a more even engine temperature. On long halts, park the vehicle with the rear end
toward the wind to keep snow out of the engine.
7.9.2.4.5. Under normal operating conditions, stop the engine during brief halts. This
can prevent plug fouling and overheating.
7.9.2.4.6. When it is very cold, cover the radiator and hood with a tarpaulin or other
suitable material.
7.9.2.4.7. In severe cold, start the engine frequently between operating periods to
keep it warm.
7.9.2.5. Means of Traction Assistance.
7.9.2.5.1. When driving on snow or ice, make sure the vehicle is equipped with
chains, snow tires, or studded tires.
7.9.2.5.2. Vehicles equipped with mud and snow tires can slide more easily on icy
road surfaces than those with commercial tread. Mud and snow treads are more
effective on roads covered with loosely packed snow.
7.9.2.5.3. All-wheel drive vehicles, without chains, generally perform better than
two-wheel drive vehicles with chains on rear wheels.
7.9.2.5.4. Chains give a good bite in snow or mud, but tend to slip and slide on ice
and packed snow.
7.9.2.5.5. Sand, cinders, or dirt scattered on icy road surfaces gives more traction
than chains.
60 AFMAN24-306 30 JULY 2020
7.9.2.5.6. Better traction is gained when the load is distributed evenly on all wheels.
7.9.2.6. Tire Chains and Tire Chain Installation. Chains are designed to creep or
move on the tires. Tighten them by hand, never with tools. Creeping or moving of
chains reduces the possibility of the links gouging into the tires. When using chains
continuously, check their fit and condition at each halt. Install repair links as soon as one
of the cross chains is broken. Do the following when installing tire chains under normal
conditions:
7.9.2.6.1. Check the condition of the chains. Eliminate twists. On some vehicles, tire
chains must be installed on all driving wheels. (T-0). Check the manufacturer’s
operator’s manual, Technical Order and/or respective lesson plan.
7.9.2.6.2. Drape chains over tires with open ends of cross chain hooks away from the
tire and with fasteners on the trailing ends of the side chains.
7.9.2.6.3. Tuck the first cross chain under the front of the tire. Move the vehicle
forward until the fasteners are hub high.
7.9.2.6.4. Straighten and center the chains. Lift the ends of the side chains to
determine which links may be hooked into the fasteners.
7.9.2.6.5. If installing on duals, first fasten chains between wheels, then inner chains,
and finally the outer chain. If installing on singles, fasten the inner chain before the
outer chain.
7.9.2.6.6. Do the following when the vehicle is mired:
7.9.2.6.6.1. Determine whether to install the chains with a forward or backward
wheel motion.
7.9.2.6.6.2. Check the condition of the chains. Eliminate twists.
7.9.2.6.6.3. Drape chains over tires with open ends of cross chain hooks away
from the tire and with fasteners on the trailing ends of the side chains.
7.9.2.6.6.4. Locate the first cross chain near mud or snow line. If the chains are
dual, fold the inner half of the chain over top of the outer half. This makes a
doubled chain on the outer wheel. For this reason, the methods listed below then
apply to either dual or single wheels.
7.9.2.6.6.5. Secure one end of each side chain to the wheel by a strong wire, cord,
or chain passed through the opening in the wheel and fasten to the inner and outer
side chains adjacent to the first cross chain.
7.9.2.6.6.6. Pull the chain back to take up slack and align with tire. To keep the
loose chain from one wheel from being caught up by the other, pile it close behind
the wheel to which it is secured.
7.9.2.6.6.7. Revolve wheels slowly to draw chains around tires. Stop when
fasteners are at the top of the tires. Pull side chains up tight to select links to be
hooked into fasteners. Hook the inner side chain first.
AFMAN24-306 30 JULY 2020 61
7.9.2.6.6.8. When the vehicle has been moved to solid ground, loosen and
remove the temporary wires, cords, or chains. Adjust the chains to their proper
position.
7.9.3. Fog. Fog is dangerous at any time, but particularly so at night. It is possible that fog
can be so thick that an operator can barely see the front of the vehicle.
7.9.3.1. In dense fog, get off the road as quickly as possible.
7.9.3.2. Thick fog can collect in small pockets at the bottom of hills on otherwise clear
nights. When running into one of these pockets, slow down as quickly as possible and
switch to the low-beam headlights.
7.9.3.3. Once through the fog, continue to drive slowly. One pocket of fog is usually a
warning that there may be more fog at the bottom of the next hill. Continue to drive
slowly until completely out of the fog area.
7.10. Secondary Roads. Secondary roads, built for local transportation and not as main
highways, may be hazardous. The fact that a secondary road is paved does not necessarily mean
that it was designed for heavy traffic or regular highway speeds.
7.10.1. Secondary roads are recognizable by their rectangular route signs.
7.10.2. An operator who is unfamiliar with one of these roads should be on guard for sudden
bends and sharp dips.
7.10.3. Secondary roads cannot be driven safely at speeds that would be normal on primary
highways. Operators should adjust to a safe speed and adjust their driving and awareness.
7.10.4. Gravel roads are particularly dangerous because of their loose surface and flat
(unbanked) curves. Stopping distances at all speeds are greater and skids and spinouts are
more likely to occur. On gravel roads, keep the vehicle under tight control and drive at a
much lower speed than would be safer on a paved road.
7.11. Overloading and Overcrowding. No vehicle is safe when it is overloaded or crowded to
the point that the operator’s normal vision of the road is obstructed or they have difficulty
operating the vehicle.
7.11.1. Overloading. Do not use a car as a truck. A heavy load decreases performance and
increases stopping distances. A heavy load may also damage the springs, shock absorbers,
tires, and transmission. A heavy load or one that is not evenly distributed may upset the trim
and balance of a vehicle, making curves and stops more dangerous.
7.11.1.1. Loads on trucks and trailers should be securely fastened to prevent any part of
them from falling off. See Chapter 10 and vehicle specific lesson plan for loading and
tie-down instructions.
7.11.2. Overcrowding. As a general rule, an operator cannot safely drive if they allow more
than three persons, including themselves, in the front seat of a vehicle with the gearshift lever
on the steering column, or more than two persons with the gearshift on the floor of the
vehicle. (In some compact vehicles, the maximum safe limit may be only two, regardless of
the position of the gearshift.)
62 AFMAN24-306 30 JULY 2020
7.11.2.1. Overcrowding in the back seat (more than three persons) is dangerous because
it is likely to interfere with the line of sight from the rearview mirror.
7.11.2.2. When a vehicle is equipped with seat belts, the number of passengers will not
exceed the number of seat belts provided. (T-0).
Section 7C—Off-Road Driving
7.12. General Information. Off-road driving conditions present special challenges for the
GMV operator.
7.13. Off-Road Driving Terrain Types. The following section discusses different types of
terrain a GMV operator may encounter while driving off-road. Follow instructions for driving
under other than normal conditions. Driving techniques are different for rear-wheel drive, front-
wheel drive, and all-wheel drive vehicles. Operators of large GMVs should be aware, that due to
vehicle weight, the shoulder of the road might give way. NOTE: The operator should first check
the vehicle’s manufacturer’s operator’s manual and the respective lesson plan and/or Technical
Order for the equipment being operated.
7.13.1. Ditches.
7.13.1.1. Crossing shallow ditches requires shifting into low gear or range and
proceeding slowly.
7.13.1.2. Enter the ditch obliquely so that one wheel leaves the ditch as the other wheel
on the same side enters.
7.13.1.3. When crossing deep ditches, use the lowest forward gear and four-wheel drive
if the vehicle is so equipped.
7.13.1.4. When reaching the bottom, accelerate the motor enough to keep rolling as the
vehicle goes up the other side.
7.13.1.5. If the ditch is deep and has very steep sides, it may be necessary to cut away the
tops of the banks before trying to cross.
7.13.2. Gullies and Ravines. Gullies and ravines are natural formations caused by running
water.
7.13.2.1. Look over these formations carefully to find a place to cross and to ensure that
the vehicle can get across. Examine both banks.
7.13.2.2. If water is flowing in the ravine, check its depth.
7.13.2.3. Put the vehicle in low gear and slowly approach the ravine at a right angle to
the edge.
7.13.2.4. Using the service brake, ease the front wheels into the gully; taking care to
have them strike the bottom at the same time.
7.13.2.5. Bring the engine up to normal operating speed as the wheels hit the bottom.
Accelerate enough to climb as the front wheels touch the opposite bank.
AFMAN24-306 30 JULY 2020 63
7.13.3. Woods. Woods help to conceal the GMV operator and their vehicle from air
observation. However, woods present certain problems. Wooded areas are likely spots for
guerrillas, partisans, or enemy troops. Be alert to the possibility of an ambush.
7.13.3.1. Fairly open woods with trees at least as far apart as the width of the vehicle
may allow passage if the GMV operator can maneuver the vehicle around the trees.
7.13.3.2. Use an established trail if possible.
7.13.3.3. Do not plan to return on the same route because these same saplings may stop
or damage the vehicle when braced against it.
7.13.3.4. If the trees are too dense and prevent passage, drive as closely as possible to the
edge of the woods using shadows for concealment.
7.13.4. Stumps. A high tree stump, if straddled by the vehicle, can seriously damage the
vehicle axles, tires, and other low parts. Check ground clearances and drive with caution.
7.13.5. Low Limbs. When driving through wooded areas, whether on country roads or
cross-country, low hanging limbs may rip the tarp, break the tarp bows or radio antennas.
7.13.5.1. It is usually best to remove the canvas top and the bows for field operation.
7.13.5.2. Survey the route to determine if the vehicle can proceed without damage from
low-hanging limbs or if it is practicable to remove obstructing limbs.
7.13.6. Timber. If necessary, driving over fallen trees is possible if angle crossings cannot
be achieved. By piling dirt and other materials/debris over the fallen tree, the obstacle can
become more level with the path being traveled enabling the GMV operator to pass.
7.13.7. Rocky Terrain.
7.13.7.1. Do not try to straddle large boulders; they may damage axles and other low
parts of the vehicle.
7.13.7.2. Move very slowly when driving in rocky terrain.
7.13.7.3. If available, operators of GMVs should carry an extra spare tire because the
possibility of getting a flat is greatly increased.
7.13.7.4. Remove stones between dual tires as often as possible to prevent breaking the
sidewalls of the tires.
7.13.8. Mud and Swamps. Every military vehicle has enough power in its lowest gear to
pull out of mud if it gets traction.
7.13.8.1. Try to pull out slowly in low gear or low range if the vehicle is equipped with
an automatic transmission. Placing boards, brush, or similar material under the vehicle’s
wheels can increase traction. Remember the following:
7.13.8.1.1. Select the gear that can get the vehicle through. Roll onto the soft area at
a medium speed for the selected gear. Carefully maintain a steady throttle until
reaching solid ground.
7.13.8.1.2. If stopped by mud rolling up in front of the wheels, the GMV operator
may have to back up and try again, this time with increased momentum.
64 AFMAN24-306 30 JULY 2020
7.13.8.1.3. Under most conditions, this technique requires prompt action. Otherwise,
the mud may fill the tracks behind the wheels and slow or stop the backing. There
needs to be solid footing within reach of the vehicle in order to do this.
7.13.8.1.4. If a vehicle with an automatic transmission gets stuck, pull out slowly in
low gear or low range.
7.13.8.1.5. If the vehicle cannot get out, and if brush or boards do not provide the
traction needed, have another vehicle pull out the stuck vehicle.
7.13.8.1.6. When other vehicles are not available and the vehicle is equipped with a
winch, attach the winch cable to a tree or solid object and pull the vehicle out with
winch power. Do not rock the vehicle; it may only dig in.
7.13.9. Streams. The applicable Manufacturer’s Operator’s Manual and lesson plan written
for the specific vehicle contain detailed instructions on fording streams. In addition to those
instructions, follow these precautions before fording:
7.13.9.1. Check the stream bottom to determine how firm it is.
7.13.9.1.1. If some sinking is expected, determine if this sinking added to the water
depth may exceed the vehicle’s fording limit. If the fording limit may be exceeded,
find another crossing point.
7.13.9.2. After reaching dry land, test the brakes while moving at a reduced speed. If the
brakes do not operate properly, continue at a slow speed while maintaining a light steady
pressure on the brake pedal to cause a slight drag on them. The heat should dry the
brakes.
7.13.10. Sand. When driving in sand, never drive while holding the inside of the steering
wheel. The sand can grab the tires causing the steering wheel to jerk suddenly and cause
injury to the operator.
7.13.10.1. The main objective when driving in sand is to maintain movement with the
least amount of strain on the vehicle, its engine, and its power train. The GMV
operator’s ability to do these things well comes only through experience. To do this:
7.13.10.1.1. Estimate if a sandy area is drivable.
7.13.10.1.2. Adjust the tire pressure to meet changing conditions.
7.13.10.1.3. Use various aids to improve bearing surfaces.
7.13.10.1.4. Exercise sound driving techniques.
7.13.10.2. Accessories. To help overcome the many difficult conditions associated with
extended driving in sand, the GMV operator should lubricate and service the vehicle at
more frequent intervals as specified by the unit commander. Also, the GMV operator
should be provided with the following:
7.13.10.2.1. A tire gauge.
7.13.10.2.2. The means to inflate tires if the vehicle is not so equipped.
7.13.10.2.3. Spare valve cores.
7.13.10.2.4. Readily available material for use under wheels in extremely soft areas.
AFMAN24-306 30 JULY 2020 65
7.13.10.2.5. Shovels and tow chains or cables.
7.13.10.3. Sound Driving Techniques for the Sand.
7.13.10.3.1. Follow normal engine starting procedures.
7.13.10.3.1.1. Select a gear or range that can start to move the vehicle forward
with a minimum of, or no clutch slippage and wheel spinning.
7.13.10.3.1.2. Accelerate gradually. Maintain a steady and even rate of
movement.
7.13.10.3.1.3. Avoid unnecessary shifting of gears. If the vehicle is equipped
with an automatic transmission, keep it in low range.
7.13.10.3.2. Anticipate difficult spots and try to bypass them.
7.13.10.3.2.1. Head for a small stretch of soft sand with increased speed, when
necessary, to take advantage of momentum. Stop before entering an extensive
stretch of soft sand. Reduce the tire pressure, if necessary.
7.13.10.3.2.2. As soon as the need for low tire pressure ceases, stop and re-inflate
to appropriate pressure.
7.13.10.3.3. Approach a dune (hill of sand piled up by the wind) from the windward
(most gradual) slope at a 90-degree angle.
7.13.10.3.3.1. Select the proper gear or range to avoid shifting while on the slope.
Maintain as much momentum as possible while going up the slope.
7.13.10.3.3.2. Be prepared to change direction upon reaching the crest. Ride the
crest if necessary to seek a safe route.
7.13.10.3.3.3. If the lee (steepest) slope may be used, select a point where the
angle of approach may allow the front bumper to clear.
7.13.10.3.3.4. Follow in the tracks of preceding vehicles or break a new path
depending on conditions.
7.13.10.3.3.5. Make wide turns. Sharp turns can stall or even overturn the
vehicle.
7.13.10.4. Do the following to stop in sand:
7.13.10.4.1. Let the vehicle roll to a halt if practicable. Otherwise, brake gradually.
This prevents tires from digging in.
7.13.10.4.2. Try to stop on a downhill slope. This gives a GMV operator an
advantage when starting.
7.13.10.5. Freeing Vehicle from the Sand. At the first sign the vehicle is bogging down,
try shifting to a lower gear. Do the following if it still bogs down:
7.13.10.5.1. Stop power to the driving wheels. If a GMV operator continues to use
the motor to force the vehicle out of the sand, it may only sink deeper and become
more difficult to get out.
66 AFMAN24-306 30 JULY 2020
7.13.10.5.2. Check tires for sand operation inflation. High temperature may have
built up the pressure. Lower the tire pressure, if necessary, for emergency movement
over a short distance. Check the applicable Manufacturer’s Operator’s Manual and
respective vehicle lesson plan for the allowable minimum tire pressure.
7.13.10.5.3. As soon as the need for low tire pressure ceases, stop and re-inflate the
tires to the appropriate pressure.
7.13.10.5.4. If lowered tire pressure is not enough to free the vehicle, use any or all
of the following procedures:
7.13.10.5.4.1. Shovel a clear path ahead of the wheels.
7.13.10.5.4.2. Lay boards, brush, canvas, wire netting, rope ladders, or some
similar material under and in front of the tires for better flotation and traction.
7.13.10.5.4.3. Use the winch or a tow if it appears that continued operation of the
vehicle under its own power would only cause it to sink deeper into the sand.
7.13.10.5.4.4. If a vehicle is stuck in sand and needs pulled out, unload the
vehicle to the maximum extent possible.
7.13.10.5.4.5. As soon as the need for low pressure ceases, stop and re-inflate tire
to appropriate pressure.
7.14. Vehicle Care. In addition to responsibilities contained in the respective Manufacturer’s
Operator’s Manual and lesson plan. A GMV operator must do the following: (T-1).
7.14.1. Keep valve caps on all tires. (T-1).
7.14.2. Check engine temperature and oil pressure frequently. (T-1).
7.14.3. Check for a loose or broken fan belt if overheating occurs. (T-1). Correct as
necessary. (T-1).
7.14.4. Clean the oil spout before adding oil. (T-1). Remove any accumulation of sand or
dirt around the filler hole. (T-1).
7.14.5. Clean the spouts of gasoline containers before using them for refueling. (T-1).
Under extremely dirty conditions, filter gasoline when filling tank.
7.14.6. Inspect nuts, bolts, springs, mountings, and accessories frequently for evidence of
looseness or damage. (T-1).
7.14.7. Park with the rear of the vehicle toward the wind when halted overnight or for any
extended period. (T-1).
7.14.7.1. If this is not possible, cover the windshield and radiator with a tarpaulin to
prevent sand from accumulating in the engine compartment and damage to the
windshield.
AFMAN24-306 30 JULY 2020 67
Chapter 8
ROADSIDE EMERGENCY AND ACCIDENT RESPONSE
Section 8A—General Information
8.1. General Information. There are some roadside emergencies and accidents that are
unavoidable. However, many times the operator is the cause because they are driving carelessly,
driving too fast, not obeying traffic signals or signs, or failing to take proper care of the vehicle.
The techniques discussed in this chapter can assist the GMV operator in avoiding roadside
emergencies and accidents, and can aid in the proper response in the event that an emergency or
accident were to occur.
Section 8B—Roadside Emergencies
8.2. Tire Blowouts. An operator seldom receives a warning before a tire blowout. There is
usually a loud bang, and then a whooshing and flapping sound before the vehicle starts swerving
to one side or swaying dangerously.
8.2.1. An operator should use all his/her strength on the steering wheel to keep the vehicle
moving straight ahead. Let-off the gas but do not apply the brakes. Let the vehicle slow
down gradually and then gently apply the brakes and get the vehicle under control.
8.2.2. If in a passing lane when a blowout occurs, do not attempt to get to the highway
shoulder until the lanes on the right are clear. When lanes are clear, move over as far to the
right side of the road as safely possible on the shoulder and stop. If in a jurisdiction where
the operator primarily drives on the left side of the road, move over as far to the left side of
the road as safely possible on the shoulder and stop.
8.3. Skids. Almost all skids can be avoided if driving slowly enough and if the operator stops,
starts, and turns slowly enough on slippery surfaces. If the vehicle starts to skid, the operator
may be able to regain control if they ease up slowly on the accelerator and do not apply the
brakes.
8.3.1. Always make sure the vehicle is kept in gear. If the skid occurs when braking, the
operator should remove his/her foot from the brake. It may be necessary to feed gas
carefully to reduce the braking effect of the engine. In either case, the reason for reducing
the brake action is to keep the wheels from slowing down too quickly and making the skid
worse.
8.3.2. At the same time, turn the steering wheel in the direction of the skid (see Figure 8.1).
If the rear end of the vehicle is skidding to the right, turn the steering wheel to the right. If it
is skidding to the left, turn the steering wheel to the left. Do not turn the steering wheel too
sharply or keep it turned too long since this may cause the vehicle to start skidding in the
opposite direction.
8.3.3. Ease the steering wheel back to the center position as the vehicle starts to recover from
the skid and regain control of the vehicle. Let the engine slow the vehicle down gradually. If
the brakes are applied, do not hold the pedal down. Pump the pedal gently until the vehicle
comes to a complete stop. Figure 8.1 shows how to recover from a skid.
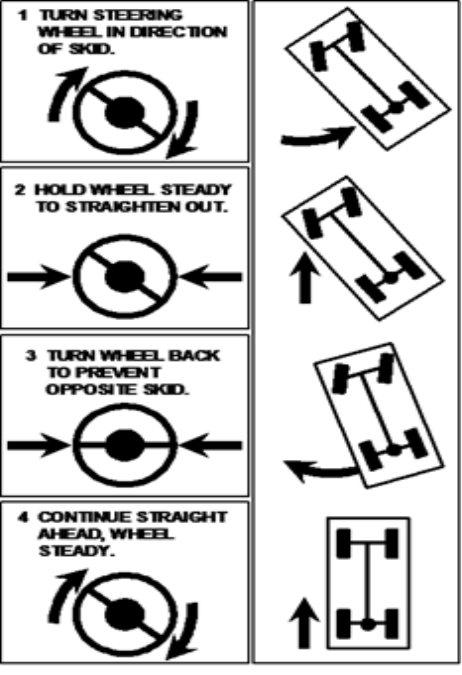
68 AFMAN24-306 30 JULY 2020
Figure 8.1. Recovering from a Skid.
8.4. Running Off the Pavement. At some point, a vehicle may drift off the roadway onto the
shoulder or may been steered onto the shoulder to avoid a collision. There may be a drop-off of
several inches from the edge of the road to the shoulder. Pulling-off onto the shoulder and
returning to the roadway can be done safely:
8.4.1. If the two right or left wheels of the vehicle veer off the paved roadway, keep a firm
grip on the steering wheel. Keep the vehicle traveling straight ahead. Straddle the edge of
the pavement. Fight the tendency of the wheels to pull toward soft shoulders. Resist the
urge to immediately whip the vehicle back onto the pavement.
8.4.2. Ease-off the accelerator pedal so the vehicle can slow down. If possible, avoid
braking. If braking is necessary, pump the brakes lightly to help control steering.
8.4.3. Before returning to the pavement, visually check ahead, to the sides, and to the rear.
Unless some object beside the road poses a serious threat of a collision, avoid trying to return
to the roadway immediately. Move the off-road tires out about one and a half to two feet
away from the pavement edge. When it is safe and speed is under control, turn the wheel
quickly about a quarter turn to the right or left as necessary. This lets the tire climb the
pavement edge and get back on the roadway.
8.4.4. As soon as the front tires are back on the roadway, counter steer quickly to maintain
the proper lane.
AFMAN24-306 30 JULY 2020 69
8.5. Brake Failure.
8.5.1. If the brakes fail and the failure is not related to engine failure, pump the brake pedal
rapidly (if vehicle has hydraulic brakes) to restore braking action long enough to get off the
highway.
8.5.2. If this does not work, apply steady pressure to the parking brake that controls the rear
wheels. Be careful when using the parking brake to stop and be prepared to release the brake
if the rear wheels lock. Reapply the parking brake if needed. Downshifting the vehicle also
serves as a braking force.
8.5.3. Find an escape ramp or a safe exit from the highway. Communicate the emergency to
other drivers by sounding the horn and flashing the lights. In more extreme cases, more
severe methods may be required to slow the vehicle. An operator may have to run along an
embankment; scrape against a curve; or drive into bushes, hedges, or other obstructions.
8.6. Breakdowns. In the event of a vehicle breakdown, follow these general guidelines:
8.6.1. Whether day or night, the GMV operator will always turn on the four-way flasher
warning lights. (T-0).
8.6.2. Place warning devices contained in the highway warning kit as prescribed in the kit
instructional manual. If the instructions are not with the kit, follow the procedures in
paragraph 8.10
8.6.3. Remove the vehicle from the main traveled portion of the road, if possible. If it is
impossible to get the vehicle off the road and it is obstructed from view by a curve or hill,
walk back along the shoulder of the road to a position where it is possible to signal
approaching drivers to stop in time.
8.6.4. Do not attempt to make repairs on the vehicle while it is in an exposed position on the
road.
8.6.5. For disabled vehicles, GMV operators will notify Vehicle Management and his/her
unit through his/her chain-of-command. (T-1).
8.6.6. Flat tire. If the vehicle has a flat tire, it is possible to damage the tire beyond repair if
the operator continues to drive on it. The operator should gradually bring the vehicle to a
stop and, if possible, pull over to the side of the road.
Section 8C—Vehicle Fires
8.7. Preventing Vehicle Fires. There are several means to prevent vehicle fires. Below are
some, but not all precautions that should be taken by the GMV operator:
8.7.1. Refueling. Turn-off the engine during refueling. Do not allow smoking or open
flames within 50 feet of a vehicle during fueling or at an accident scene where there is danger
from spilled gasoline or other flammables. If tactical refueling, ensure refueling vehicle and
customer vehicle are bonded together prior to refueling. Keep the gasoline nozzle in contact
with the gas tank when fueling.
70 AFMAN24-306 30 JULY 2020
8.7.2. Flares. When flares are authorized, issue instructions for their handling and storage
on the vehicle. Since flares are a potential fire hazard, it is imperative that operators take the
prescribed precautions when handling them. Ignited flares will not be attached to a vehicle.
(T-0). Flares are prohibited on vehicles transporting explosives or flammable cargo.
8.7.3. Transporting Flammable Cargo. Do not allow smoking within 50 feet of the
vehicle when transporting explosives or flammable cargo. Do not allow the vehicle to be
exposed to open flames or explosives when it is loaded with flammables or explosives.
8.7.4. Transporting Bulk Flammable Liquids. Vehicles designed for transporting bulk
flammable liquids will be permanently marked with warning signs. (T-0).
8.7.4.1. When a general-purpose vehicle is used to transport liquid fuels or other
dangerous cargo, it is the operator’s responsibility to place the prescribed warning signs
on the vehicle. When dispatched to transport dangerous cargo, ask a supervisor for
special instructions and warning signs for the vehicle.
8.7.4.2. Title 49 CFR Part 172, Hazardous Materials Table, Special Provisions,
Hazardous Materials Communications, Emergency Response Information, Training
Requirements, and Security Plans prescribes the warning placards for vehicles
transporting hazardous cargo in the CONUS. When operating overseas, be sure to have
the required warning signs for all the countries in which driving is required.
8.7.4.3. Take emergency measures provided in the vehicle’s lesson plan and
Manufacturer’s Operator’s Manual when bulk fuel transporters develop leaks.
8.7.4.4. When dispensing fuel to another vehicle or a tank, a ground cable must be
secured to the dispensing vehicle and the vehicle or tank being filled (Grounding and
Bonding). (T-0).
8.8. Fighting Vehicle Fires. Due to the limited resources available for fighting a vehicle fire,
send for help from professional fire fighters when possible. Common firefighting equipment
usually consists of a hand fire extinguisher and any available natural materials (such as sand and
water). Those resources, when applied at the start of a fire, have a good chance of bringing it
under control. However, if the fire is out of control, attempting to extinguish it with inadequate
equipment not only diminishes the possibility of successfully extinguishing the fire, but it also
endangers the lives of the operator and others nearby.
8.8.1. When it is discovered that a vehicle is on fire: Pull the vehicle off-the-road in an open
area away from buildings, trees, brush, vehicles, or anything else that might catch fire. Do
not pull into a service station. Notify the fire and police departments. Prevent the fire from
spreading. With an engine fire, turn-off the engine as soon as possible. Do not open the
hood if avoidable.
8.8.2. Use the correct type of fire extinguisher. B- and C-rating extinguishers are designed
to work on electrical and liquid fires. The A, B, and C type extinguishers are designed to
work on burning wood, paper, and cloth; as well as electrical and liquid fires.
AFMAN24-306 30 JULY 2020 71
8.8.3. Know how to use the fire extinguisher. Stay far away as possible from the fire. Aim
at the source or the base of the fire, not up in the flames. Take a position upwind from the
fire. This can allow the wind to carry the extinguisher chemicals to the fire, limiting the
possibility of the flames coming towards you, causing harm and interfering with
extinguishing attempts. Do not attempt to extinguish a fire if unfamiliar with firefighting
techniques and equipment.
8.8.4. Cargo fires in trucks and trailers are usually discovered by smell or observing smoke
escaping from around doors and/or from under the tarpaulin. Unless an adequate source of
firefighting equipment is available, do not open the cargo doors or remove the tarpaulin until
the vehicle has been moved to a safe location where help (preferably from a fire department)
can be obtained. After help has been obtained, the doors may be opened cautiously or the
tarpaulin partially removed and the source of the fire determined. It may be necessary to
remove part of the cargo to find the source of the fire.
8.8.5. Tires that are not inflated properly generate excessive heat during operation. This
may result in the tires igniting, especially in dual-wheeled vehicles. Tires dragged along the
road surface because of a locked wheel may begin to burn. Fires resulting from these
conditions may be prevented by keeping the tires properly inflated, recognizing any
difference in the performance of the vehicle that would indicate a locked wheel, and
promptly taking corrective action. If a tire does start burning, it may not be possible to
extinguish it with firefighting equipment. However; further damage may be prevented by
employing the following measures:
8.8.5.1. When possible, attempt to extinguish the fire by covering it with sand, mud or
water.
8.8.5.2. When the wheel cannot be safely removed; drive the vehicle into sand, mud, or
water and cover any exposed parts with mud or a similar substance.
8.8.5.3. When the fire cannot be controlled by the above procedures, use the vehicle
firefighting equipment or other suitable substance to prevent the fire from spreading. Do
not attempt to transport a burned tire on the vehicle unless the fire is completely
extinguished and the tire has cooled to normal temperate.
Section 8D—Roadside Tool Kits
8.9. Spare Tire and Tool Kit. The operator must ensure that the vehicle is equipped with the
proper tools in case of an emergency breakdown. (T-1). The vehicle should have a suitable
jack, lug wrench, and screwdriver; as well as any additional tools based on conditions (such as
bad weather, difficult terrain, warfare, and so forth). The unit Vehicle Control Official will
provide a spare tire, tool kit, and basic issue items for each vehicle. (T-1).
8.10. Highway Warning Kit. This kit has reflectors that can be used in all cases where
warning is necessary (see Figure 8.2).
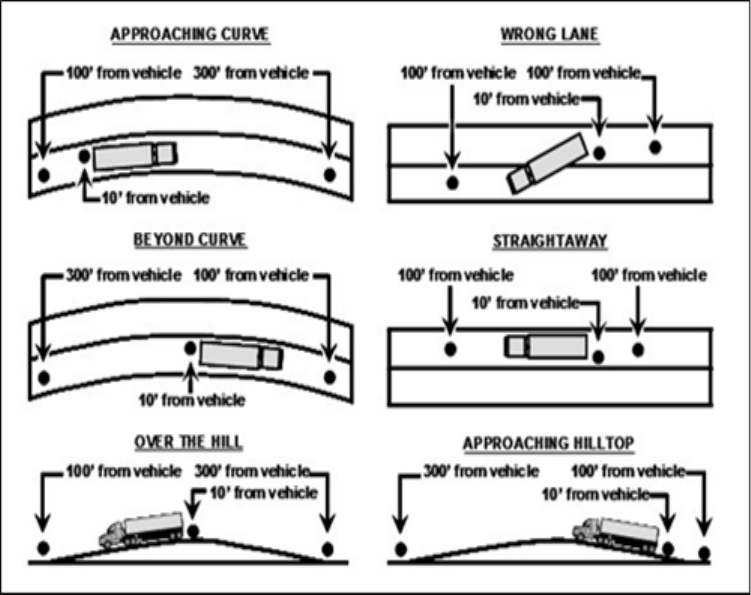
72 AFMAN24-306 30 JULY 2020
8.10.1. All Air Force GMVs, capable of carrying ten or more persons or with a rated
capacity of more than four tons, will be equipped with approved highway warning kits. (T-
0). Vehicles of lesser capacity that regularly operate over public highways will also be
equipped with warning kits. (T-0). These kits stay with vehicles regularly used on public
highways. Additional kits are stored with Ground Transportation. The kits are issued for
specific trips when required.
8.10.2. Convoys will be equipped with one kit for each ten vehicles, with a minimum of two
kits per convoy. (T-1). Of the total kits, at least one will be carried in the trail vehicle. (T-
1). Instructions for use will accompany each kit when issued. (T-1). The unit Vehicle
Control Official will furnish the highway warning kit IAW AFI 24-301. (T-1).
Figure 8.2. Use of Highway Warning Kits.
8.11. Use of Highway Warning Kit. Whenever a vehicle is inoperative or unable to move on a
traveled portion of any highway, the following instructions will be complied with immediately
(except in blackouts or within business or residential districts where traffic conditions do not
permit or warrant the placing of warning devices): (T-0).
8.11.1. Make every reasonable effort to move the vehicle from the traveled portion of the
roadway onto the shoulder if possible.
8.11.2. When lights are required (sunset to sunrise), place a reflector in the obstructed lane,
or on the shoulder of the road if the vehicle is on or over the shoulder, between the vehicle
and the approaching traffic using that lane. Do this before trying to repair the vehicle. Place
the reflectors as follows:
AFMAN24-306 30 JULY 2020 73
8.11.2.1. One reflector in the center of the lane of traffic occupied by the vehicle, not less
than 40 paces (about 100 feet) from the vehicle in the direction of traffic approaching in
that lane. If the vehicle is on or over the shoulder and does not occupy a traffic lane,
place the warning device alongside the edge of the roadway to avoid obstructing the
traffic lane.
8.11.2.2. One reflector on the traffic side of the vehicle 4 paces (about 10 feet) to its rear,
in the direction of traffic approaching in that lane.
8.11.2.3. One reflector not less than 40 paces from the vehicle in the opposite direction.
8.11.2.4. If the motor vehicle is stopped within 300 feet of a curve, crest of a hill, or
other obstruction to view, place one reflector no less than 40 paces or more than 120
paces from the vehicle to afford ample warning to other highway users.
8.11.2.5. When lights are not required (sunrise to sunset), place red flags or reflectors
with flags mounted on them as prescribed for night. Since most warning kits contain
only two flags, the reflector placed 20 feet behind the vehicle will not have a flag
mounted on it. (T-1).
8.11.3. A basic vehicle highway warning kit containing three sets of reflectors and two red
flags which are acceptable in most states. Some states also require items, such as flares in
the kit. However, vehicles transporting compressed gases, explosives, or flammable liquids
will use three red electric flashing lanterns instead of flares. (T-0). Check the kit and/or
additional items periodically to ensure compliance with local legal requirements.
Section 8E—Off-Base Repair Service
8.12. Off-Base Repair Service. Vehicle Management can furnish local procedures and policies
for the off-base area to be served by the installation’s vehicle maintenance crew. When the
vehicle needs service at an off-base location and it is too far away to obtain practical vehicle
maintenance furnished from the base, proceed according to the instructions below:
8.12.1. Contact the vehicle’s owning unit and Vehicle Management to make them aware of
the needed repair and to gain additional guidance and coordination pertaining to repair
services, dispatch support and vehicle recovery.
8.12.2. For most minor repair services, use of the government credit card is authorized IAW
with AFI 24-302.
Section 8F—Accident Response
8.13. Initial Accident Response Procedures. If involved in an accident, always stop and assist.
Exception: The only possible exception to this rule might be in combat or in case of military
necessity when operating under definite orders not to stop.
8.13.1. Assist in acquiring medical attention and/or authorities for the individuals involved
in the accident.
8.13.1.1. If anyone appears injured, render first aid.
74 AFMAN24-306 30 JULY 2020
8.13.1.2. State laws require that police will be summoned to all motor vehicle accidents.
(T-0). The military cooperates with civil authorities that are responsible for investigating
all accidents on public highways.
8.13.1.3. If in an area controlled by armed services police; send for them or ask someone
to do so. The armed services police must complete their own investigation of the
accident. (T-0). Cooperate and assist them in every way.
8.13.2. Whenever practical, the GMV operator or assistant operator (if present) will report
the accident to his/her unit commander using the chain-of-command by telephone as soon as
duties at the scene of the accident have been completed. (T-1).
8.13.3. Emergency roadside repair involves replacing or repairing automotive accessories at
the point of breakdown. Repair is limited to the guidelines of the region responsible for the
installation Vehicle Management and the local installation policies. Repairs of this type
include tires, tubes, batteries, and automotive accessories. When government facilities are
nearby, use them (if possible) instead of commercial facilities. Vehicle Management will
normally advise an operator if a government facility is readily available or if a commercial
source must be used. (T-1). The operator may be held liable for the bill if this procedure is
not followed.
8.13.4. The person who signs for a government credit card is solely responsible for the
control and purchases made with the card. Credit card purchases must be substantiated with
a copy of the service station receipt. (T-0). In addition to the information normally shown
on delivery receipts, ensure that the speedometer reading and the registration (or license)
number of the vehicle and the operator’s name, grade, and organization are put on the receipt.
The receipt must also show the credit card number; date of purchase; name and address of the
station; the grade, quantity, and price per gallon of fuel; and the total amount charged. (T-0).
Upon returning to the base, the operator will return the credit card issued and a copy of any
credit card receipts to Vehicle Management. (T-1).
8.14. Precautions Against Further Accidents. After a motor vehicle accident, the vehicle or
vehicles involved are frequently in dangerous locations. Often a crowd assembles around the
accident.
8.14.1. To prevent additional accidents, damage, or injury; be sure to post guards, flags,
flares, or lights (except in a blackout) to warn all other traffic to proceed with caution.
8.14.2. If civil or armed forces police are present, they will direct traffic. (T-0). If Airmen
are present, they should be asked to act as guards.
8.14.3. Cargo, glass, or other debris spilled on the highway (as a result of the accident)
should be cleared from the road surface as soon as possible.
8.15. Removal of Vehicle From Accident Scene.
8.15.1. Moving the vehicle from the scene of the accident is governed by laws or regulations
of the state or area where the accident occurred. Obtain all the necessary data relating to the
accident before moving the vehicle. If possible, the GMV operator or passengers should
document (drawing, marking, photographing, or otherwise) the exact position of all vehicles
and objects before moving them.
AFMAN24-306 30 JULY 2020 75
Section 8G—Preparation of Accident Forms
8.16. Preparation of Accident Forms. The following forms assist in documenting accidents:
8.16.1. DD Form 518 (Accident Identification Form ). The purpose of the DD Form 518
(Figure 8.3) is to give any persons involved in an accident all of the information required
from the military operator.
8.16.1.1. This form must be filled out at the scene of the accident or as promptly as
possible and given to the person directly concerned. (T-0). If the accident involves a
parked vehicle and the person concerned is not present, place the DD Form 518 in the
vehicle or secure it on the windshield. Notify local authorities and then stand by the
scene of the accident for their arrival, if practical.
8.16.1.2. Disclosure of social security number is voluntary. Based on a failure to share
information, no disciplinary action will be taken in cases where the social security
number is not provided. (T-0).
8.16.2. SF Form 91. Even though an accident is minor or is not the operator’s fault, the
operator must report it so facts are clearly presented and witnesses are identified. (T-0).
This protects the operator and the government against claims and exaggerations. For the
purpose of reporting an accident, use SF Form 91.
Figure 8.3. DD Form 518.
76 AFMAN24-306 30 JULY 2020
8.16.2.1. In completing SF Form 91 (Figure 8.4, Figure 8.5, Figure 8.6, Figure 8.7),
keep the following general instructions in mind:
8.16.2.2. Secure hard-to-get facts first. The first responsibility of the operator, after
ensuring that the vehicle will not cause another accident, is that the injured are cared for,
and other precautions are taken. (T-1). The operator should also get the names and
addresses of the people involved in the accident and of all witnesses. If this is not done
promptly, it may be impossible to later get the information.
8.16.2.3. Do not leave the scene of the accident until all pertinent facts concerning the
accident have been obtained. This information should include the following:
8.16.2.3.1. Condition of the road.
8.16.2.3.2. Position of the vehicles.
8.16.2.3.3. Amount of damage involved.
8.16.2.3.4. Any other information that may be relevant, but difficult to remember at a
later time.
8.16.2.4. After obtaining the information required for the report that may include
information from others, the operator should complete the sections of the SF Form 91. Be
exact. Be sure the report gives a clear picture of what actually happened.
8.16.2.4.1. If another vehicle is involved, the operator’s diagram of the accident
should show exactly where the vehicles were before and after the crash and exactly
what obstacles blocked either driver’s view.
8.16.2.4.2. Every name should be spelled correctly and every street address listed by
number. On highways where there are no house numbers, use mileage markers,
power line or telephone pole numbers, or intersecting roads to pinpoint the location of
the accident.
8.16.2.4.3. State the visible damage (for example, crushed right rear wheel, bent or
broken axle, crumpled fender, and so on). If a party claims that damage has occurred,
but it is not visible to the operator, a note indicating this should be made.
8.16.2.4.4. Follow the same procedures with injuries. If an injury is visible, write it
down. If the injured party claims an injury that is not visible, make a note of the
injured party’s complaint.
8.16.2.4.5. If it is not possible to obtain the exact information on an item, write
“unknown.” If there is a section that does not pertain to the accident, write “N/A” or
“NONE.” Make an entry in every blank, to assure the reviewer that nothing was
overlooked.
8.16.2.5. Never express an opinion (either orally or in writing) to claimants or their
agents concerning liability, investigation findings, or the possibility of claim approval.
8.16.2.6. If more space is needed, use a separate sheet of paper to answer a question.
Write “see attached” in the space by the question on the report and attach the extra sheet
firmly to the report form.
AFMAN24-306 30 JULY 2020 77
8.16.2.7. Check each item. As an agent for the United States government, it is the
operator’s responsibility to ensure that all information is obtained and is accurate. If
provided information does not seem legitimate, do not hesitate to further question the
other driver.
8.16.2.8. Any employee of a federal agency who fails to accurately report a motor
vehicle accident involving a federal vehicle may be subject to administrative action.
Figure 8.4. Sample Form of SF 91 (Page 1).
78 AFMAN24-306 30 JULY 2020
Figure 8.5. Sample Form of SF 91 (Page 2).
AFMAN24-306 30 JULY 2020 79
Figure 8.6. SF Form 91 (Page 3).
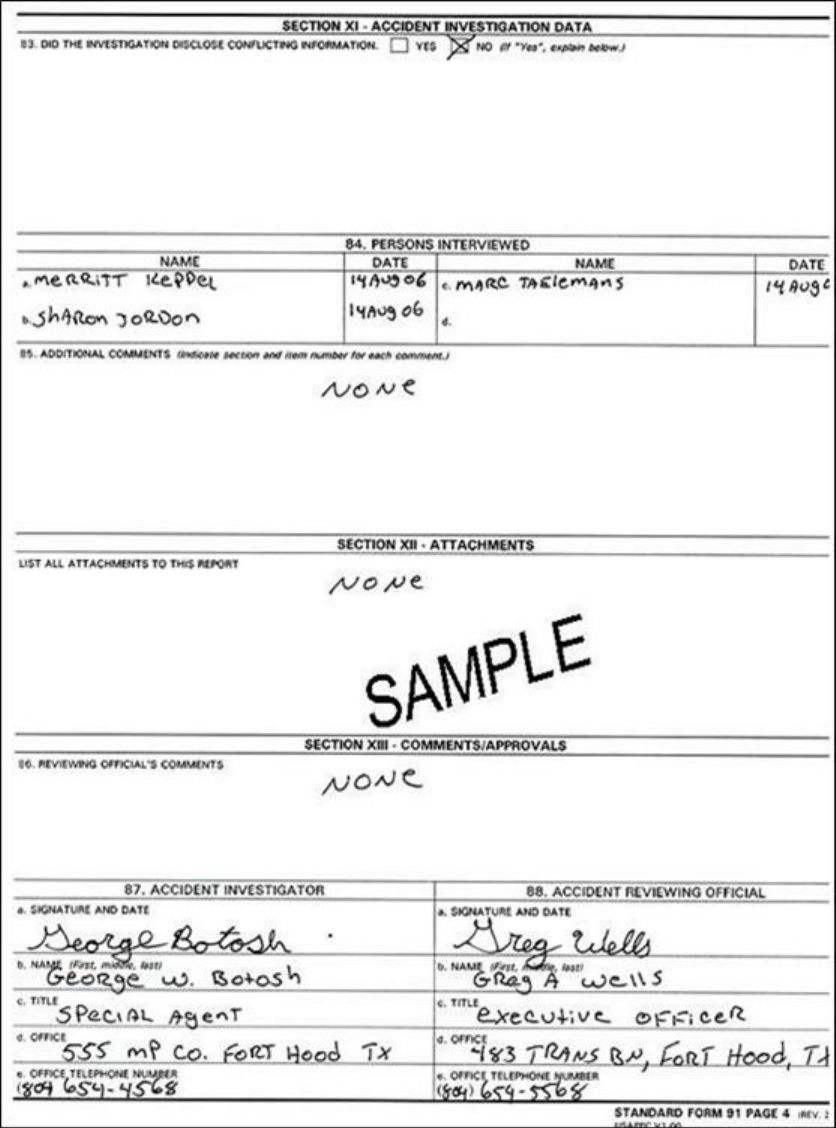
80 AFMAN24-306 30 JULY 2020
Figure 8.7. SF Form 91 (Page 4).
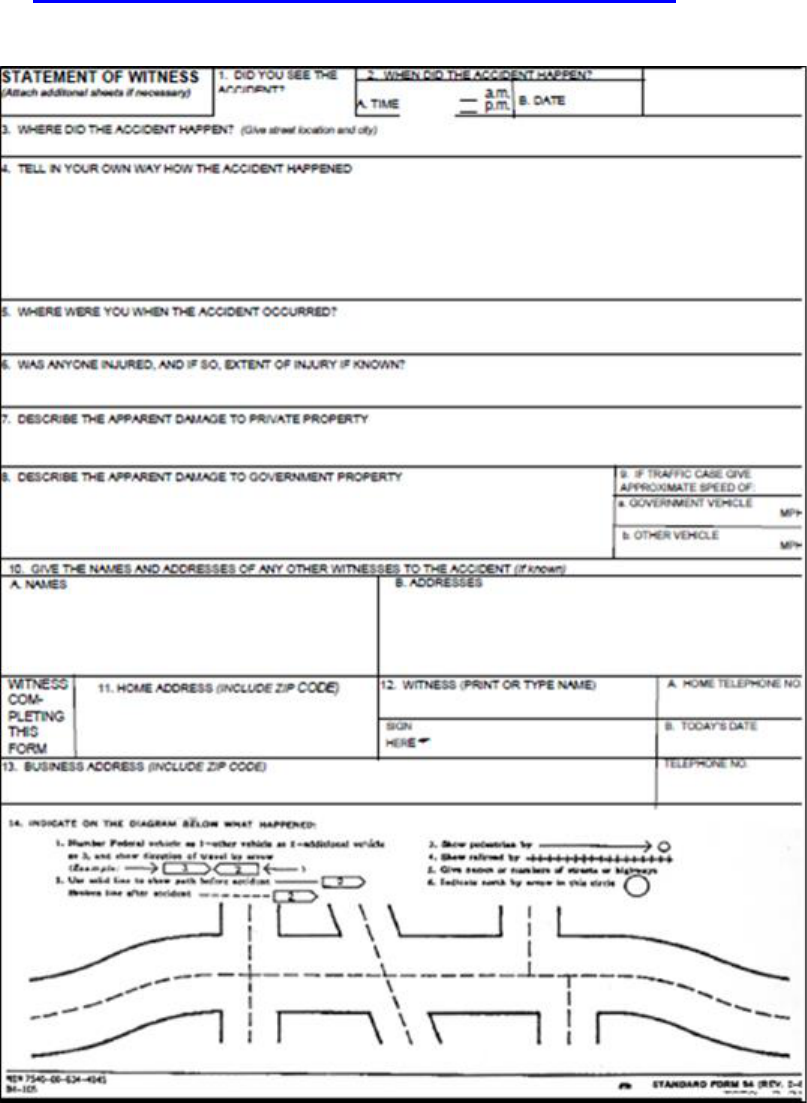
AFMAN24-306 30 JULY 2020 81
8.16.3. SF Form 94. This form must be filled out at the scene of the accident or as promptly
as possible and given to the person directly concerned. (T-0). If the accident involves a
parked vehicle and the person concerned is not present, place the SF 94 in the vehicle or
secure it on the windshield. Notify local authorities and then stand by the scene of the
accident for their arrival, if practical. See Figure 8.8 available at
https://www.gsa.gov/cdnstatic/SF94-17a.pdf?forceDownload=1.
Figure 8.8. SF Form 94.
82 AFMAN24-306 30 JULY 2020
Chapter 9
LOADING AND TIE-DOWN PROCEDURES
Section 9A—Loading and Tie-down Procedures General Information
9.1. General Information. This chapter covers the general aspects of transporting various
types of cargo with military vehicles. It does not cover every configuration of loading cargo.
Within CONUS units must adhere to local, state and interstate laws and regulations. Within
foreign countries, host nation guidelines/restrictions must be complied with. (T-0). For overseas
combat theaters of operation, combatant commanders must consider host nations
guidelines/restrictions when developing movement criteria for cargo. (T-0). For more detailed
information on loading and tie-down procedures and required compliance, refer to DTR 4500.9-
R Part II, Cargo Movement and Surface Deployment and Distribution Command Transportation
Engineering Agency (SDDCTEA) Pamphlet 55-20, Tie-down Handbook for Truck Movements.
Section 9B—Cargo Responsibility and Distribution
9.2. Responsibility for Cargo. The operator should help load his/her vehicle to ensure that the
load is properly secured to avoid damage during movement. The operator is responsible for the
cargo from the loading point to receipt at destination.
9.2.1. Inspect all cargo loaded in the vehicle.
9.2.2. Be sure that its weight does not exceed the vehicle’s capacity and that it is secured
against falling or shifting.
9.2.3. Shippers must ensure they have adequate chains, cables, or special tools required to
secure a load when blocking, bracing, or banding. (T-0).
9.2.4. After the load has been secured to the vehicle, recheck security before covering the
load. This may prevent shifting or loss of load en route.
9.2.5. The operator covers the load with the tarpaulin and lashes the tarpaulin in place.
9.2.6. Protection Against the Weather. Use the sides, tailgate, tarpaulin, curtains, and
ropes on the vehicle whenever needed to protect the load from rain, snow, sun, sand, or dust.
Draw tarpaulins tight over the bows or sides. Tie them down to the proper cleats with the tie-
down ropes, using two half hitches.
9.2.6.1. If properly tied down the canvas should look neat and be free from wrinkles and
bulges.
9.2.6.2. If improperly placed on the vehicle, the canvas develops rubbed spots and tears
that could reduce the tarpaulin’s effectiveness and may damage the cargo.
9.2.6.3. If the canvas is not in use, it should be folded, stored, and secured during
transport. However, to prevent mold and mildew, the canvas should not be stored if it is
wet. As soon as practicable after the job is done, spread out the wet canvas and let it dry
before storing it.
AFMAN24-306 30 JULY 2020 83
9.2.7. Protect Against Pilferage. When cargo is protected against the weather, it is also
protected, to a degree, against pilferage. However, a GMV operator must stay constantly
aware of this danger. (T-0). Keeping close watch of people approaching the vehicle
provides the best protection. Loads may be pilfered while moving, as well as while halted.
If the cargo is particularly valuable or if operating in an area where theft is common, armed
guards may be assigned to assist with transporting the cargo.
9.2.8. Protection Against Casual Observation. When cargo is protected against the
weather, it is also protected against casual observation. Security for sensitive loads is very
important in a tactical situation. If the enemy is unable to identify a high-priority target that
the vehicle is carrying, chances of mission success have just been significantly improved.
Operators of GMVs should strive to constantly improve on concealing the identity of their
cargo in a threat environment. Load lashing and camouflage screens can be used for this
purpose.
9.3. Distribution of Cargo. The distribution of cargo definitely bears on the life of the tires,
axles, frame, and other vehicle parts. Although a vehicle may not be overloaded beyond its
weight capacity, individual tires and axles may still be overloaded due to faulty cargo
distribution (see Figure 9.1, Figure 9.2 and Figure 9.3).
9.3.1. Learn the capacity of any vehicle assigned to operate before leaving the dispatcher’s
office. No vehicle should be loaded beyond its rated capacity without written authority from
supervision. Operators can usually get the weight of the load from the shipping agency. If in
doubt about the weight of special loads, contact supervision for instructions before moving.
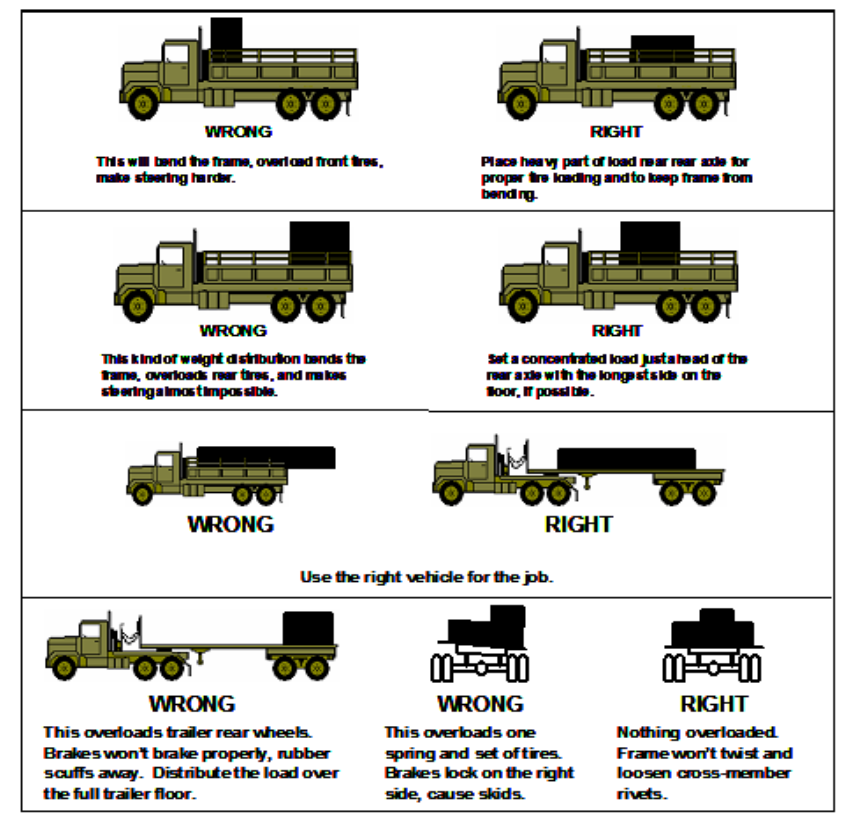
84 AFMAN24-306 30 JULY 2020
Figure 9.1. Load Distribution.
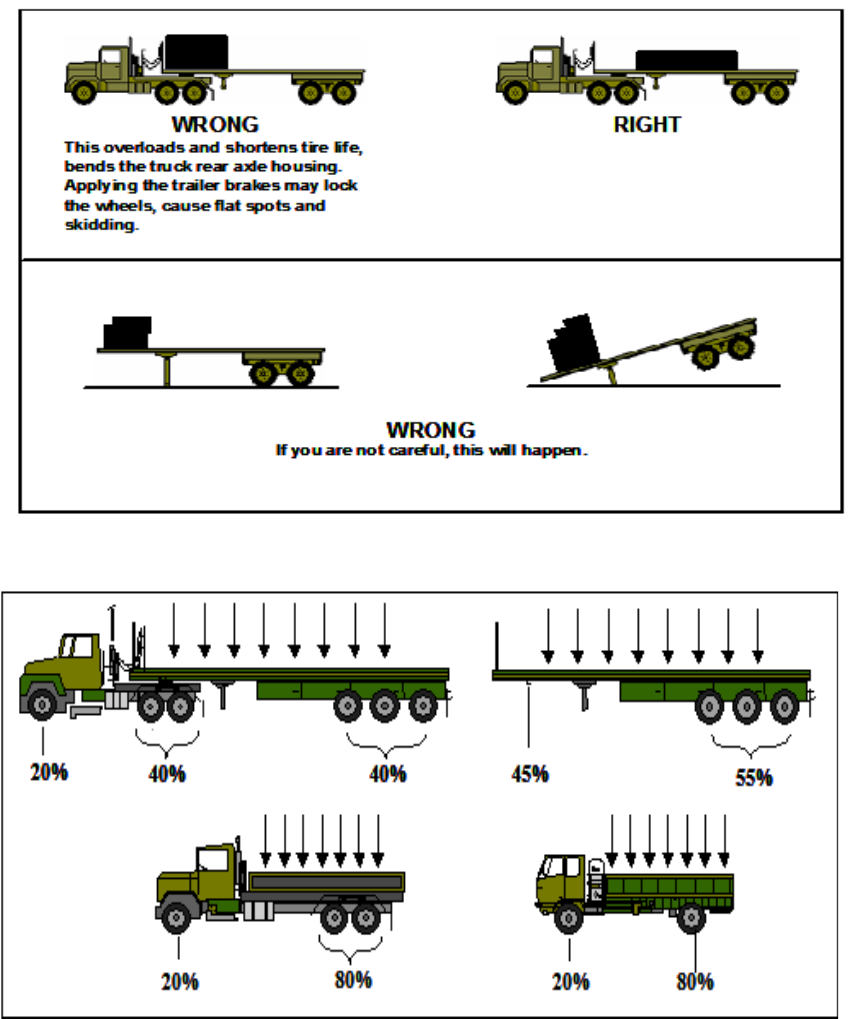
AFMAN24-306 30 JULY 2020 85
Figure 9.2. Load Distribution (Continued).
Figure 9.3. Load Distribution (continued).
9.4. Loading and Tie-down Safety. Safety is everyone’s responsibility. The operator must
receive adequate instruction on safe practices when vehicles are operated. (T-0). Safety,
properly taught and constantly emphasized, prevents much needless manpower and equipment
loss during decisive military operations. Refer to AFI 91-207 and AFMAN 91-203 to define
safety responsibility. A few of the safety hazards associated with vehicle loads that should be
avoided are as follows:
86 AFMAN24-306 30 JULY 2020
9.4.1. Loading heavy loads on top of lighter loads. This may cause damage to both the
load and vehicle and may cause the vehicle to overturn easily during movement due to a
higher center-of-gravity.
9.4.2. Stacking load on vehicle beyond recommended limits (too high). Depending on
the weight, this may cause the vehicle to overturn or loss of load from low overpasses.
9.4.3. Unbalanced loads. This may prematurely cause undue wear or failure of vehicle
components and cause degradation of vehicle control.
9.4.4. Failure to recheck load security en-route. Loads may shift during movement
causing loss of load or a vehicle accident.
9.4.5. Using inadequate or unserviceable tie-down devices. Failure to ensure the integrity
of the tie-down equipment may result in loss of load, a vehicle accident, and injury to
personnel.
9.4.6. Using inadequate lifting devices. This may cause damage to lifting device and or
injury to personnel when attempting to lift loads that exceed the maximum capacity.
9.4.7. Personnel under a suspended load. This violation may cause serious injury or death
to personnel if load falls.
9.4.8. Controlling a suspended load. Failure to comply may cause suspended load to
swing uncontrollably into vehicle or personnel causing injury or damage.
9.4.9. Smoking or open flame during refueling. Failure to comply with no smoking rules
may cause serious injury or death to personnel or destruction of vehicle and loads.
9.4.10. Driving too fast with loaded vehicle. Despite recommended speeds being posted
on roadways, a loaded vehicle may require even slower speeds. Failure to comply may result
in an overturned vehicle and injury to personnel.
9.4.11. Damage to load due to improper tie-down. This may cause damage to the load
and tie-down materials from sharp edges. Over tightening straps may crush certain palletized
loads.
9.4.12. Failure to properly placard a vehicle carrying hazardous cargo. In the case of an
accident this may prevent local emergency crews or recovery personnel from determining the
hazard posed by spilled cargo and summoning appropriate aid.
9.5. Vehicle Safety Standards. These vehicle safety standards are applicable to loading and
tie-down. Before vehicle dispatch, the chain-of-command should ensure that operators perform
before, during and after operational checks to prevent the following: A non-mission-ready
vehicle, improperly secured loads, vehicle loaded beyond design load limits, unsafe
transportation of personnel.
9.6. Types of Loads. Cargo can come in most any configuration. The GMV operator may be
required to move cargo that is configured in one or more ways. Examples are listed below.
9.6.1. Bulk cargo is defined as cargo that is not packaged in bundles or containers.
9.6.2. Palletized cargo is defined as cargo that has been placed on a standardized platform
for shipment. In the Air Force’s case, the standard platform is the 463L pallet. Cargo may
be shipped on wooden shipping pallets as well.
AFMAN24-306 30 JULY 2020 87
9.6.3. Vehicle payload is defined as a tracked or wheeled vehicle being transported on a
wheeled vehicle or semitrailer to its destination.
9.6.4. Passenger cargo is defined as transporting personnel, with or without equipment, in a
vehicle designed to accommodate such a load with installed troop seating and safety device.
9.6.5. Containerized load is defined as containers that are placed on semitrailers so that the
weight of the load is spread evenly over the trailer bed.
9.7. Special Loads. When transporting a load that extends beyond the sides or more than 4 feet
beyond the front or rear, mark the part of the load that extends beyond the truck body with red
flags (measuring not less than 12 inches square) in daytime and with red lights at night. On
loads extending one-third or more the length of the cargo bed, determine if a special permit is
required as explained below.
9.8. Load Compatibility.
9.8.1. For certain ammunition and explosives, compatibility standards must be strictly
enforced. (T-0). When ammunition, in either commercial or military conveyance, is to be
transported along or across roads accessible to the public, Department of Transportation
compatibility rules shall apply. (T-0). For more information, see 49 CFR Parts 171-179,
Highways and Railways, 49 CFR Parts 390-397, Federal Motor Carriers, and OSHA
1926.902, Surface Transportation of Explosives.
9.8.2. When ammunition is transported along or across roads that are not accessible to the
public or roads that are clearly posted as prohibited to the public, ammunition may be
transported according to the stowage compatibility chart. For more information, see 49 CFR
173.52, Classification Codes and Compatibility Groups of Explosives, and 49 CFR 175.78,
Stowage Compatibility of Cargo.
9.8.3. When ammunition is transported in the training area on the installation, by Airmen on
a training exercise using tactical vehicles, the vehicles may transport a mix of ammunition
similar to that the vehicles would carry in combat, provided the vehicles do not cross or
move along a route accessible to the general public.
9.8.4. Incompatible loads may be transported on public roads during times of war,
contingency operations (not contingency exercises) or declared national emergencies when
Department of Transportation-Special Permit (SP) 3498 has been invoked and the shipper
complies with all provisions of that exemption (see 49 CFR 175.78).
9.9. Load Configuration.
9.9.1. Vertical Height of Load. When vehicles are loaded with substantial weight
concentrated high above the ground, the possibility of a high center of gravity exists. This
situation becomes critical when trying to drive around a corner or make a short-radius turn at
too great a speed. When this occurs, centrifugal force, which is always present in turns,
joined by the high center of gravity point, results in an increased tendency of the load to tip
over. To preclude this and possible damage to the vehicle and cargo:
9.9.1.1. Load the heaviest items on the bottom of the vehicle.
9.9.1.2. Avoid stacking heavy items too high.
9.9.1.3. Slow the vehicle before turning and watch and listen for possible load shifting.

88 AFMAN24-306 30 JULY 2020
9.9.2. Oversize and Overweight Cargo. Before operating a truck or trailer loaded with
unusually heavy or odd-size loads, check with the operator to determine if the load is within
state and local laws limiting load weight and dimensions on public highways. The operator
must arrange to obtain special permits before moving oversize or overweight vehicles on
public highways. (T-0). Refer to the SDDCTEA, Highways for National Defense program
for questions, concerns or assistance.
(http://www.sddc.army.mil/sites/TEA/Functions/SpecialAssistant/Pages/HighwaysNatio
nalDefense.aspx.).
9.9.3. Over-height. When transporting a load that exceeds 13.5 feet in height from the
ground, the operator must request clearance and permits to transport the load. (T-0). This
gives the operator route guidance that is safe for movement.
9.9.3.1. Operators should be issued a 25-foot tape measure or telescoping ruler to
measure from the highest point of the load to the ground and from side-to-side for width.
Units can fabricate a “telltale” or “bang bar” to determine height before vehicle’s
departure. Units should consider fabricating one for deployment away from their
installation.
9.9.3.2. The chain-of-command must always anticipate that a load may be picked up at a
receiving point or remote loading area, such as a port or terminal that does not have a
method of verifying the load’s height, width, or weight. (T-1).
9.9.3.3. If a chance of this occurs, the chain-of-command must develop clear guidelines
for the operator to report exceeding dimensions. (T-1).
9.9.3.4. Do not move the load if uncertain of its oversize dimensions. It is highly
recommended that units assign assistant operators to aid in this determination and
movement of “oversized loads through tight spots.”
9.9.4. Overhead Clearance. Know the overhead clearance of the vehicle. Signs on most
overpasses indicate the clearance in feet and inches. When transporting an unusual load, if
not completely sure of the clearance, drive very slowly when approaching the underpass
allowing enough time to stop if the load or vehicle cannot clear. Be aware of other low
hanging objects, such as electrical wires, traffic lights, and tree limbs.
9.10. Perishable Cargo. Perishable cargo normally consists of fresh foods. Prompt delivery is
essential. Vehicles that transport fresh consumable items must be kept clean and free from
contamination and odors. (T-0).
9.11. Types of Tie-down Devices. Tie-down devices used to secure cargo to vehicles, trailers,
and semitrailers can be dangerous if mishandled. Before use, inspect all items to ensure their
integrity and replace as necessary any item that is deemed unserviceable. Tie-down materials
may come in any one of the following configurations.
9.11.1. Chains and load binders.
9.11.2. Wire rope and turnbuckles.
9.11.3. Wire rope and cable clamps (U-bolts).
9.11.4. Wire rope with chain hoist and cable grippers.
9.11.5. Web style ratchet and strap assemblies.
AFMAN24-306 30 JULY 2020 89
9.11.6. Steel banding with crimp joints.
9.12. Load binders. Load binders come in four types (see Figure 9.4).
9.12.1. The ratchet load binder can achieve significantly greater tie-down forces than the
other types of load binders. Of the load binders shown, the ratchet and type IV are safest.
9.12.2. Other types of load binders may spring back with great force upon release. See
SDDCTEA Pamphlet for further details on load binders.
9.12.3. Turnbuckles may be used in the absence of load binders. See paragraph 9.16 for
further details in the use of turnbuckles. Securing a load with this equipment is discussed
later in this chapter under “Securing the Load.”
9.12.4. Be careful when releasing type I, II, and IV load binders. Stay clear of the swing-
path of the load binder handle.
9.13. Chains. Chains used in the tie-down of cargo come in 7/16, 3/8, 1/2, and 3/4 inch sizes.
Table 9.1 depicts detailed information concerning each size.
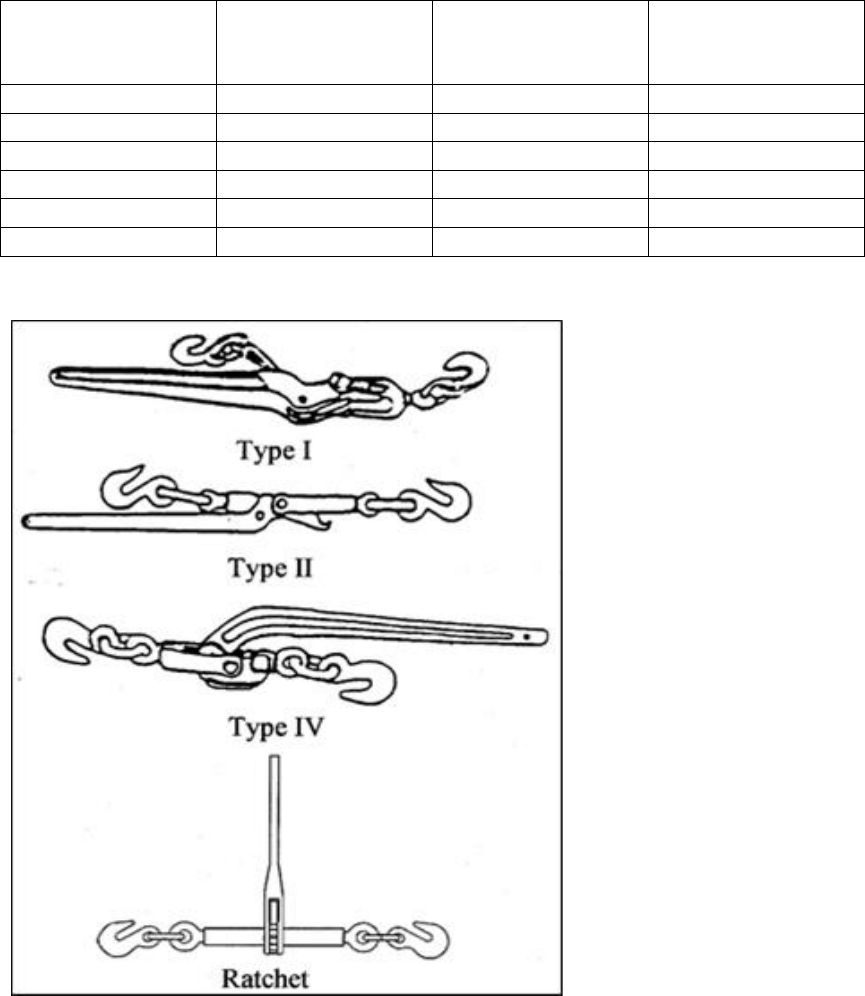
90 AFMAN24-306 30 JULY 2020
Table 9.1. Chain Characteristics.
NSN
Working Load
Limit
(lb.)
Breaking Strength
(approximate lb.)
Size
4010-00-443-4845
6,600
13,200
3/8”x 141/2’
4010-00-803-8858
8,250
16,500
1/2”x 10’
4010-00-047-3902
10,350
20,700
7/16”x 16’
4010-01-361-8378
12,500
50,000
1/2”x 7’
4010-01-371-5772
12,500
50,000
1/2”x 11’
4010-00-449-6573
16,800
50,400
1/2” x 12’
Figure 9.4. Types of Load binders.
9.14. Wire Rope. If chains are not available, wire may be used.
9.14.1. Wire rope comes in 1/4”, 3/8”, 1/2”, and 5/8” sizes depending on the load weight.
Wire rope is rated in nominal strength; actual strength may vary.
9.14.2. When wire rope is assembled in a complete loop using wire rope clamps, the strength
should be calculated as 80 percent of twice the value of the nominal strength. With an end
loop, the strength should be calculated as 80 percent of the wire rope (see Figure 9.5 and
Table 9.2).
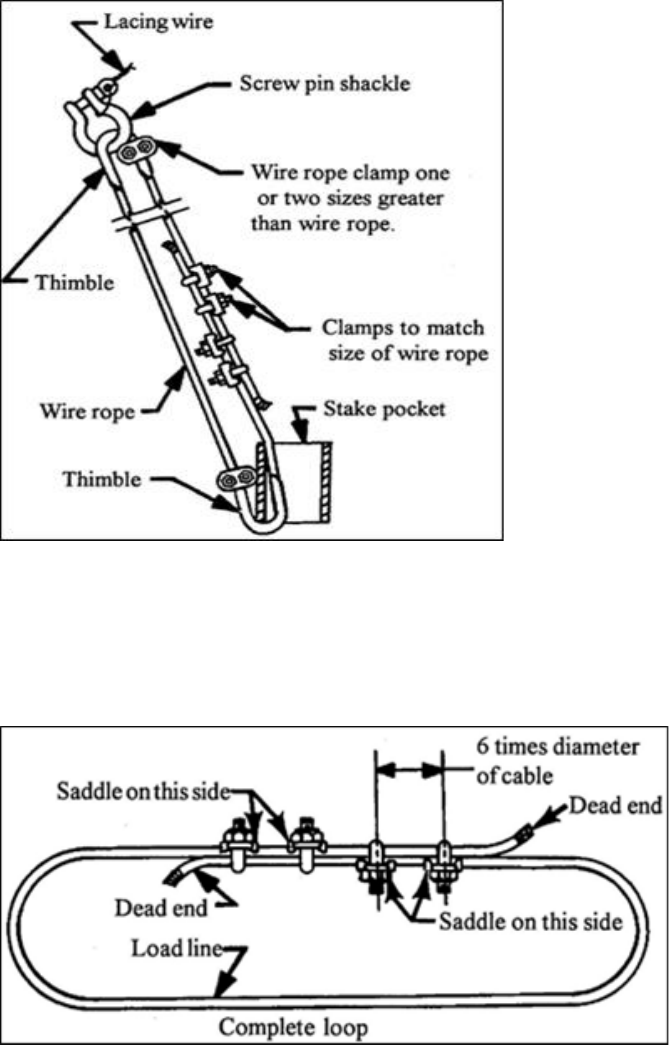
AFMAN24-306 30 JULY 2020 91
Figure 9.5. Wire Rope.
9.15. U-Bolts (Clamps). These devices go on the dead end of wire rope because the U-bolt
introduces a stress concentration that may weaken the wire rope. The saddle has a large surface
and does not cause this type of damage. The clamps are applied with U-bolt near the end of rope
limiting damage to the less critical part of the rope (see Figure 9.6).
Figure 9.6. U-Clamps.
9.15.1. If a torque wrench is not available, adequate torque can be attained by:
9.15.1.1. For 3/8-inch clamps, use 12-inch-long wrench and apply a force of about 50
pounds.
9.15.1.2. For 1/2-inch clamps, use a 15-inch-long wrench and apply a force of about 60
pounds.
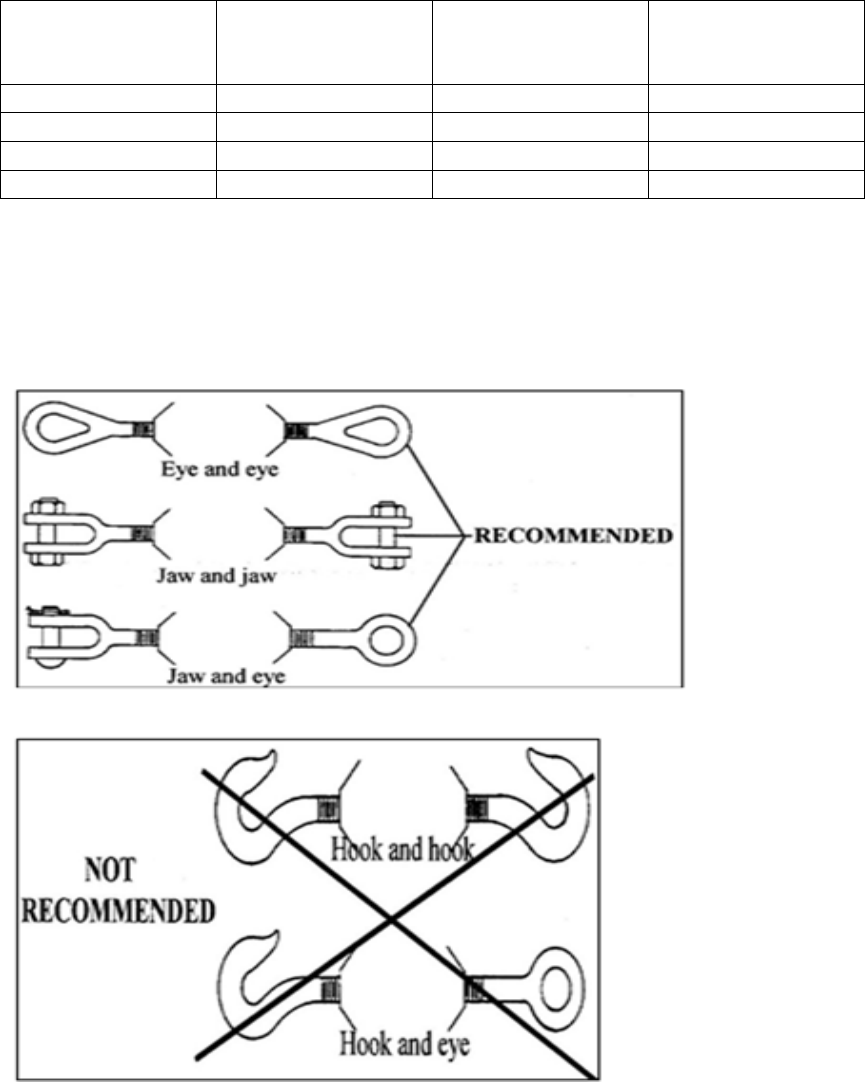
92 AFMAN24-306 30 JULY 2020
9.15.1.3. For 5/8-inch clamps, use a 24-inch-long wrench and apply force of about 70
pounds.
9.15.1.4. See Table 9.2 for characteristics of wire rope.
Table 9.2. Wire Rope Characteristics.
Size
Stock Number
Nominal Strength
(lb.)
Required Clamp
Torque (foot-
pound)
1/4”
4010-00-269-9324
5,880
25
3/8”
4010-00-272-8849
13,120
45
1/2”
4010-00-272-8848
23,000
65
5/8”
4010-00-763-9361
35,800
130
9.16. Turnbuckles. Turnbuckles can be used to properly apply tension to wire rope.
Turnbuckles can also be used with chains if load binders are not available. Turnbuckles with
jaws and/or eyes should be used. Hook end turnbuckles are not recommended because they are
weaker than a jaw or eye turnbuckles of the same size (see Figure 9.7).
Figure 9.7. Turnbuckle Types.
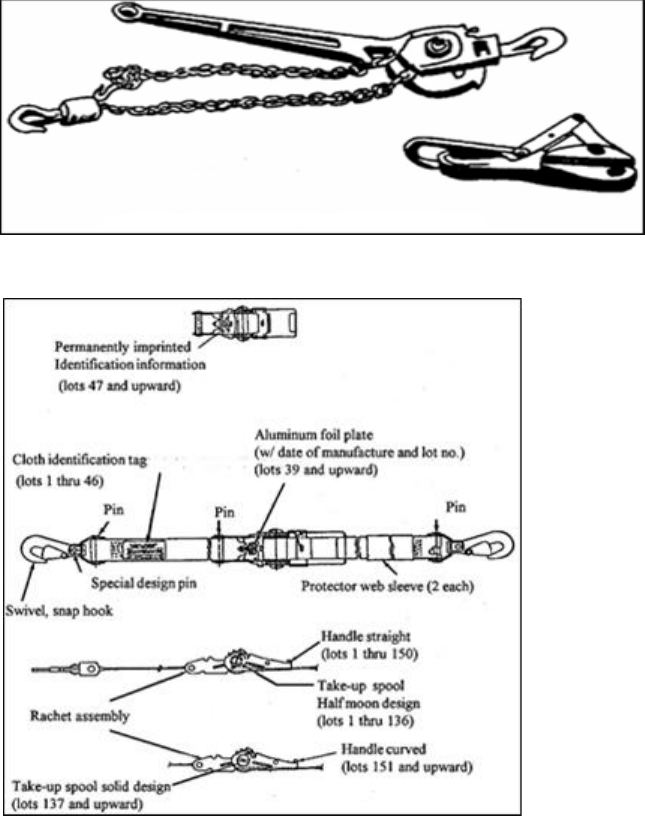
AFMAN24-306 30 JULY 2020 93
9.17. Chain-Hoist and Cable Grippers. Instead of a turnbuckle, a chain hoist and cable
grippers may be used to tension the wire rope attached to the payload vehicles. Be sure that at
least 24 inches of wire rope are available on either side of the intersection point to allow proper
application of cable clamps. Also, be sure proper tension of wire rope exists. Tension wire rope
to allow no more than 1-inch of deflection when supporting the weight of a 200-pound person
(see Figure 9.8).
9.18. Web-Style Ratchet and Strap Assemblies. Web straps are easy to use to secure boxes
and pallets for transport. NSN 1670-00-725-1437 and NSN 5340-01-204-3009 are rated at 5,000
pounds (see Figure 9.9).
9.18.1. When using web straps to secure loads on pallets, padding may need to be placed
between the load and the hooks to prevent the hooks from damaging the load. Figure 9.10
and Figure 9.11 show typical loads secured to the cargo bed of the vehicle with straps. Steel
banding is used to secure the items together.
Figure 9.8. Cable Grippers and Chain Hoist.
Figure 9.9. Web-Style Strap and Ratchet Assemblies.

94 AFMAN24-306 30 JULY 2020
Figure 9.10. Strap-Secured Load.
Figure 9.11. Strap or Banded Load.
AFMAN24-306 30 JULY 2020 95
9.19. Steel Banding. Steel banding is an effective way to secure a load for transport, if the
equipment to tighten and crimp the bands is available. This type of banding can be used for all
modes of transport.
9.19.1. Rail transport is the only mode that has specific requirements for steel bands and
crimping the bands. If the band requirements meet rail transport they will not have to be
changed during truck transport. (T-0). See Figure 9.12 for the types of crimps approved for
rail transport and appropriate for highway transport.
9.19.2. The railroad banding requirements generally reflect proper band application as
developed by the Association of American Railroads and labeled as required. The banding
suppliers should be aware of these requirements. Figure 9.13 shows a typical load secured
to a cargo bed of a vehicle.
9.19.3. Blocking is typically used to prevent the load from moving longitudinally and
laterally. Steel banding is also good for binding together several items with identical
dimensions without blocking. Blocking may be nailed directly to wood deck semitrailers or
it must be against the end and side walls of the cargo vehicle to prevent it from shifting
during transport. (T-0).
Figure 9.12. Crimp Type Joints.
96 AFMAN24-306 30 JULY 2020
Figure 9.13. Load Secured by Steel Banding.
9.20. Inspection of the Load. It is imperative that the load be inspected prior to loading and
during transport. If the load is palletized or pre-configured for combat missions, the emphasis
should be placed on compatibility of items loaded together and the integrity of the overall load.
9.20.1. Check for obvious damage to the load and leakage from fluid containers. Leakage
from petroleum-based products can significantly degrade the integrity of nylons-type web-
straps. If this type of leakage is present, then consideration should be made as to
removal/replacement of leaking container and possibly any contaminated web-straps.
9.20.2. See inspection of tie-down equipment in next section for detailed inspection criteria.
9.20.3. Check to ensure boxes, crates, or other containers have not been damaged or
positioned as to allow for damage during transport. Preconfigured loads such as those loaded
onto flat racks undergo severe tilting during loading and unloading.
9.20.4. Ensure the load is secured to the flat racks in such a manner that the load is not
unbalanced causing and unsafe condition during loading or transport.
9.20.5. Loads that are not preconfigured or already palletized, such as crates, loose boxes, or
un-palletized ammunition should be loaded in a manner that considers load compatibility,
weight, balance, and outside dimensions.
9.20.6. If the load has shifted during transport the operator must take actions to correct the
problem prior to regaining movement. (T-0).
9.20.7. If any unsafe load condition exists see supervision for disposition of load prior to
loading and transport.
9.20.8. Hazardous Cargo to be transported on payload vehicles for air transport by the Air
Force should conform to guidelines/restrictions found in AFMAN 24-204, Preparing
Hazardous Materials for Military Air Shipments.

AFMAN24-306 30 JULY 2020 97
9.21. Inspection of Tie-down Equipment.
9.21.1. Web strap Assemblies. Before each use, straps should be inspected for burns, tears,
punctures, cuts, caustic damage, oil or grease contamination, and frayed or broken stitches.
Also, their metal parts should be inspected for improper operation, corrosion, cracks, or
distortion. If any of these conditions exist, the tie-down should be replaced. They should not
be used for any mode of transport if they have been damaged. No strength testing of straps
will be made. (T-0).
9.21.2. Load binders. Visual inspection of load binders consists of examining, noticing the
defect, and classifying the defect as major or minor (see Table 9.3). If the defect is classified
as major, refer defect to supervisor for disposition. When in doubt, do not use.
Table 9.3. Load binder Inspection Criteria.
Defect
Classification
Major
Minor
Finish, Protective
Any breaks through
coating into metal
X
Any area of rust of
corrosion
X
Dirt, oil, grease, or
other foreign matter
X
Materials
Component not
fabricated of
specified material
X
Design
Any characteristic
not IAW the
specified
requirements.
X
Construction and
Workmanship
Any component
cracked, fractured
or otherwise
damaged affecting
serviceability.
X
Defective or other
damage, not
affecting
serviceability
X
Any component
missing
X
Any operation
omitted or not
performed as
specified.
X
Any sharp edges,
butts, or metal
slivers
X

98 AFMAN24-306 30 JULY 2020
Functioning
component that
requires abnormal
force to operate.
X
Any part not
assembled or joined
as specified
X
Identification
Markings
Missing,
incomplete, not
legible, or incorrect
X
9.22. Transferring the Load. It is vitally important to ensure that proper preparations are made
to ensure a safe transfer of the load to and from the load-carrying vehicle. MHE is used for this
purpose. Many tactical vehicles come equipped with such equipment to load and unload cargo
without the need of additional fork lift trucks or cranes on site. Prior to lifting and transferring a
load, the vehicle and the MHE must be inspected to ensure a safe operation. (T-0). Refer to
vehicle Manufacturer’s Operator’s Manual and respective lesson plan written for inspection
criteria for both the vehicle and the MHE. As with any operation of this type, transferring a load
can be a dangerous operation. Consider the following points for a safe load transfer operation:
9.22.1. Ensure the load itself is prepared for movement by:
9.22.1.1. If palletized, ensuring pallet is intact and cargo net is secured properly.
9.22.1.2. If not palletized, ensuring web strapping is securely holding the contents
together for shipment.
9.22.1.3. Attach guide ropes to control load during transfer.
9.22.1.4. Prepare MHE for operation. Refer to vehicle or Manufacturer’s Operator’s
Manual, Technical Order and respective lesson plan written for details on equipment
setup and emplacement.
9.22.1.5. Determine who is to direct the transfer and ensure all participants are informed.
Inform MHE operator that if any hand signal is obscured or not clearly understood, to
stop movement of load.
9.22.1.6. Designate guide rope handlers and ensure they all know where the load is being
transferred to.
9.22.1.7. Ensure all participants clearly understand all hand and arm signals required for
a safe operation. Misunderstood signals could spell disaster when moving heavy or
dangerous cargo.
9.22.1.8. Ensure personnel not involved in transfer of load to move to a safe location out
of the way.
9.22.1.9. Position cargo on load-carrying vehicle according to established load plans for
type and amount of load. If ammunition or explosives are involved, ensure compatibility
standards are not violated.
AFMAN24-306 30 JULY 2020 99
9.22.1.10. DO NOT allow personnel to stand or walk under a suspended load. Failure to
comply may result in death or serious injury if the load should fall. Ensure load is under
total control during transfer. Failure to comply may result in death or serious injury to
personnel from an uncontrolled, swinging load.
9.22.1.11. DO NOT allow anyone to stand or walk between moving load and sides of
vehicles where they could become pinned. Failure to comply may result in death or
serious injury
9.23. Blocking and Bracing. Blocking and bracing may be necessary on certain types of loads
or partial loads. This usually applies in partial loading of cargo vehicles or semitrailers.
Blocking and bracing may be accomplished by the shipping element or the unit depending on the
load or mission. Since the GMV operator is responsible for delivering the load intact, being
knowledgeable of how to block and brace a load becomes necessary.
9.23.1. Generally, bulk cargo is shipped as palletized loads thus minimizing or eliminating
the need for blocking and bracing for truck movements. However, certain un-palletized
loads such as 55-gallon barrels of lubricants may be shipped individually and should be
blocked and braced for safe transport (see Figure 9.14 and Figure 9.15).
Figure 9.14. Bracing a Load of Barrels.

100 AFMAN24-306 30 JULY 2020
Figure 9.15. Load Arrangement of Ammunition.
9.24. General Rules for Blocking and Bracing. It is important to properly secure the load to
ensure safe arrival of cargo. Here are some general steps in blocking and bracing.
9.24.1. Block crates, boxes, and barrels to keep them from shifting en-route.
9.24.2. Use crib blocking whenever possible. It need not be nailed to the floor or sides if
placed tightly against the cargo to reduce damage to the floor and sideboards of the vehicle.
9.24.3. If a gap exists between pipes or lumber and the end of the trailer, block the load with
a gate constructed with 4 by 4 inch boards to prevent it from slipping.
9.24.4. All lumber used for blocking must be free of knots and strong enough to provide a
rigid and stable support for the load en-route. (T-0).
9.25. Securing the Load. This section does not cover all possible load platform/configurations.
However, it can cover commonly used platform/configurations.
9.25.1. Generally, the load is evenly distributed within the cargo area. Ensure that vehicle
load is configured and distributed so that it produces as low a profile as possible. This
reduces the vertical center-of-gravity thus decreasing the chances of vehicle rollover on
rough terrain or if the load shifts during movement. An additional benefit of keeping the
load center-of-gravity low is the ability to avoid overhead obstacles along the route.
AFMAN24-306 30 JULY 2020 101
9.26. Using Web Straps. When tie-down straps are attached to cargo and to vehicle tie-down
fittings, each strap must be tensioned to form at least 1 1/2 turns on the take-up spool of the
tensioning ratchet. (T-0).
9.26.1. The 1 1/2 turns must take place after webbing-to-webbing contact. (T-0). To
prevent movement of the cargo, each tie-down must be tightened until about equal tension is
applied throughout the tie-down arrangement. (T-0).
9.26.2. After tensioning is completed, the take-up spool locking latch must be checked to
ensure that it is fully seated at both ends of the spool in the matching locking notches. (T-0).
9.26.3. The scuff sleeve may have to be removed to allow tightening of tie-downs. Secure
the loose ends of straps by suitable means.
9.27. Chains and Load binders. When chains and load binders are used to secure the load onto
the vehicle cargo bed, flat rack, or semitrailer bed, special considerations must be made with
respect to applying and releasing tension to the load binders. (T-0). Use of cheater bars to gain
a mechanical advantage may cause serious injury to personnel. For this reason the use of a
cheater bar to apply tension to a load binder is not recommended.
9.28. Load Lashing. Load lashing is used for the purpose of protecting the load from inclement
weather and from casual observation and should not be confused with the efforts to secure the
load to the vehicle. Lashing is done once the load has been secured properly using the proper
tie-down materials.
9.28.1. The vehicle, trailer, or semitrailer involved usually comes issued with a canvas and
tarpaulin with ropes to secure during movement. The operator must ensure their loads are
lashed properly in order to provide the maximum amount of protection from the weather (see
Figure 9.16). (T-0).
102 AFMAN24-306 30 JULY 2020
Figure 9.16. Load Lashing.
9.28.2. If the tarpaulin and rope has not been issued with the vehicle, the operator needs to
obtain two 60- to 70-foot lengths of 3/8-inch rope can usually be enough to secure the
tarpaulin (For short bed 2 ½-5-ton cargo trucks). Use the following procedure:
9.28.2.1. Fasten the end of one rope to one of the front lash hooks or rings (A1).
9.28.2.2. Pass the rope diagonally across the top of the load through or under the second
rope support on the opposite side (A2). Pull the rope tight.
9.28.2.3. Pass the rope diagonally back across the top of the load through or under the
third rope support (A3). Pull the rope tight.
9.28.2.4. Continue this process until the rear of the vehicle is reached. Secure the rope.
9.28.2.5. Repeat the entire process with the second rope, starting at the front lash hook or
ring (B1).
AFMAN24-306 30 JULY 2020 103
Chapter 10
DANGEROUS/HAZARDOUS CARGO AND MATERIALS
Section 10A—Transporting Dangerous/Hazardous Cargo
10.1. General Information. Transporting dangerous/hazardous cargo is perhaps the most
demanding job a military GMV operator may ever perform. Much of the cargo that trucks move
is dangerous, delicate, or awkward. It may be explosive, radioactive, sensitive to shock, or
simply oversize or overweight. All hazardous material must be in compliance with CFR Title 49
(See Parts 100-185). (T-0). All military oversize, overweight, or special movements must be
IAW DoD DTR 4500.9-R Part II. (T-0). Also, comply with additional hazardous shipping
instruction guidance (International Air Transport Association Dangerous Goods Regulation
(DGR), International Civil Aviation Organization (ICAO), International Maritime Dangerous
Goods (IMDG), etc.). See lesson plan on transporting hazardous material for additional
requirements and guidance, (add) review and complete the Air Force Qualification Training
Package 24-3HAZMAT for training/certification on transporting dangerous/hazardous materials.
10.2. Necessary Forms. Various forms are necessary for transporting special cargo. The GMV
operator must keep these forms safely on board the vehicle when transporting special cargo. (T-
0). Although the operator does not need to fill out any of the following forms, they must be
familiar with their purpose and where they need to be signed: (T-0).
10.2.1. DD Form 2890, DOD Multimodal Dangerous Goods Declaration (see Figure 10.1
and Figure 10.2).
10.2.2. DD Form 626, Motor Vehicle Inspection (Transporting Hazardous Materials) (see
Figure 10.3, Figure 10.4, and Figure 10.5).
Section 10B—General Safety Measures
10.3. General Safety Measures. Observe these safety measures when dealing with HAZMAT:
10.3.1. Establish a training program (AFI 32-7086, Hazardous Materials Management) for
loading, unloading, and handling HAZMAT. Be sure each person involved in the operation
is familiar with its contents.
10.3.2. When handling explosives or flammable materials:
10.3.2.1. See CFR Title 49.
10.3.2.2. Prohibit smoking except in an established smoking area and provide facilities
for safe disposal of smoking materials. Prohibit matches, lighters, or other sparking or
open-flame producing items in the hazardous area.
10.3.2.3. Do not allow smoking within 50 feet of the vehicle during loading and
unloading or while the vehicle is moving.
10.3.2.4. Prohibit footwear strengthened with nails or other spark-producing metal,
unless the footwear is covered with rubber, leather, or other non-sparking material.
104 AFMAN24-306 30 JULY 2020
10.3.2.5. Establish firefighting and other emergency plans and provide for firefighting
and other emergency equipment. Carry the prescribed number and type of serviceable
fire extinguishers.
10.3.2.6. Avoid jars or shocks, particularly with sensitive explosives used in detonators.
Handling of nuclear weapons is authorized only using nuclear certified equipment and
procedures that are designed to minimize handling and exposure to shock.
10.3.3. Ensure that protective clothing and/or equipment must be used during handling of
toxic oxidizers, fuels, or chemical agents. (T-0). This may include masks, goggles, gloves,
or other garments. Suitable neutralizing agents should be available for personnel handling
toxic gases, etiologic agents, and white phosphorus.
10.3.4. Always have a protective mask and protective ointment kit in the vehicle when
carrying chemical ammunition.
10.3.5. Keep personnel clear of loads being lifted by terminal or marshaling yard equipment.
10.3.6. Keep roadways and marshaling yard aisles in good repair to minimize the danger of
toppling container-bearing transporters.
Section 10C—Rules for Transporting Dangerous/Hazardous Cargo
10.4. Rules for Transporting Dangerous/Hazardous Cargo. In addition to the rules that
apply to general cargo, the following general rules apply to most dangerous/hazardous cargo (see
also local law, CFR Title 49 and DoD DTR 4500.9-R Part II for detailed standards of moving
this type of cargo):
10.4.1. Inspect vehicles that carry dangerous/hazardous cargo according to DD Form 626.
The inspector checks to see that the vehicle can be operated safely and is free of grease
accumulations that can cause a fire.
10.4.2. Inspect gasoline cans for leaks. Do not permit defective cans to be loaded. Keep
gasoline cans, whether full or empty, tightly closed.
10.4.3. Remove tarpaulins from gasoline cans unless otherwise instructed. If tarpaulins are
used, air and dry them before folding and storing.
10.4.4. Once the vehicle passes inspection, attach the proper warning placards (if tactical
situation permits) to the vehicle’s front, rear, and sides to identify its cargo (see Figure 10.6).
Use bilingual placards of the Host Nation when OCONUS.
10.4.5. When loading and unloading, the GMV operator must: (T-0).
10.4.5.1. Provide qualified supervisors to direct and control the loading, unloading, and
handling of HAZMAT. Supervisors should thoroughly understand the hazards involved
and should indoctrinate subordinates on special precautions and emergency situations that
may arise.
10.4.5.2. Set the vehicle’s parking brakes.
10.4.5.3. Chock at least one wheel. Chock the semitrailer when separated from the
tractor.
10.4.5.4. Handle cargo with care and avoid overloading.
AFMAN24-306 30 JULY 2020 105
10.4.5.5. Keep the engine turned off during loading and unloading, unless it is providing
power to the vehicle accessories used to load or unload.
10.4.5.6. Load un-palletized shells with their sides parallel to the vehicle body.
10.4.5.7. Secure the load against shifting.
10.4.5.8. Post the appropriate placards on the front, rear, and both sides of the vehicle.
10.4.6. Designate specific segregated areas for container re-stowing activities, if available,
and for in-transit storage purposes. (T-0).
10.4.7. HAZMAT operating and storage areas must be marked with appropriate warning
signs. (T-0).
10.4.8. When appropriate, initiate security measures to prevent theft, sabotage, and so forth.
(T-0).
10.4.9. When driving with dangerous/hazardous cargo:
10.4.9.1. Avoid sudden stops and turns.
10.4.9.2. Do not smoke inside the vehicle.
10.4.9.3. Do not enter tunnels, if prohibited by local law.
10.4.9.4. Maintain safe distances from other traffic.
10.4.9.5. Under normal driving conditions on an open highway, the safe following
distance for trucks, tractor and semitrailer combinations, and similar vehicles is 300 feet
daytime and 500 feet nighttime. Increase the following distance in adverse weather and
under other poor driving conditions. Check with local authorities for the required
minimum following distance.
10.4.9.6. Never park a vehicle loaded with hazardous cargo overnight in or near a
building or a populated area.
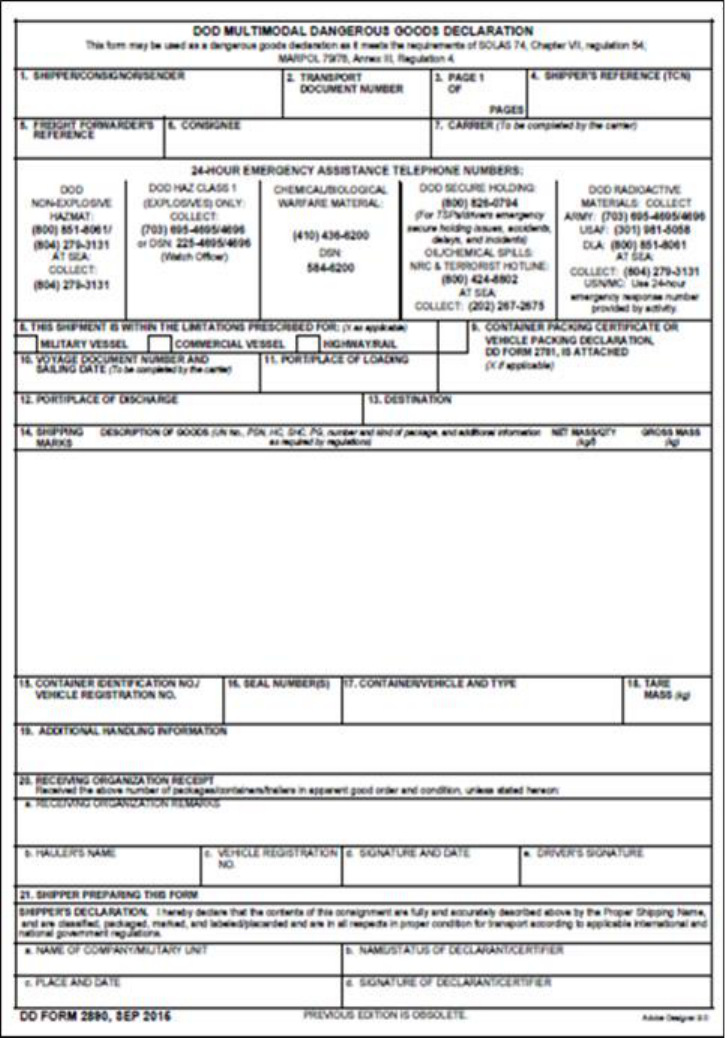
106 AFMAN24-306 30 JULY 2020
Figure 10.1. DD Form 2890 (Page 1).
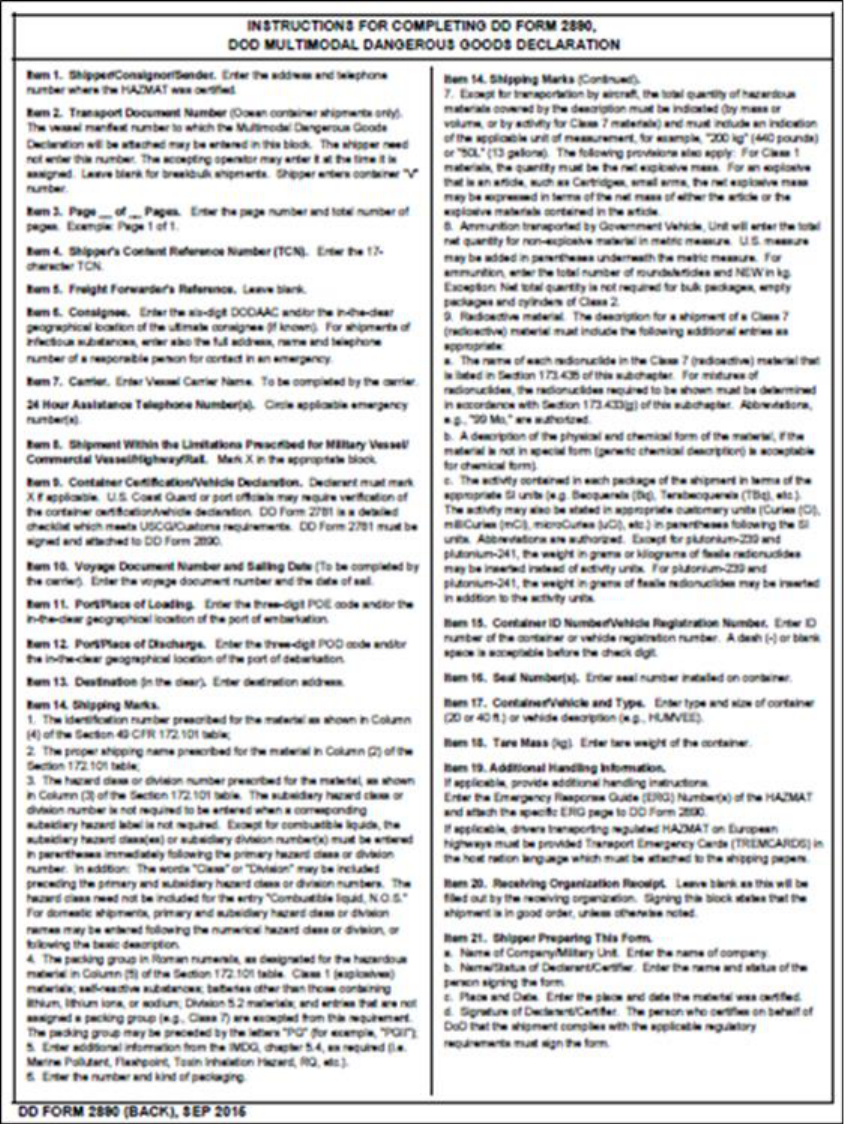
AFMAN24-306 30 JULY 2020 107
Figure 10.2. DD Form 2890 (Page 2).
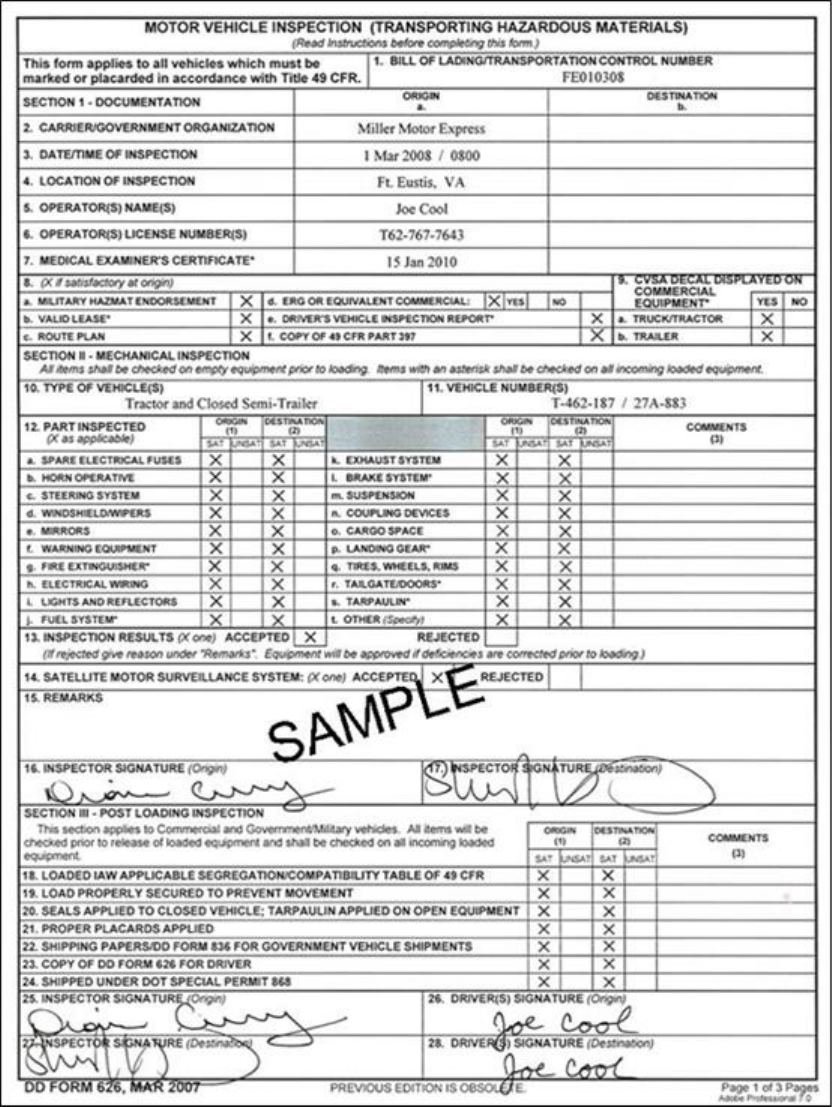
108 AFMAN24-306 30 JULY 2020
Figure 10.3. DD Form 626 (Page 1).
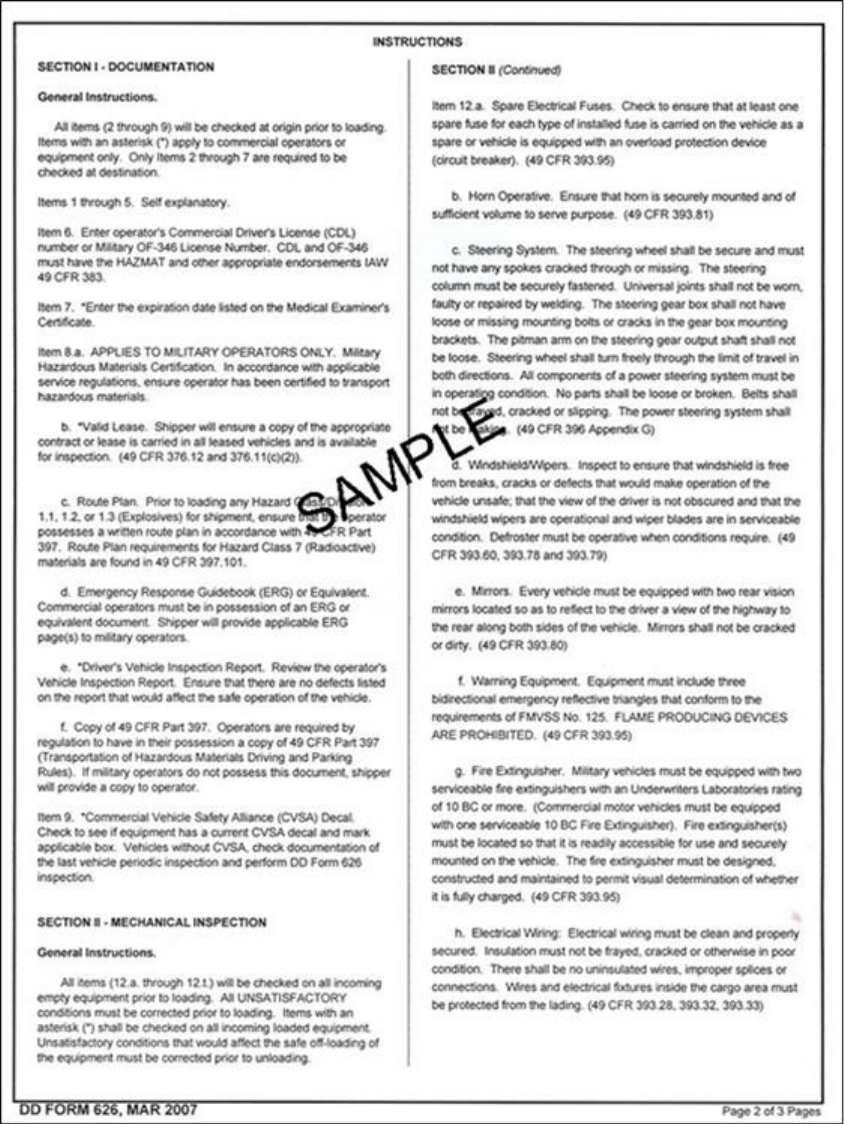
AFMAN24-306 30 JULY 2020 109
Figure 10.4. DD Form 626 (Page 2).
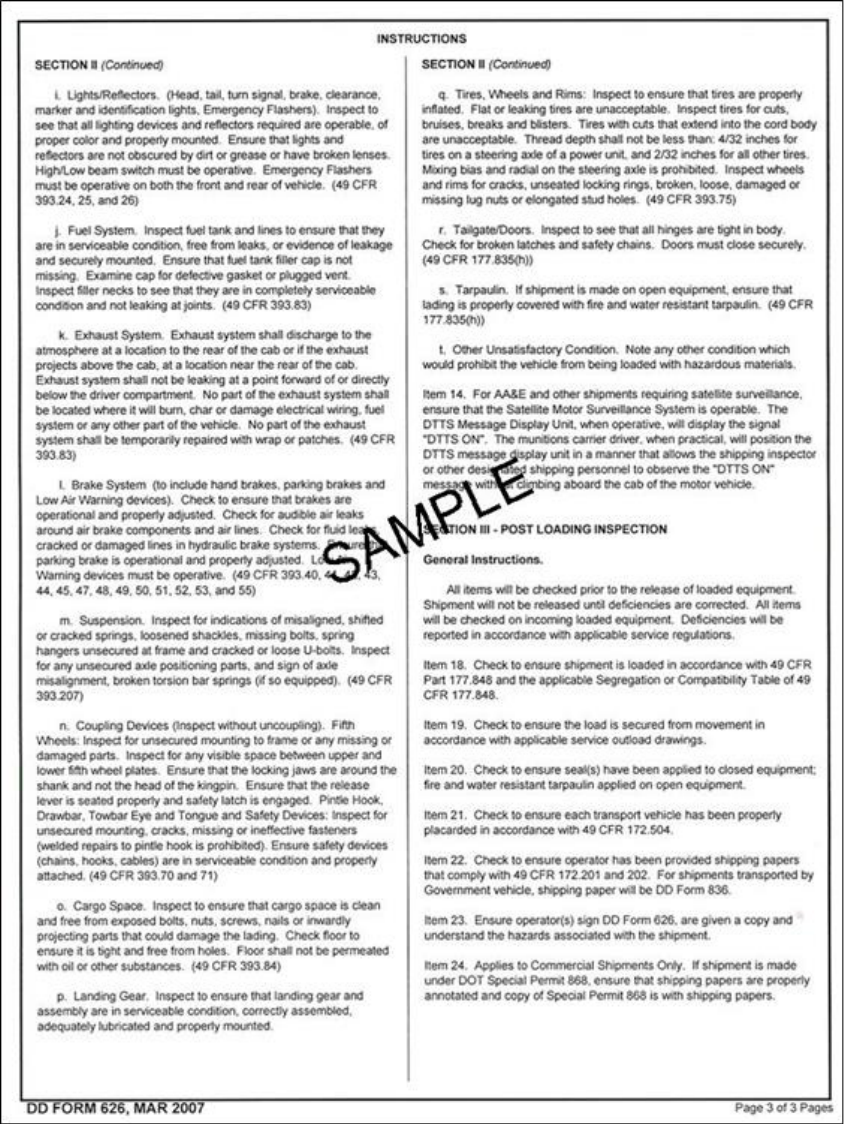
110 AFMAN24-306 30 JULY 2020
Figure 10.5. DD Form 626 (Page 3).
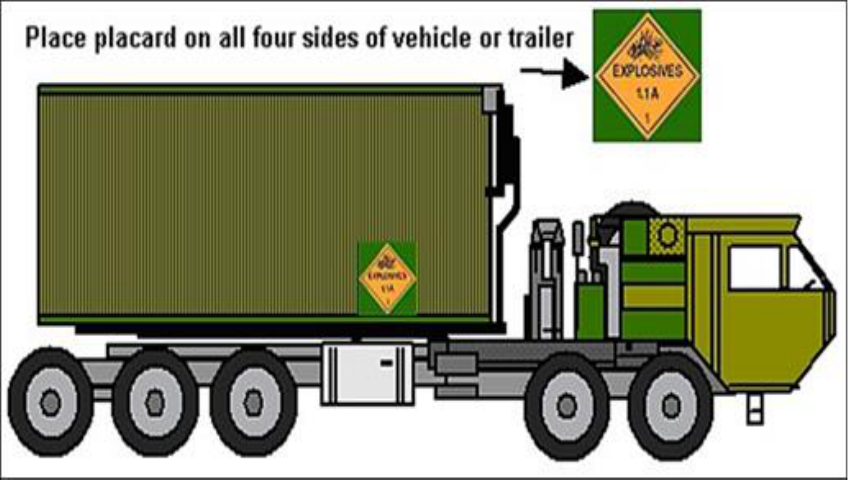
AFMAN24-306 30 JULY 2020 111
Figure 10.6. Placarding a Vehicle.
10.5. HAZMAT Routes. A motor vehicle, which contains HAZMAT, should avoid routes
through or near the following: Heavily populated areas, places where crowds are assembled,
tunnels, narrow streets, or alleys. (T-0). Follow approved routes IAW CFR Title 49, DoD DTR
4500.9-R Part II, state and local laws for HAZMAT transportation. (T-0).
10.6. Operator Responsibilities. Except as provided below, the GMV operator or another
individual qualified to operate the vehicle must stay with a motor vehicle at all times which
contains Class A or Class B explosives. (T-0). The GMV operator must attend to a motor
vehicle which contains HAZMAT other than Class A or Class B explosives and which is located
on a public street or highway. (T-0). However, the vehicle need not be attended while its
operator is performing duties that are incident and necessary to their duties as the operator of the
vehicle.
Section 10D—Load Custody
10.7. Load Custody. A motor vehicle is attended when the person in charge of it is awake in
the vehicle (not in the sleeper berth) or is within 100 feet of it and has an unobstructed field of
view of it.
10.7.1. A qualified representative of the unit will meet all of the following criteria: (T-0).
10.7.1.1. The unit has designated them to attend the vehicle.
10.7.1.2. They are aware of the nature of the HAZMAT contained in the vehicle.
10.7.1.3. They have been instructed on the procedures to follow in emergencies.
10.7.1.4. They are authorized and have the ability to move the vehicle.
10.7.1.5. They are HAZMAT certified.
112 AFMAN24-306 30 JULY 2020
10.8. Parking. A safe haven is an area specifically approved (in writing) by local, state, or
federal governmental authorities for the parking of unattended vehicles containing Class A or
Class B explosives. A motor vehicle that contains Class A or Class B explosives must not be
parked under any of these circumstances: (T-0).
10.8.1. On or within five feet of the traveled portion of a public street or highway.
10.8.2. On private property (including premises of a fueling or eating facility) without the
knowledge and consent of the person who is in charge of the property and who is aware of
the nature of the HAZMAT the vehicle contains.
10.8.3. Within 300 feet of a bridge, tunnel, dwelling, building, or place where people work,
congregate, or assemble except for brief periods when the necessities of operation require the
vehicle to be parked and make it impracticable to park the vehicle in any other place.
10.9. Missiles. Missiles are very different from most items the Air Force transports because
they can be at the same time overweight, sensitive, and flammable. These complex
characteristics call for special loading procedures.
10.10. Ammunition and Explosives. Air Force GMVs often transport ammunition and
explosives. Although safety is always important, it is especially so when the cargo itself is
dangerous.
10.10.1. A vehicle carrying explosives must be equipped with two fully charged dry
chemical fire extinguishers. (T-0). One of them must be mounted on the outside of the cab
on the GMV operator’s side; the other mounted inside the cab IAW Title 49 CFR Subpart
393.95. (T-0).
10.10.1.1. All fire extinguishers must be inspected monthly to make sure they have not
been damaged and the hose nozzles are not clogged. (T-0). The inspection date and the
initials or name of the inspector must be recorded and kept on file. (T-0). Methods of
recording vary by state. Check state regulations, local and military fire station for
compliance standards. IAW the National Fire Protection Agency (NFPA) 10, Standard
for Portable Fire Extinguisher, where manual inspections are conducted, records for
manual inspections shall be kept on a tag or label attached to the fire extinguisher, on an
inspection checklist maintained on file, or by an electronic method. If using a tag, the tag
must be attached to the extinguisher. (T-0). Another tag, indicating the date of the last
weight-test, must also be attached to the extinguisher. (T-0). The inspection is recorded
on the appropriate AF Form 1800.
10.10.1.2. Block and brace the load well to prevent its shifting during travel. Comply
with applicable HAZMAT shipping instructions (i.e., Title 49 CFR, International Air
Transport Association, DGR, ICAO IMDG, etc.)
10.10.1.3. Be sure that detonating caps (for such explosives as dynamite) are not carried
in the same vehicle as the explosives. While loading or unloading, handle explosives
with care.
10.10.1.4. The truck’s tailboard or tailgate must be closed and secured to be sure all
ammunition or explosives stay inside the cargo compartment. (T-0).
AFMAN24-306 30 JULY 2020 113
10.11. Chemical Agents. Federal agencies govern and regulate the transport of hazardous
chemicals and related items within the US. A brief summary of the regulations and safety
standards to be used to load and unload this kind of cargo follows:
10.11.1. The Vehicle. The cargo compartment of the vehicle must be a closed body or one
covered with a fire resistant tarpaulin. (T-0). The vehicle must be equipped with red
lanterns, red reflectors, red cloths, and two fire extinguishers for use in emergencies. (T-0).
10.11.2. Loading and Unloading Safely. In addition to those precautions already
explained, securely load containers with valves or fittings to prevent damage to the valves or
fittings during transit. Once unloaded, vehicles should be swept clean. The sides and floors
should be tested for contamination and decontaminated, if necessary.
10.11.3. GMV Operator Instructions. Each operator of a GMV transporting dangerous
chemicals must be given full and complete information about the shipment to help them
safely deliver the cargo to its destination. (T-0). When the vehicle is loaded, the GMV
operator is informed of necessary safety precautions both verbally and in writing, using DD
Form 2890.
Section 10E—Transporting HAZMAT by Highway
10.12. Transporting HAZMAT by Highway. Because the transportation of ammunition,
explosives, flammables, chemical agents, and radioactive materials is dangerous, it is essential
that personnel involved know and observe applicable safety regulations.
10.12.1. A vehicle transporting Class A or Class B ammunition, explosives, or other
HAZMAT is inspected at the following:
10.12.1.1. The origin of shipment. At this time, deficiencies are corrected before the
transporter enters a sensitive area.
10.12.1.2. At trailer transfer points (when prime movers are exchanged).
10.12.1.3. At destination, before delivery is accepted.
10.12.2. DD Form 626. In CONUS, the shipper uses DD Form 626 (see Figure 10.3,
Figure 10.4 and Figure 10.5) as a guide and record of the inspection. In an overseas theater,
DD Form 626 (modified appropriately) may be used or may serve as a model for a locally
produced inspection form.
10.12.3. In CONUS, military shippers use DD Form 2890 (see Figure 10.1 and Figure 10.2)
to instruct GMV operators of military and commercial vehicles transporting dangerous
material. Sections of the form outline actions to be taken in case of fire, accident, and
breakdown. The form also provides for entry of specific information by the shipper or
transportation officer. This form (appropriately modified) may also be used in an overseas
theater or may serve as a model for a locally produced instruction form. The GMV operator
must have shipping papers available at all times (see Title 49 CFR 177.817, Shipping
Papers). (T-0).
114 AFMAN24-306 30 JULY 2020
Section 10F—Detecting Fuel Leakage Occurring On a Public Highway
10.13. Detecting Fuel Leakage Occurring On a Public Highway. Do the following
immediately, upon detecting a fuel leak in the cargo tank:
10.13.1. Turn off the vehicle’s electrical system.
10.13.2. Extinguish any cigarettes or open flames in the vicinity.
10.13.3. Remove the vehicle’s fire extinguisher from its bracket and keep it close at hand. If
an assistant GMV operator or other person is available, tell him/her to man the fire
extinguisher.
10.13.4. Notify police of the hazardous situation by the most expeditious means.
10.13.5. Inspect the leak. Determine if a field expedient (for example, a wooden plug or
rubber matting) can be used to control the leak.
10.13.6. Place highway warning devices at prescribed locations. Do not use flares.
10.13.7. Keep spectators away from areas where flammable liquids are spilled or toxic
fumes have accumulated.
10.13.7.1. Guard against smoking by spectators or passing motorists. If personnel are
available, post guards to warn passing operators of the fire hazard.
10.13.7.2. Notify nearby residents when spillage may place them in danger.
10.13.8. When civilian police and/or firefighting personnel arrive, tell them the nature of the
cargo.
10.13.8.1. Follow instructions issued by fire or police department personnel until the
hazard is neutralized.
10.13.8.2. Military personnel will inform civilian investigators and cooperate with
civilian authorities in clearing the damaged equipment from the highway. (T-0).
Section 10G—Detecting Fuel Leakage Occurring Off the Road
10.14. Detecting Fuel Leakage Occurring Off the Road. When traveling off road, check for
leaks at all stops. The movement from the bumps could jar something loose and cause a leak.
10.14.1. Emergency Procedures. Do the following immediately upon detecting a leak in
the cargo tank:
10.14.1.1. Turn off the vehicle’s electrical system.
10.14.1.2. If the tanker is a semitrailer, lower the landing legs, disconnect the semitrailer
from the tractor, and drive the tractor a safe distance from the semitrailer.
10.14.1.3. Remove the vehicle fire extinguisher from its bracket and keep it close at
hand. If an assistant GMV operator or other person is available, tell him/her to man the
fire extinguisher.
10.14.1.4. Inspect the leak. Determine if a field expedient (for example, a wooden plug
or rubber matting) can be used to control the leak.
AFMAN24-306 30 JULY 2020 115
10.14.1.5. If space is available in another compartment of the tanker, transfer the fuel
from the leaking compartment to the secure one. However, this procedure is not
recommended when fumes have accumulated around the tanker pump.
10.14.2. Fuel Jettisoning. When fuel cannot be transferred from the leaking compartment,
contact the nearest HAZMAT protection facility (local fire station) for permission to locate a
proper location to jettison fuel.
10.14.2.1. Air Force, Department of Defense, and Federal regulations prohibit discharge
of fuel on the ground.
10.15. Petroleum Tank Vehicles Safety Procedures. Whenever operating a tank vehicle, there
are vital safety precautions and procedures that every operator must know and follow. (T-0). If
using petroleum tank vehicles, know and observe the safety precautions and procedures found in
the Manufacturer’s Operator’s Manual and respective vehicle lesson plan.
116 AFMAN24-306 30 JULY 2020
Chapter 11
VEHICLE RECOVERY OVERVIEW
Section 11A—Vehicle Recovery General Information
11.1. General Information. This chapter describes a few of the more common field vehicle
recovery procedures – operations that can be performed with limited resources. In any of these
operations, remember to use brainpower to make up for a lack of available horsepower. Time
should be taken to figure out the rigging and include a reasonable factor for safety. Sloppy
planning results in wasted time and may further damage the vehicle and equipment as well as
causing injury or death to personnel. Recovery failures are often the direct result of haste.
NOTE: For detailed vehicle-specific vehicle recovery procedures and safety practices, refer to
the proper Manufacturer’s Operator’s Manual and respective lesson plan.
Section 11B—Recovery Safety
11.2. Recovery Safety. Recovery can be inherently dangerous unless safety is continually
observed and practiced. Each of the recovery functions (winching, lifting, and towing) should
only be performed with safety as the primary concern. Always follow safety warnings in this
manual and in the operator’s manual for both the recovery vehicle and the recovered vehicle or
equipment. Following are some key factors and actions that can help or prevent unnecessary
damage to equipment and more importantly, injury to personnel:
11.2.1. Know recovery equipment capabilities and limitations. Winches have tremendous
power and if not properly secured to the disabled vehicle, can rip off tow lugs, bumpers, and
other attachments that often become projectiles injuring personnel and/or damaging
equipment. Always follow the safe rigging guidelines in the Manufacturer’s Operator’s
Manual and respective vehicle lesson plan. Keep all but the minimum required personnel
away from the recovery area. Each recovery crew member should know where other crew
members are located at all times.
11.2.1.1. Ground chock blocks have their limitations. If overloaded, the recovery
vehicle can slide out of control.
11.2.1.2. Winch cables can break and backlash into equipment and personnel.
11.2.1.3. Exercise extreme caution when towing.
11.2.1.4. Some wheeled vehicles may not have any braking effect. The recovery vehicle
must provide braking for the towed vehicle as well as itself. (T-0).
Section 11C—Common Tools for Recovery
11.3. Common Tools for Recovery.
11.3.1. Tow Strap.
11.3.2. Tow Cable.
11.3.3. Tow Chains.
AFMAN24-306 30 JULY 2020 117
11.3.4. Hydraulic Jack.
11.3.5. Highway Warning Kit. NOTE: Other recovery lifting actions also require extreme
caution to prevent injury to personnel and/or damage to the recovery vehicle, recovered
vehicle or equipment.
Section 11D—Spotters for Recovery
11.4. Spotters for Recovery. For safe control of a recovery operation, there should be two
spotters to prevent confusion.
Section 11E—Towing Vehicles With Bars
11.5. Towing Statement. To the extent possible, a wrecker should be used to tow wheeled
vehicles. Use of a wrecker or an approved tow bar may negate the need for an operator in the
towed vehicle. When a wrecker or tow bar is not used, an operator should be placed in the towed
vehicle to assist with steering if required. Due to increased risk of injury to the operator in the
towed vehicle, it is extremely important to limit the use of anything but a wrecker or tow bar to
those cases where moving the vehicle for short distances is an absolute military necessity. In
such cases, speed should be kept to a minimum to ensure safe operation. Unusual or unique
towing operations may have an associated risk assessment with residual risk approved at the
proper level of command.
11.6. General Rules for Towing. Before towing any vehicle, refer to the Manufacturer’s
Operator’s Manual and respective lesson plan. The following are general rules for towing:
11.6.1. Move towed loads at slow speed. Avoid quick stops.
11.6.2. Mark towing vehicles with warning lights or flags.
11.6.3. Use a wrecker whenever possible. It is designed for towing.
11.6.4. Use a tow bar in preference to chains, ropes or cables. Tow bars keep the towed
vehicle from running into the towing vehicle.
11.6.5. Connect cables, chains, or ropes, if used, to the pintle of the towing vehicle and to
the lifting shackles of the towed vehicle.
11.6.6. In cities or heavy traffic, tie the front lifting shackles of the towed vehicle tightly to
the rear lifting shackles of the towing vehicle and connect the air brakes.
11.6.7. Proceed slowly at 5 to 10 mph because the towed vehicle may skid on turns at higher
speeds.
11.6.8. When using a tow bar, connect a chain between the two vehicles for safety in case
the bar breaks or becomes disconnected.
11.6.9. Be sure a GMV operator is in every motor vehicle being towed to control it, unless a
wrecker is towing the vehicle.
11.6.10. Always use rigger’s gloves when handling chains, cables, and wire rope.
118 AFMAN24-306 30 JULY 2020
Section 11F—Anchoring Vehicles
11.7. Anchoring Vehicles. Trees, stumps, or rocks are natural anchors. Always attach lines
near the ground when using a tree or a stump as an anchor. A GMV operator should lash the
first tree or stump to a second one to provide added support for the line. When using a rock as an
anchor, be sure it is large and firmly embedded in the ground. Construct anchors when natural
ones are not available. For more information on methods for anchoring vehicles, see the
applicable vehicle lesson plan.
Section 11G—Winch Recovery
11.8. Winch Recovery. Many military trucks are equipped with winches. Know how to get the
most from a winch without danger to personnel or abuse to the equipment. For additional and
vehicle-specific guidance on winch recovery to include: Single-vehicle winch recovery, two-
vehicle winch recovery, cable safety, A-frame recovery, and field expedients, refer to the
Manufacturer’s Operator’s Manual for that vehicle and the applicable vehicle lesson plan.
11.8.1. As a general guideline, to ensure safety, the protection of the equipment, and the
success of the recovery operation, use the following as a guide:
11.8.1.1. Check the capacity of the winch. The capacity shown on the manufacturer’s
plate is the maximum with one layer of cable on the drum. Each successive layer
increases the diameter of the drum and reduces the winch capacity to as little as 50
percent of the rated capacity when the last layer is being wound on the drum.
11.8.1.2. Check the cable for rust, kinks, or frays.
11.8.1.3. Estimate the total resistance. Consider grade or slope, weight of the vehicle,
and type of terrain. Then add a reasonable factor for safety.
11.8.1.4. Check the equipment. Be sure to rig safely to overcome the resistance with the
equipment available.
11.8.1.5. Select or provide a suitable anchor.
11.8.1.6. Rig and check rigging. Do not put power on the winch until every element in
the rigging has been checked.
11.8.1.7. Clear personnel from the danger area. All persons observing the operation
should stand outside the angle formed by the cable under stress at a distance at least equal
to the distance between the two most distant points in the rigging. Clear personnel away
before tightening the cable.
AFMAN24-306 30 JULY 2020 119
Chapter 12
CONTINGENCY OPERATIONS OVERVIEW
Section 12A—Motor Marches and Convoys General Information
12.1. General Information. The GMV operator must know specific procedures for maintaining
convoy speed, halting, and handling breakdowns. (T-0). The GMV operator should also know
convoy and aircraft loading signals as well as NATO convoy flags. For additional information
on motor marches and convoy operations (also referred to as line-haul), aircraft loading signals,
and the use of NATO convoy flags and convoy signals, refer to: Air Force Tactics, Techniques,
and Procedures (AFTTP(I)) 3-2.58., Multi-Service Tactics, Techniques, and Procedures for
Tactical Convoy Operations, Army Techniques Publication 4-11, Army Motor Transport
Operations, and Army Techniques Publication 4-16, Movement Control.
Section 12B—Motor Marches and Convoys Overview
12.2. Rate-of-Speed and Interval. The road, weather, and amount of space needed between
vehicles to allow for stopping without rear-end collisions and for letting faster-moving vehicles
pull into the column after passing, determine the proper rate-of-speed and interval. Of all the
space around the vehicle, the area ahead of the vehicle (the space that the GMV operator is
driving into) is most important.
12.2.1. Determining space to keep between vehicles.
12.2.1.1. One good rule to determine how much space to keep in front of the vehicle is to
allow at least one second for each 10 feet of vehicle length at speeds below 40 mph. At
greater speeds, add one second for safety.
12.2.1.2. For example, if driving a 40-foot vehicle, the GMV operator should leave four
seconds between their vehicle and the vehicle ahead, in a 60-foot vehicle, 6 seconds.
Over 40 mph, a GMV operator needs 5 seconds for a 40-foot vehicle; 7 seconds for a 60-
foot vehicle.
12.2.1.3. To know how much space a GMV operator has, he/she should wait until the
vehicle ahead passes a shadow on the road, a pavement marking, or some other clear
landmark. Then count the seconds, one thousand one, one thousand two, and so on, until
he/she reaches the same spot.
12.2.1.3.1. The GMV operator can compare their count with the rule of 1 second for
every 10 feet of length.
12.2.1.3.2. For example, if driving a 40-foot truck and only count 2 seconds, the
GMV operator is too close. The GMV operator should drop back a little and recount
until the right number of seconds of following distance is reached. When the road is
slippery, more space is required to stop.
12.2.2. Maintain the proper place in the convoy.
12.2.2.1. If a GMV operator has no other orders, a good general rule is to keep a distance
in yards that is twice the rate-of-speed at which driving.
120 AFMAN24-306 30 JULY 2020
12.2.2.2. For example, if traveling at 25 mph, leave 50 yards between the vehicle and the
one just ahead at 30 mph, 60 yards. Remember, this distance is in yards, not feet. The
number that is used to multiply, in this case 2, is called the speedometer multiplier. The
convoy commander may set an speedometer multiplier greater than two.
12.2.3. Judging distances. In applying the speedometer multiplier, the GMV operator
should be able to judge distances. They can do this more easily by practicing estimating
distances.
12.2.3.1. Take a known distance (such as the length of a truck or the distance between
telephone poles) and observe carefully how that distance looks. Try this in different light
conditions (such as day, night, and dusk). A GMV operator can soon be able to estimate
distances accurately.
12.3. Vehicle Failures. If the vehicle fails while driving in a convoy, remember these basic
rules:
12.3.1. Signal a stop and pull off the road.
12.3.2. Signal vehicles behind to proceed.
12.3.3. Correct the trouble if possible and fall back in the column at one of the breaks (halts).
12.3.4. If the GMV operator or a mechanic left with the GMV operator cannot repair the
trouble, wait for the trail officer and tell them of the difficulties. They make the necessary
arrangements. NOTE: Caution, the GMV operator should not attempt to exceed the
designated catch-up speed (or posted speed limit) to regain position within the convoy.
Doing so may cause an accident.
12.4. Vehicle Halts. A convoy halt is made for personal convenience, checking the vehicle’s
operational status, checking load security, and refueling (if necessary). Make the at-halt checks
at each halt. Be sure to keep off the road, if possible, while checking the vehicle. If a GMV
operator needs to halt on the road, their designated assistant GMV operator should act as a guard
to warn other traffic. Each GMV operator should accomplish specific duties while at the halt.
These duties are determined by the convoy commander prior to start of convoy.
12.5. Convoy Security. Convoys are inviting targets for an enemy force. Convoys cannot
always depend on security support or added firepower. Such support is often not available
because of other priorities. To provide more firepower for a convoy, units may employ a
hardened gun truck. The purpose of a gun truck is to: provide a mobile firing platform, help
counter enemy attacks, and to increase survivability of the convoy.
12.6. Convoy Control Signals. Use and obey hand signals in a convoy. In addition to the
signals for right and left turns, stopping, and so forth, the GMV operator must learn convoy
control signals. (T-1). Whenever a march column is halted on a curve or downgrade, or
whenever some GMV operators cannot see the signal, signals may be relayed along the column
or transmitted by messenger to all concerned.
12.7. NATO Convoy Flags and Signals. The GMV operator is responsible for knowing the
proper use and placement of NATO convoy flags and signals. More information regarding the
use of NATO convoy flags and signals will be available through the convoy commander, and
through referencing AFTTP(I) 3-2.58., Army Techniques Publication 4-11, and Army
Techniques Publication 4-16. (T-0).
AFMAN24-306 30 JULY 2020 121
Section 12C—Vehicle Camouflage Operations
12.8. Camouflage Operations. Understanding the fundamentals of camouflaging is vital to the
mission. Without proper camouflage a vehicle could be seen and attacked by an airstrike.
12.9. Stationary Vehicle Camouflage and Concealment. A stationary vehicle can best be
camouflaged by placing it under vegetation to break up the regular pattern of shadows and by
covering all parts that are likely to reflect light. Use blankets, shelter halves, or pieces of dark
burlap to cover the windshield, cab window, a wet vehicle body, light paint on insignia, and so
forth. Use foliage to cover headlights. Fishnet or chicken wire scattered with artificial material
or with vegetation can be used to cover the vehicle when trees or bushes are not available. When
snow is on the ground, cover the vehicle with white cloth. Be sure that color and texture blend
with the surrounding area.
12.10. Camouflage Screen System. The camouflage screen system is the principal artificial
expedient for camouflaging vehicles. Use it when concealment by natural methods or materials
is not possible. Use it also to supplement natural methods and materials in sparsely vegetated or
barren areas (such as deserts, predominantly snow-covered areas, and thinly wooded areas).
12.11. Erecting of Camouflage Screens Over Vehicle. When erecting the camouflage screen
over a vehicle, take extreme care to prevent the screen from snagging and tearing on any sharp
corners or vehicle accessories (such as mirrors, bumpers, mounted armament, and so forth).
When joining multiple screens, first spread the screens to be joined over a level ground site free
from large rocks and sharp objects. Be sure the same pattern designs on all screens are facing
the same way.
Section 12D—Vehicle Operations Using Night Vision Devices and Operations Under
Blackout (BO) Conditions
12.12. General Information. Night operations in combat, combat support, and combat service
support units have played an important role in many US Air Force engagements. In fact, the
ability to conduct effective tactical transportation operations during hours of darkness and
limited visibility is a long-standing Air Force objective. Today’s technology provides each
GMV operator with the ability to meet these objectives using the driver’s vision enhancer and
night vision goggles (NVGs). A GMV operator’s ability to safely and effectively drive using
night vision devices depends on their understanding the device’s limitations and capabilities, the
amount of ambient (available) light, driving ability, proficiency with night vision devices,
familiarity with the terrain, and availability of night vision devices.
12.13. Night Vision Goggles Introduction. Night vision goggles are image-intensification
devices that improve visibility during periods of low light levels. They amplify available
ambient light (such as moonlight and starlight). However, NVGs do not magnify an image. An
object viewed through the NVGs looks the same size as if it were seen in the day without the
NVGs. Objects that are hard to see during the day are also hard to see at night through the
NVGs. NVG performance is directly related to the amount of ambient light. During periods of
high ambient light, resolution is improved and objects can be identified at greater distances.
122 AFMAN24-306 30 JULY 2020
12.13.1. Visual acuity (the accuracy with which an object is seen) with NVGs may never be
as good as it is with the naked eye during daylight conditions.
12.13.1.1. Rain, haze, fog, snow, or smoke and viewing into shadows and other darkened
areas greatly reduce the effectiveness of NVGs.
12.13.1.2. Vision using NVGs equals the vision of an unaided GMV operator with less
than perfect vision. The best case for a GMV operator with 20/20 vision wearing the
NVGs is 20/40 with the AN/PVS-7 and 20/50 with the AN/PVS-5.
12.13.2. The NVGs affect depth perception and distance estimation.
12.13.2.1. For the first 20 feet in front of the user, the NVG decreases depth perception.
From 20 to 500 feet, depth discrimination roughly equals that of the unaided eye.
12.13.2.2. NVGs reduce depth perception beyond 500 feet and distance viewing. This is
due mainly to reduced visual acuity and lack of peripheral vision.
12.13.3. Peripheral vision lets a person see things on the side of the field of vision while
concentrating on looking straight ahead at an object.
12.13.4. Color discrimination is absent when NVGs are used.
12.14. Single Color Vision. The picture seen with NVGs is green. It is also less distinct than
normal daylight vision. As a result, it is hard to distinguish between certain objects or features.
For example, shadows are hard to distinguish from puddles of water, walls, or ditches and vice
versa when viewed through the NVGs at night.
12.15. Color Adaptation. A person, because of the green color in NVGs, may see one of two
things when removing the NVGs after several minutes:
12.15.1. If looking at the lighter of two backgrounds, one may see the complement or
opposite of the green color to which they had become adapted.
12.15.2. If looking at the darker of the two backgrounds, one might see an after-image of the
green light to which they had become adapted. Do not be concerned with this after-image, it
is a normal physical reaction.
12.16. Considerations When Driving With Night Vision Goggles. Driving during the day
takes a lot of concentration. Driving at night with Night Vision Goggles compounds the amount
of concentration needed to safely operate a vehicle. Also, see Table 12.1 for NVG lighting
countermeasures.
12.16.1. Effects of Light. Any detectable light source in the vehicle’s cab may affect the
GMV operator’s ability to see with NVGs. The adverse effect of panel lights on the NVGs is
greatest during low ambient light conditions.
12.16.1.1. Vehicle Light System. NVG compatibility is best achieved by eliminating all
interior and exterior light sources. Tape up lights that cannot be controlled to reduce the
amount of light they emit. Instruments and gauges can normally be read with NVGs
without instrument lighting.
AFMAN24-306 30 JULY 2020 123
12.16.1.2. Dark Adaptation. No dark adaptation period is necessary for effective
viewing through NVGs. In fact, viewing through NVGs for a short period of time lessens
the normal dark adaptation period. After using NVGs, it takes about two minutes to
reach the 30-minute dark adaptation level.
12.16.1.3. Lasers. Lasers are used on the battlefield (in training and in combat). Lasers
affect NVGs as much as other light sources do. Most lasers may not cause permanent
damage to NVGs. In fact, the NVGs protect the GMV operator’s eyes from the
damaging effects of lasers, even if the laser is bright enough to damage the NVGs. If the
NVGs are damaged, it is possible to continue using the NVGs with a bright or dark spot
at the point where the tube was damaged. To reduce the effects of the laser on the NVGs
and eyesight, look away.
12.16.2. Object Identification. Viewing an area lit by artificial lights (such as flares) can
limit the ability to see objects outside the lighted area. The ability to see objects within the
lighted area depends on the brightness of the light and the object’s distance.
12.16.2.1. Try to keep the light source outside the field of view of the NVGs.
12.16.2.2. Using NVGs enable personnel to detect light sources that are not visible to the
unaided eye. Light from vehicles, flashlights, IR light sticks, and burning cigarettes is
easily detected at great distances. The capability of NVGs to detect these light sources
improves as the ambient light level decreases.
12.16.2.3. When using NVGs, some objects may be more difficult to distinguish (low
contrast against the background) than during the day when color clues are available. Pay
close attention to unfamiliar objects. NOTE: Warning, GMV operators without NVGs
may not see another operator. Ensure the route selected is in an area where other traffic
(commercial and tactical) is precluded. If the route does not preclude this, establish some
form of traffic control.

124 AFMAN24-306 30 JULY 2020
Table 12.1. NVG Lighting Countermeasures.
SPECIFIC CONDITIONS
IMPACT ON NVGs
COUNTERMEASURES
Driving with external and
internal lights off.
(Vehicles without NVGs
may not see you.)
None.
N/A
Blue-green instrument
panel lights on.
(Vulnerable to threat
detection with NVGs.)
Minimal on third
generation tubes; can
degrade performance of
second generation tubes.
Turn to lowest light level
or turn off. Tape over
nonofficial lights. (May
allow warning lights to go
unnoticed.)
Instrument panel lights on.
(Vulnerable to threat
detection with NVGs.)
Can degrade all NVG
performance.
Turn to lowest level or turn
off. Tape over nonofficial
lights. (May allow
warning lights to go
unnoticed.)
Headlights on.
(Vulnerable to threat
detection.)
Non recommended. Can
shorten life of NVGs and
blind oncoming operators
with NVGs.
Use BO lights.
Chemlights on front of lead
vehicle and rear of trail
vehicle. (Vulnerable to
threat detection.)
Can degrade lead vehicle’s
distance vision to some
degree under low light
conditions.
Tape over part of
chemlight. Use BO lights.
BO marker lights on.
(Vulnerable to threat
detection with NVGs.)
As low light levels (heavy
overhead canopy or
starlight), Can degrade
NVG performance.
Tape over all but one or
four markers on rear of
vehicle. Tape over brake
marker.
BO markers with BO drive.
(Threat detection easy with
NVGs.)
Can enhance near vision,
but degrade distance
vision. May blind
oncoming operators with
NVGs.
Turn off BO drive or
ensure BO hood is adjusted
so light only shines down.
Normal parking/brake
lights. (Vulnerable to
threat detection.)
Can seriously degrade all
NVG performance and
may blind oncoming
operators with NVGs.
Use BO lights.
12.16.3. Vehicle Preparation. The design of some Air Force vehicles can affect the ability
to see outside the windshield. To reduce the loss of night vision because of vehicle
shortcomings, properly prepare the vehicle for night driving with NVGs.
AFMAN24-306 30 JULY 2020 125
12.16.3.1. Vehicle instruments are easier to read under high levels of instrument lighting.
However, the level of light needed for the best reading interferes with the NVGs ability to
see dim objects outside the vehicle. Interior lights also interfere with NVG performance.
They reflect off the windshield, reduce outside visibility, and are subject to enemy
detection. To minimize these effects, turn off all interior lights and turn off or tape all
exterior lights.
12.17. Driving Techniques With Night Vision Goggles. The ability to drive with NVGs is
developed through training. The more a GMV operator drives with NVGs, the more they learn
about them. As a result, they gain confidence in their ability and in the capability of the device.
On the other hand, overconfidence is a main fault associated with NVG use. After wearing the
device for only a short time, one may feel they have complete visual acuity and depth perception
when in fact they do not.
12.17.1. Driving techniques and visual clues used during unaided night driving (without
NVGs) also apply to aid night driving (with NVGs). The advantage of NVG use is improved
ground reference and object identification. However, the field of view is greatly reduced.
12.17.1.1. Use a continual scanning pattern to make up for this. To view an area while
using NVGs, turn head slowly until the NVGs point in the desired direction. Rapid head
movement can induce vertigo, which may lead to dizziness and nausea. NOTE:
Warning, never use NVGs on public highways. The effect of oncoming headlights on the
device may cause some very dangerous situations (such as the GMV operator not being
able to see other objects in the field of view).
12.17.1.2. If the light is sufficiently bright, the devices all have a bright source protection
feature that shuts down the NVG to protect it.
12.17.1.3. If the bright source protection is activated, the NVGs will be off for at least
two hours. (T-1).
12.17.2. To minimize the effect of headlights from an oncoming vehicle:
12.17.2.1. Slow down.
12.17.2.2. Look away so that the light source is just outside the NVGs field of view.
12.17.2.3. Pull off to the far right-hand side of the road, and stop the vehicle.
12.17.2.4. DO NOT continue driving with NVGs unless authorized by a responsible
officer or individual (such as the range control officer).
12.18. Role of the Assistant GMV Operator. The assistant GMV operator plays an important
role in driving with NVGs.
12.18.1. The GMV operator should focus the NVGs for distance vision even though this
makes instrument reading difficult. An assistant GMV operator wearing NVGs can
compensate for this by alternating between distance and close-up viewing and telling the
GMV operator the status of warning lights, speedometer, fuel gauge, and other instrument
readings.
126 AFMAN24-306 30 JULY 2020
12.18.2. Depending on the vehicle configuration, the assistant GMV operator may need to sit
directly behind the GMV operator to gain a better view of the instrument panel.
12.18.3. The assistant GMV operator must also use a slow scanning pattern and tell the
GMV operator of any obstacles inside or outside his/her field-of-view. (T-1).
12.19. Parking Vehicles. When parking vehicles in areas where NVG tactical lighting is used,
trained spotters equipped with NVGs should direct GMV operators to parking spots.
12.19.1. Neither GMV operators nor guides should remove their NVGs until the vehicle is in
the desired parking spot.
12.19.2. Modify flashlights used by spotters for NVG compatibility. Alternative light
sources for use during tactical operations are available in the Air Force supply system.
12.20. Operations Under Blackout Conditions Without Night Vision Devices.
12.20.1. When operating under BO conditions, be sure the BO marker lights are functioning
properly.
12.20.2. Lower the windshield to improve visibility.
12.20.3. Drive at reduced speeds.
12.20.4. If in a column, watch the rear BO marker lights of the vehicle ahead to be sure of
following at the correct distance. Remember, the white BO stoplight of the vehicle ahead is
on the right and left side.
12.21. Blackout Marker Lights. To show the location of vehicles during BO conditions,
military vehicles are equipped with four BO marker lights. Two of these lights are on the rear
corners of the vehicles and the other two are on the front (see Figure 12.1). They do not
illuminate the road but depending on the weather can indicate the position of a vehicle as much
as 250 yards ahead. These lights cannot be seen from an airplane flying higher than 400 feet.
12.21.1. When operating a vehicle in a convoy under BO conditions, if practicable, post a
person equipped with a screened flashlight or large white piece of material in the rear of the
vehicle to warn the following operator if they approach too closely.
12.21.2. An alert rear guard can usually detect a vehicle at a reasonable distance, even one
with no lamps. In BO operation, vehicles should maintain a speed of 5 to 10 mph (8 to 16
kilometers per hour).
12.21.3. When a vehicle is disabled on the side of the road, the GMV operator is based at the
rear of the disabled vehicle with a screened flashlight or large white piece of material to warn
approaching vehicles of the danger.
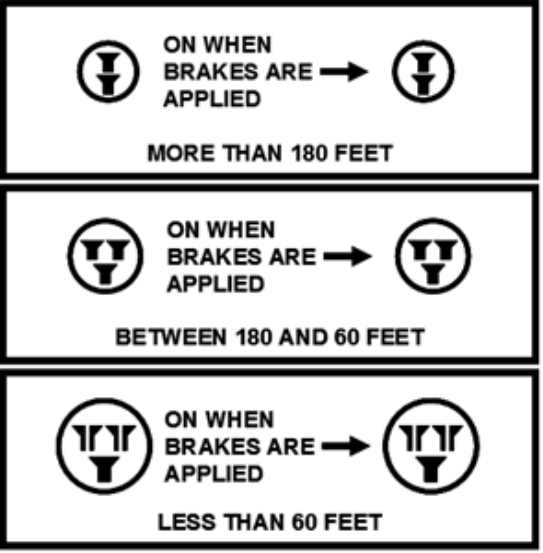
AFMAN24-306 30 JULY 2020 127
Figure 12.1. Rear BO Marker Lights.
128 AFMAN24-306 30 JULY 2020
Chapter 13
LAND NAVIGATION
Section 13A—Navigation Considerations
13.1. Navigation Considerations.
13.1.1. Assembling Equipment. The navigator must gather all required equipment (maps,
pencils, and so forth) before the mission starts. (T-1).
13.1.2. Servicing Equipment. The navigator is responsible to ensure the operational
serviceability of equipment before the mission starts. (T-1).
13.1.3. Recording Data for Precise Locations. During movement, the navigator must make
sure that the correct direction and distance are recorded and followed. (T-1). Grid
coordinates of locations must be recorded and plotted. (T-1).
Section 13B—Land Navigation Overview
13.2. Maps. An easy way to become familiar with the area of operation is by studying a map.
From the map operators can determine the major roads and where they go. Also, maps indicate
obvious landmarks such as mountains, valleys, coastlines, rivers, cities, railroads, crossroads, and
bridges. The two basic types of maps are the grid map and the strip map.
13.2.1. For more information on land navigation, see AFTTP 3-4, Airman’s Manual.
13.3. Military Grid Reference System. To keep from getting lost, operators have to know how
to find out where they are. There are no street addresses in a combat area, but a military map can
identify locations accurately.
13.4. Grid Squares. The map has lines running up and down (north and south) and across (east
and west). These lines form small squares 1,000 meters on each side called grid squares.
13.5. Determining Coordinates. The lines that form grid squares are numbered along the
outside edge of the map picture. No two grid squares may have the same number. The precision
of a point location is shown by the number of digits in the coordinates the more digits, the more
precise the location; for example:
13.5.1. 1181 is a 1,000 meter grid square.
13.5.2. 115813 is to the nearest 100 meters.
13.5.3. 11508133 is to the nearest 10 meters.
13.5.4. For instance, suppose an address is grid square 1181. How is this found? Start from
the left and read right until reaching 11, the first half of the address. Then read up to 81, the
other half. The address is somewhere in grid square 1181 (see Figure 13.1).
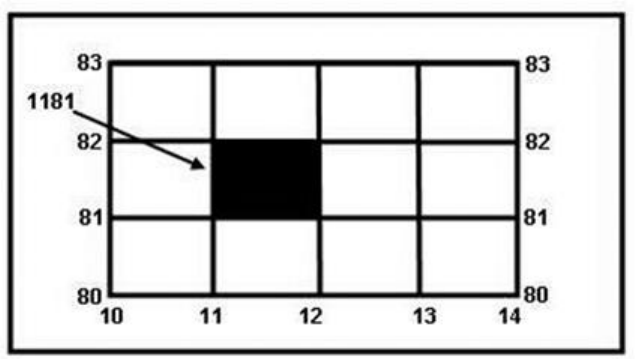
AFMAN24-306 30 JULY 2020 129
Figure 13.1. Grid Square.
13.5.5. Grid square 1181 provides general location, but there is a lot of ground inside that
grid square. To provide a more accurate location, just add another number to the first half
and another number to the other half, so the location address has six numbers instead of four.
13.5.6. To get those extra numbers pretend that each grid square has 10 lines inside it
running north and south and another 10 running east and west. This makes 100 smaller
squares. Operators can estimate where these imaginary lines are.
13.5.7. If the location is halfway between line 11 and line 12, the next number is 5 and the
first half of the address is 115. If the location is also three-tenths of the way between line 81
and line 82, then the second half of the location address is 813. (If exactly on line 81, the
second half would be 810.). Figure 13.2 shows that if the location is where the dot is in the
grid square 1181, then the location address would be 115813.
13.5.8. The most accurate way to determine the coordinates of a point on a map is to use a
coordinate scale (see Figure 13.3). Imaginary lines are not necessary because the exact
coordinates are displayed on the coordinate scale and protractor or the plotting scale.
Located on both of these devices are two coordinate scales: 1:25,000 and 1:50,000 meters.
When using either of these devices, be sure to use the correct scale.
13.5.9. Use the coordinate scales to determine the coordinates of a point (Point A) already
plotted on a map (see Figure 13.4). First, locate the grid square in which the point is located.
The number of the vertical grid line on the left (West) side of the grid square is the first and
second digits of the coordinates (11). The number of the horizontal grid line on the bottom
(South) side of the grid square is the fourth and fifth digits of the coordinates (81).
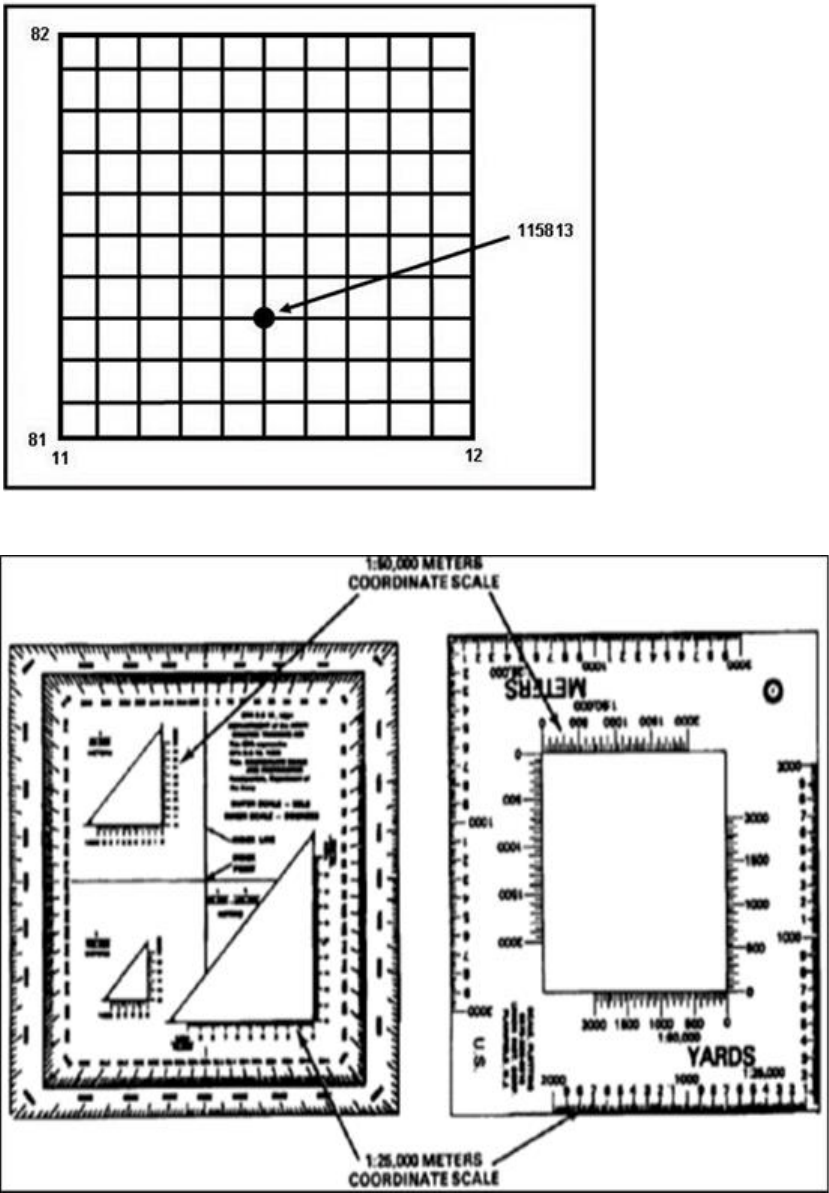
130 AFMAN24-306 30 JULY 2020
Figure 13.2. Point on a Grid Square.
Figure 13.3. Coordinate Scales.
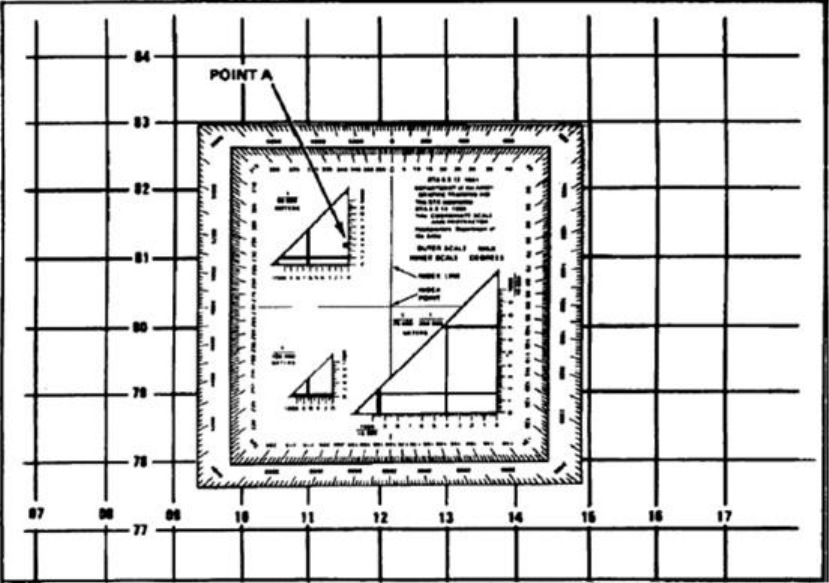
AFMAN24-306 30 JULY 2020 131
Figure 13.4. Determining Coordinates of a Point Using a Coordinate Scale.
13.5.10. To determine the third and sixth digits of the coordinates, place the coordinate scale
on the bottom grid square containing point A. Be sure the zeroes of the coordinate scale are
in the lower left-hand (Southwest) corner of the grid square. Slide the coordinate scale to the
right, keeping the bottom of the scale on the bottom grid line until point A is under the
vertical (right-hand) scale.
13.5.11. To determine a six-digit coordinate, the 100-meter mark on the bottom scale, which
is nearest the north-south grid line, is the third digit, 5. The 100-meter mark on the right-
hand scale, which is nearest point A, is the sixth digit, 3. Putting these together, establishes a
location of 115813.
13.5.12. To determine an eight-digit coordinate, which locates a point on the ground to
within 10 meters, keep in mind that there are 100 meters between each 100-meter mark
(number) on the scale. A short tick mark indicates 50 meters between each 100-meter mark.
As shown in Figure 13.2 the grid line crosses the bottom scale on the 500-meter mark, this
makes the third and fourth digits 50. If the grid line crossed the scale between the 500- and
600-meter mark, then interpolate how many meters it is beyond 500 meters. To determine
the seventh and eighth digits, read the right-hand scale where the point is on the scale. As
shown, the point is between the 300- mark and the 50-meter tick mark. Make an estimate of
how many 10s the point is beyond the 300 mark. In this case it is 3, which makes the seventh
and eighth digits, 33. Putting these together, establishes a location of 11508133.
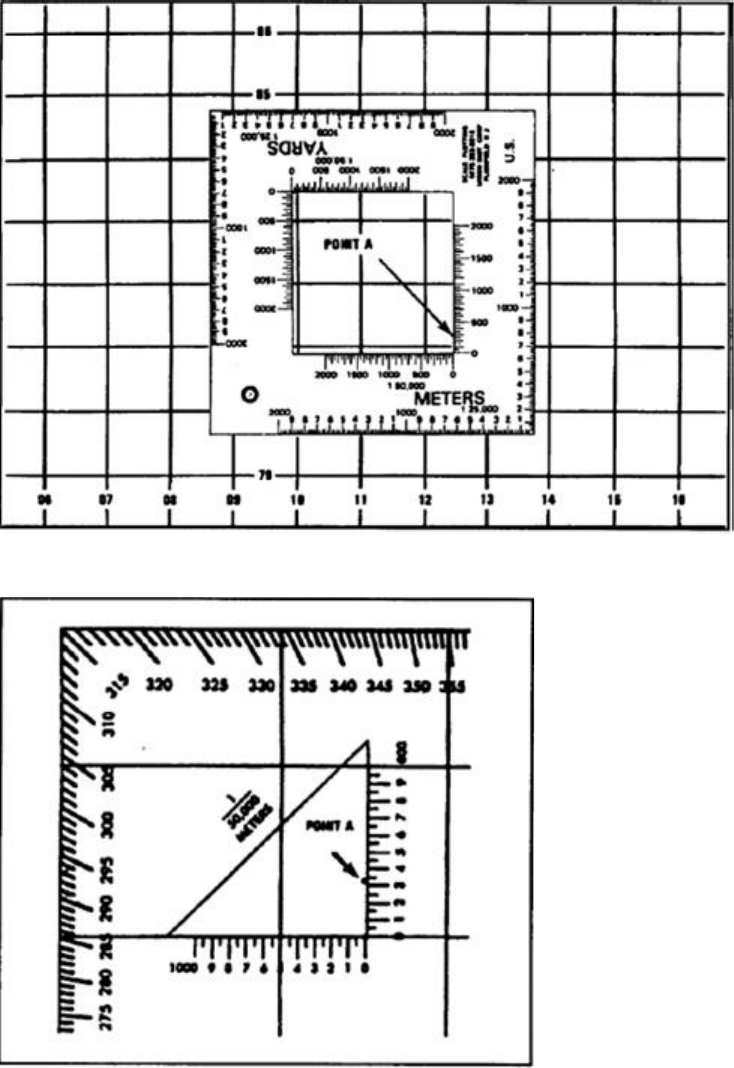
132 AFMAN24-306 30 JULY 2020
13.5.13. To determine the correct two-letter 100,000-meter square identifier, look at the grid
reference box in the margin of the map. Place the 100,000 – meter square identifier in front
of the coordinate GL 11508133 (see Figure 13.5, Figure 13.6, Figure 13.7, and Figure
13.8).
Figure 13.5. Locating a Point on a Grid Square.
Figure 13.6. Coordinate Scale.
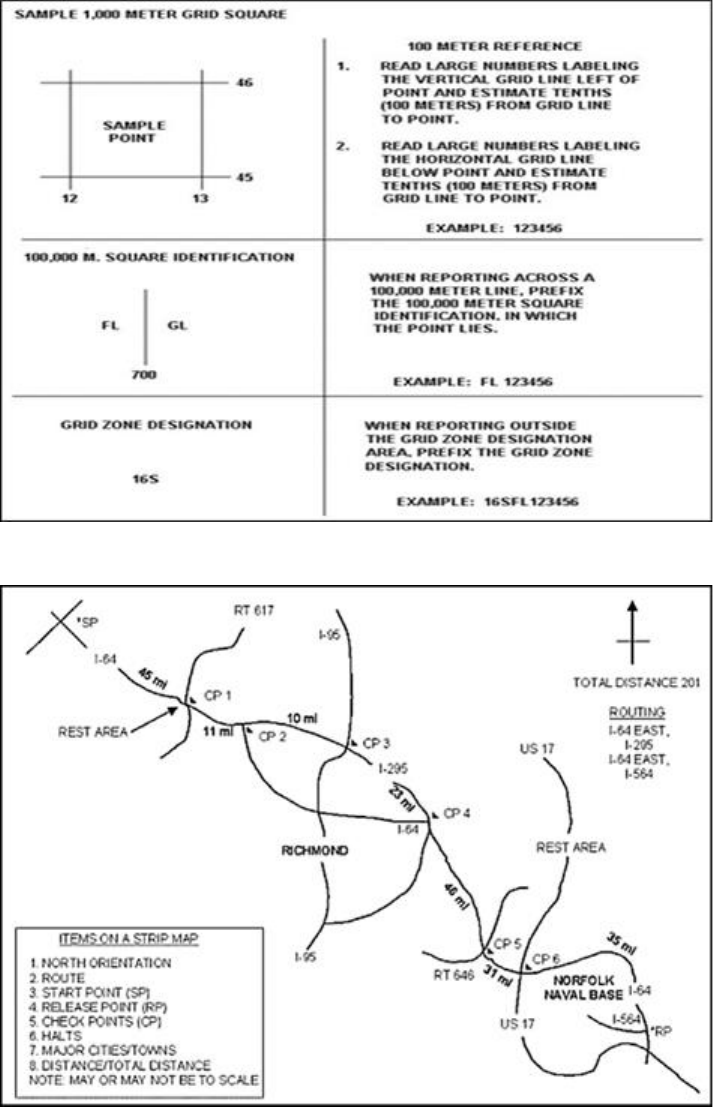
AFMAN24-306 30 JULY 2020 133
Figure 13.7. Grid Reference Box.
Figure 13.8. Strip Map.
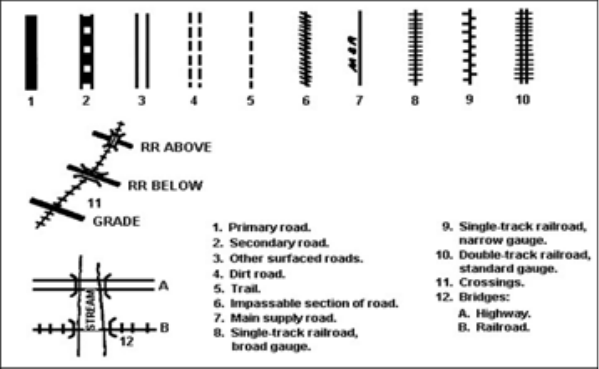
134 AFMAN24-306 30 JULY 2020
13.6. Estimating the Distance. Maps are drawn to scale so measurements of distance on the
map estimate the distance on the ground. This scale may be indicated by a note such as ”3
inches equals 1 mile.” This means that 3 inches on the map equals 1 mile on the ground. By
using a 3-inch strip of paper as a ruler to measure the number of miles on the map, the actual
miles can be estimated. Sometimes instead of a note, a ruler is printed on the map. Another way
to show the scale is by a representative fraction; for instance, l/63,360 or 1:63,360. This means
that one unit of distance on the map equals 63,360 units on the ground. For instance, 1 inch on
the map equals 63,360 inches on the ground which equals 5,280 feet or 1 mile.
13.7. Unit Measurements. United States units for measuring distance are in terms of miles,
yards, and feet. In most overseas areas, the metric system is used. A GMV operator needs to
know metric measurements and how they compare to U.S. measurements because speedometers
and odometers may measure in miles versus kilometers. A kilometer equals a little over six-
tenths of a mile. The following conversion method shows how to convert (approximately) to the
metric system:
13.7.1. Kilometers (km) to miles (mi): multiply km by 0.62.
13.7.2. Example: 37 km x 0.62 = 22.94 or 23 mi.
13.7.3. Miles to kilometers: multiply mi by 1.6.
13.7.4. Example: 23 mi x 1.6 = 36.8 or 37 km.
13.8. Estimating the Time. Having estimated the distance, the next step is to figure-the time
needed for travel. In estimating time, remember that the maximum allowable speed should not
exceed that shown on the caution plate in the cab or that specified by the commander. Average
speed should be less than the maximum speed, as average speed includes halts and traffic
slowdowns.
13.9. Recognizing Military Signs. In addition to the signs and devices normally encountered in
civilian and military driving, an operator must know signs peculiar to the military service. (T-0).
These include signs or symbols and installation markers (see Figure 13.9). Military signs and
symbols can be found in Army Doctrine Reference Publication 1-02, Terms and Military
Symbols.
Figure 13.9. Strip Map Symbols.
AFMAN24-306 30 JULY 2020 135
13.10. Using a Strip Map. The strip map shown in Figure 13.8 is a sketch of a route-of-march.
It may or may not be drawn to scale, but it should show the identifying landmarks. A strip map
may include varying degrees of information, such as:
13.10.1. Start point and Release point.
13.10.1.1. The start point is where all elements of a column come under the control of
the convoy commander. The SP should be a place along the route easily recognized on
both maps and ground.
13.10.1.2. The release point is a well-defined point on a route at which the elements
composing a column return under the authority of their respective commanders, each one
of these elements continuing its movement towards its own appropriate destination.
13.10.2. Routes and route numbers.
13.10.3. Major towns.
13.10.4. Major roads and crossroads.
13.10.5. Mileage between points.
13.10.6. Safe havens, rest, halt, and petroleum, oils, and lubricants areas.
13.10.7. Directional arrows.
13.10.8. Legend.
Section 13C—Prepare Before Movement
13.11. Movement Preparation. Locate the start point and finish point on the map. Determine
the map’s grid azimuth from start point to finish point and convert it to a magnetic azimuth.
Determine the distance between the start point and finish point or any intermediate points on the
map and make a thorough map reconnaissance of that area. Ensure vehicle is prepared for
inclement weather operations prior to movement.
Section 13D—Terrain Association Navigation
13.12. Terrain Association. This is currently the most widely used method of navigation. The
navigator plans the route to move from terrain feature to terrain feature. The navigator selects
routes or streets between key points or intersections. These routes should be capable of
sustaining the travel of the vehicle or vehicles, should be relatively direct, and should be easy to
follow. In a typical move, the navigator does the following:
13.12.1. Determines current location.
13.12.2. Determines the location of the objective.
13.12.3. Notes both of the above locations on the navigation map.
13.12.4. Selects a route between the two.
13.12.5. After examining the terrain, makes the necessary rout adjustments by the following
actions:
136 AFMAN24-306 30 JULY 2020
13.12.5.1. Consider Tactical Aspects. Avoid sky lining, select key terrain for over watch
positions, and select concealed routes.
13.12.5.2. Consider Ease of Movement. Use the easiest possible route and bypass
difficult terrain. Remember that a difficult route is harder to follow, is noisier, causes
more wear and tear (and possible recovery problems), and takes more time. Tactical
surprise is achieved by doing the unexpected. Try to select an axis or corridor instead of
a specific route. Make sure there is enough maneuver room for the vehicles (see Figure
13.1).
13.12.5.3. Use Terrain Features as Checkpoints. These checkpoints need to be easily
recognizable in the light and weather conditions and at the speed at which the navigator
may move. The navigator should be able to find a terrain feature for all checkpoints
along each segment/leg of the route and should be used as a visual reference. An
example is checkpoint 2, the church, and checkpoint 3, the orchard (see Figure 13.10).
13.12.5.3.1. The best checkpoints are linear features that cross the route. Use
streams, rivers, hard-top roads, ridges, valleys, and railroads.
13.12.5.3.2. The next best checkpoints are elevation changes (such as hills,
depressions, spurs, and draws). Look for two contour lines of change. While
mounted, an operator should not be able to spot two lines of change.
13.12.5.3.3. In wooded terrain, try to locate checkpoints at no more than 1,000-meter
intervals. In open terrain, checkpoints may go to about 5,000 meters.
13.12.5.4. Follow Terrain Features. Movement and navigation along a valley floor or
near (not necessarily on) the crest of a ridgeline is easiest.
13.12.5.5. Determine Directions. Break the route down into smaller segments and
determine the rough directions that can be followed. An operator does not need to use
the compass; just the main points of direction (north, northeast, east, and so forth).
Before moving, note the location of the sun and locate north. Locate changes of
direction, if any, at the checkpoints picked.
13.12.5.6. Determine Distance. Get the total distance to be traveled and the approximate
distance between checkpoints. Plan to use the vehicle odometer to keep track of distance
traveled. Use the pace-count method and keep a record of the distance traveled. When
using a pace count, convert from map distance to ground distance by adding the
conversion factors of 20 percent for cross-country movement.
13.12.5.7. Make Notes. Mental notes are usually adequate. Try to imagine what the
route is like and remember it.
13.12.5.8. Plan to Avoid Errors. Restudy the route selected. Try to determine where
errors are most apt to occur and how to avoid any trouble.
13.12.5.9. Use a Navigational Log. Prepare a navigational log when the routes have
been selected and when the distance to be traveled has been divided into legs. The log is
an informal record of the distance and azimuth of each leg, with notes to aid the navigator
in following the correct route. The notes list easily identifiable terrain features at or near
the point where the direction of movement changes.
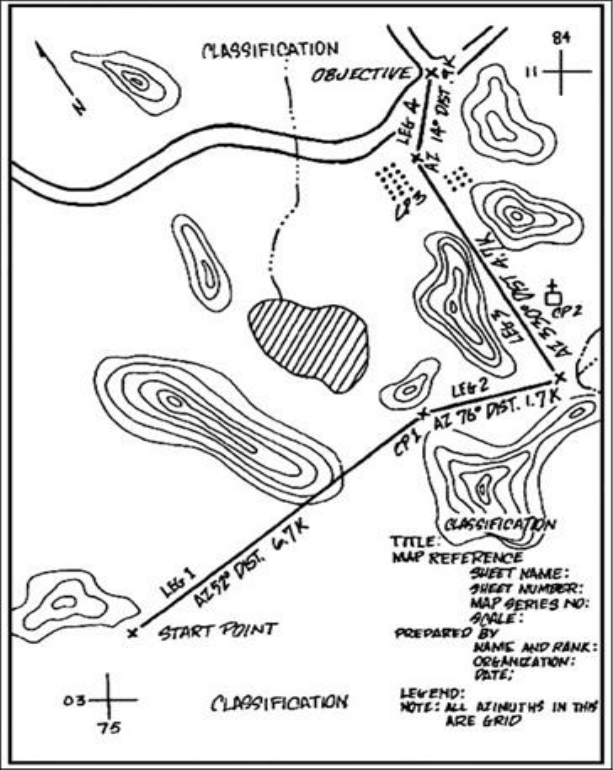
AFMAN24-306 30 JULY 2020 137
Figure 13.10. Primary Route.
Section 13E—Electronic Navigation Equipment
13.13. Precision Lightweight Global Positioning System (GPS) Receiver (PLGR). The
PLGR is a legacy military GPS receiver still in wide use today. PLGR is a key element,
providing real-time, precise position data for all combat elements to the battlefield information
systems.
13.14. Defense Advanced Global Positioning System (GPS) Receiver (DAGR). The DAGR
is a self-contained, hand-held, continuously tracking GPS receiver. It uses GPS receiver
technology. Although designed as a hand-held receiver for ground-mobile and airborne troops,
standardized interfaces enable DAGR to provide Position, Navigation, Timing information to a
wide variety of vehicles and host systems including integrated configurations for position
location, target location, rendezvous and en-route and terminal navigation.
138 AFMAN24-306 30 JULY 2020
Chapter 14
CHEMICAL, BIOLOGICAL, RADIOLOGICAL, AND NUCLEAR (CBRN)
OPERATIONS
Section 14A—Operations in CBRN Environment
14.1. General Information. Actual operations prove that response actions conducted during
training are also done during warfare. A GMV operator must know what to do when driving in a
CBRN environment. (T-1). For additional guidance, see AFTTP 3-2.60, Chemical, Biological,
Radiological and Nuclear Decontamination, AFTTP 3-4, AFMAN 10-2503, Operations in a
Chemical, Biological, Radiological, Nuclear, and High-Yield Explosive (CBRNE) Environment,
and the Installation Emergency Management Plan 10-2.
Section 14B—Practices for Operating Vehicle in Contaminated Area
14.2. Operating a Vehicle in a Contaminated Area. Personnel operating vehicles in a CBRN
contaminated environment can reduce the risk of contamination through the use of contamination
avoidance measures referred in the Airman’s Manual and AFTTP 3-2.60. Operating times for
personnel in a CBRN contaminated area may vary depending on the use of protective clothing,
temperature, nature of the contaminant, type of soil and terrain, and task to be performed. For
mission critical operations in a radiological environment, the commander has the responsibility
and authority to establish the minimum exposure dose to protect the Airmen. The following
practices are helpful in carrying out the mission:
14.2.1. Before entering CBRN contaminated areas, don protective clothing and the
protective mask, as required.
14.2.2. Use hard-surface roads, if available.
14.2.3. Avoid puddles and unnecessary splashing if roads are muddy.
14.2.4. Clean the wheels of the vehicle after crossing the area.
14.2.5. Move through the area as rapidly and safely as possible.
14.3. Vehicle Operation While Wearing Protective Mask.
14.3.1. Under combat conditions, situations change. GMV operators may be moving
forward, in a fighting position, or standing by in a replacement area some distance from the
combat area. In any of these situations, they are subject to enemy attacks.
14.3.2. Additional training is required to operate vehicles in a chemical warfare defense
ensemble. Unit vehicle control officers are the OPRs for unit-led training requirements to
operate vehicles in chemical warfare defense ensemble. Utilize AFQTP 24-3-500 Vehicle
Operation in MOPP 4 as a training package for specific training requirements and vehicle
types. Tasks that involve wearing chemical warfare defense ensembles, Individual Protective
Equipment (IPE) and MOPP, are outlined in Career Field Education and Training Plan
wartime tasks for certification. MOPP gear vehicle operations will be completed as part of
Air Force Expeditionary Force training, such as law of war, self-aid buddy care, etc. Training
is documented in personnel training records (if applicable). (T-1)
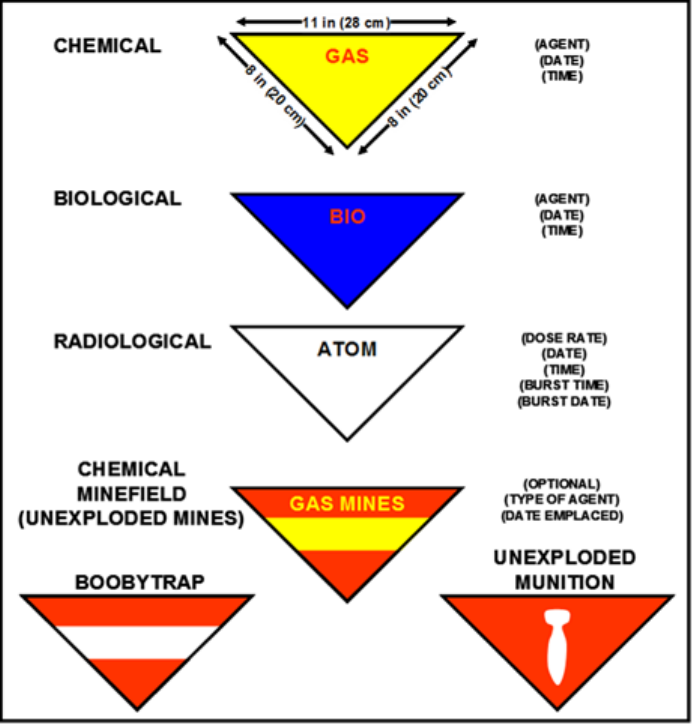
AFMAN24-306 30 JULY 2020 139
14.4. Marker Descriptions.
14.4.1. Use the triangular signs described in this chapter and AFMAN 10-2503, unless the
area is to be abandoned to threat forces, to mark CBRN contaminated areas, chemical
minefields, booby traps, and unexploded ordnance. See Figure 14.1
Figure 14.1. Standard CBRN and Unexploded Ordnance Hazard Markers.
14.5. Vehicle and Equipment Decontamination. In addition to the Installation Emergency
Management Plan 10-2 checklists, the following guidelines should be followed to decontaminate
vehicles and equipment:
14.5.1. Contaminated vehicles and equipment are still serviceable. Do not abandon or stop
protecting items contaminated from previous attacks. Personnel who use the proper
Individual Protective Equipment and protective measures can use contaminated vehicles and
equipment. As soon after contamination occurs, and as the situation permits, decontaminate
unit equipment.
140 AFMAN24-306 30 JULY 2020
14.5.2. Operational Decontamination. The most effective time to perform operational
decontamination is within one hour of contamination. Decontamination can be performed by
the operator or by the whole crew. Operators use the M295 Individual Equipment
Decontamination Kit (IEDK) to decontaminate the surfaces they need to touch or contact to
operate the equipment. Radiological contamination in the form of dust particles may be
wiped, scraped or brushed-off.
14.5.3. Vehicle Paint Schemes. See AFTTP 3-2.60.
14.5.3.1. Chemical Agent Resistant Coating is a supplemental coating applied to vehicles
and equipment to enhance the ability of operators to decontaminate the item after a
chemical attack.
14.5.3.1.1. Most non- Chemical Agent Resistant Coating painted surfaces readily
absorb liquid chemical agents. However, chemical agent absorption may take up to
six hours on Chemical Agent Resistant Coating painted vehicles or equipment items,
as long as the assets were previously painted within two years prior to a chemical
attack.
14.5.3.1.2. Due to the slower rate of absorption with Chemical Agent Resistant
Coating paint, the contact and transfer hazard remains viable as long as the agent is
on the surface. Additionally, the resulting vapor concentrations are at their maximum
limit.
14.5.3.1.3. If it is necessary to use Chemical Agent Resistant Coating painted
vehicles or equipment within 6 hours of contamination, decontaminate the entire
exterior in addition to those areas that may be continuously touched.
14.5.3.2. Polyurethane Paint. The majority of vehicles and equipment on Air Force
installations are painted with polyurethane compounds. Chemical agents readily absorb
into this type of paint. Thus, decontamination operations may not have a significant
effect unless decontamination activities take place very shortly after the time of
contamination (within minutes). When the liquid agent absorbs into the paint, it reduces
the residual contact hazard and may present a vapor off-gassing hazard for long periods.
14.5.3.3. Contaminated vehicle or interior.
14.5.3.3.1. Seating area or operator. GMV operators and passengers should place
plastic sheeting or other barrier materials on seats if the seat area or the individual are
(or were previously) contaminated. Body heat and pressure (from sitting) increases
the potential for liquid chemical agents to penetrate the ensemble.
14.5.3.3.2. Steering wheel. Consider using barrier material to cover the steering
wheels. This is especially important for vehicles that have open cabs or driver’s
compartments.
AFMAN24-306 30 JULY 2020 141
14.6. Pre/Post- Attack Preparation. Pre-attack actions include planning a vehicle covering
strategy, protecting the vehicle fleet, and pre-positioning M8 paper on all vehicle assets. Post-
attack actions include prioritizing vehicle use after an attack, conducting expedient vehicle
decontamination, and performing vehicle maintenance procedures in a contaminated
environment. Additional post-attack activities include providing long-term identification of
contaminated vehicles and supporting open-air contamination control area (CCA) operations.
14.6.1. Contaminated Vehicle Identification and Marking.
14.6.1.1. Each vehicle and equipment operator is responsible for covering and placing
M8 paper on their assets prior to attacks. They are also responsible for identifying and
marking contamination found after attacks.
14.6.1.2. Upon notification from the Unit Control Center or Emergency Operations
Center (EOC), check pre-positioned M8 paper on assets and each layer of barrier
materials and mark contamination. When the item is contaminated, mark with the
appropriate symbol. This is done to enable maintenance personnel to take the necessary
protective actions and precautions when performing maintenance.
14.6.1.3. The operator must notify their Unit Control Center of the contamination item’s
status. (T-1).
14.6.1.3.1. The Unit Control Center consolidates unit information and passes this
information to the EOC. For vehicles, the Unit Control Center will also notify the
GTOC and Vehicle Fleet Manager and include the POC information, vehicle location,
contamination type, damaged or unserviceable status, and vehicle registration
number. (T-1).
14.6.1.4. For vehicles, place the marker in lower center portion of the windshield. Each
GMV operator will annotate the AF Form 1800 when the marker is placed. (T-1).
Include the date and time of the contamination, the agent type and the location of the
contamination on the vehicle.
14.6.1.4.1. If the inspection form is not available or becomes contaminated, provide
the same information, along with the vehicle or equipment registration or
identification number, to the Unit Control Center.
14.6.2. Dispersal and Expedient Hardening. Vehicle dispersal is a valuable asset protection
technique. The probability is high that effective dispersal may protect some vehicle assets
from contamination or damage from conventional weapons effects. However, use dispersal
actions with expedient hardening and overhead cover whenever possible. Additionally,
personnel should guard against the tendency to park a large number of vehicles at any one
location due to the ease of access.
14.6.2.1. When identifying or constructing dispersal sites, choose a combination of
features that provide the best available expedient or natural protection and support
mission needs.
142 AFMAN24-306 30 JULY 2020
14.6.2.2. Locate multiple dispersal sites in areas that are not within the effective range of
adversary ground force weapons. If possible, locate sites on a concrete or asphalt surface
and ensure there are at least two entry and exit routes. One of the routes should be a
concrete or asphalt surface. Enhance protection by locating dispersal sites in areas that is
under the direct observation or control of a security forces defensive fighting position or
an owner-user security checkpoint. To simplify retrieval and post-attack reconnaissance
tasks, place sites near a unit work area.
14.6.2.3. Consider using dispersed vehicles as storage locations for alternate mission
supporting materials, such as tools and equipment.
14.6.3. Contaminated vehicles. Use contaminated vehicles only when uncontaminated
vehicles of the same type are unavailable. If possible, coordinate with the requesting unit to
delay non-critical operations until the uncontaminated vehicle is available.
14.6.3.1. As a safety precaution, always wear appropriate IPE when working with or
around previously contaminated vehicles.
14.6.3.2. Dispose of contaminated waste within a closed and marked container or in a
marked plastic disposal bag at the unit contaminated waste disposal point, or in the
nearest work center contaminated waste disposal point. If transporting contaminated
waste from the work site to another location, place the contaminated waste inside marked
plastic bags or closed containers before loading into the vehicle.
14.6.3.3. Contaminated buses move contaminated passengers and non-contaminated
buses move non-contaminated passengers. However, there can be times when
insufficient resources are available for use or mission dictates the prompt movement of
personnel. During these times, use caution and place plastic barrier materials on the seats
to prevent cross contamination.
14.6.3.4. Vehicle Contamination Specifics. There is no machine, kit, team, technique
or procedure presently capable of fulfilling all decontamination requirements. Depending
on the vehicle surface, the agent may absorb into the surface in times ranging from less
than one minute up to approximately one hour. Vehicle decontamination operations may
not have a significant effect once the agent has absorbed into the surface.
14.6.3.5. There is no need for extensive vehicle decontamination and there is no need to
establish a formal vehicle decontamination team. Placing barrier materials over the
item(s) and, or replacement are the best mitigation techniques.
14.6.3.6. Vehicles should be expediently decontaminated, specifically the parts that may
continuously be touched within one hour of contamination.
14.6.3.6.1. Ensure vehicles are clearly identified as containing a residual chemical
hazard. The operator’s or work center’s accomplishment of expedient
decontamination using M295 IEDK can suffice to continue operations.
14.6.3.6.2. Use M295 IEDK or a 5-percent chlorine bleach solution to decontaminate
appropriate asset surfaces if more than cursory contact is necessary, i.e., leaning on
hood compartment, kneeling in truck bed.

AFMAN24-306 30 JULY 2020 143
14.6.3.7. Ensure all personnel are wearing the appropriate MOPP level. Once cargo
loading/unloading is complete, determine the type, location and degree of contamination
remaining on the vehicle and ensure to transport personnel to the CCA as required. The
Installation Control Center will make the final decision as to Mission Criticality Level.
(T-1). See Table 14.1 below for specific levels.
Table 14.1. Mission Criticality Level Codes.
Mission Criticality Level
Definition
Critical
Property is sufficiently important that it
must be transported within 4 hours,
regardless of existence of contamination.
Priority
Property is sufficiently important that it
must be transported within 12 hours,
regardless of existence of contamination.
Accelerated
Property is sufficiently important that it
must be transported within 24 hours,
regardless of existence of contamination.
Routine
Mission can be delayed until
contamination levels are such that MOPP
4 is not required, regardless of how long it
takes the contamination to dissipate.
Negligible
Mission can be delayed until there is no
measurable indication of contamination;
property should not normally be accepted
inside property movement area and save
room for higher priority property.
14.6.4. Clean and Contaminated Cargo Movement.
14.6.4.1. If the transport vehicle is uncontaminated, take the following precautions to
keep it clean during the contaminated cargo movement process.
14.6.4.1.1. Expediently decontaminate the portions of the MHE exposed to either the
cargo pallet or the transport vehicle (forklift tines and rollers on the aircraft loader).
Use M295 IEDK or 5-percent chlorine bleach solution to decontaminate.
14.6.4.1.2. Place plastic or another barrier material in the bed of the transport vehicle
over the area the cargo sits on.
14.6.4.1.3. The GMV operator should be the only person in the transport vehicle and
must wear the appropriate level of IPE. (T-1).
14.6.4.1.4. Local cargo handlers should perform the actual cargo loading. Cargo
handlers should not touch or stand on or inside the vehicle unless absolutely
necessary.
144 AFMAN24-306 30 JULY 2020
14.6.4.1.4.1. If they touch or stand on or inside the vehicle, they should use
decontamination troughs containing 5-percent chlorine solutions to decontaminate
their gloves and boots before they make contact.
14.6.4.1.5. Check the clean transport vehicle for evidence of cross-contamination and
decontaminate with the M295 decontamination kit if contaminated.
14.6.4.1.6. Seal vehicle chocks or other transport vehicle accessories that may have
come in contact with contaminated surfaces inside a plastic bag prior to loading.
14.6.4.1.7. Appropriately mark the vehicle and the cargo to clearly identify the
hazard associated with the contaminated cargo.
14.6.4.1.8. Use the following guidelines when loading and transporting clean cargo
after attacks with chemical or biological agents.
14.6.4.1.8.1. Determine the contamination status of the MHE (forklifts and
aircraft loaders) and the transport vehicle or vehicles.
14.6.4.1.8.2. If the MHE and/or transport vehicle is contaminated, take the
following precautions to prevent them from cross-contaminating the 463L cargo
pallet during the cargo movement process.
14.6.4.1.8.2.1. Expediently decontaminate the portions of the MHE
equipment that may come in contact with the cargo.
14.6.4.1.8.2.2. Place at least two sheets of plastic or another layer of barrier
material in the bed of the transport vehicle over the area the cargo or pallets sit
on.
14.6.4.1.8.2.3. Ensure the cargo has at least a double wrap of barrier material.
14.6.4.1.8.2.4. The GMV operator should be the only person in the transport
vehicle and must wear the appropriate level of IPE. (T-1).
14.6.4.1.8.2.5. Local cargo handlers should perform the actual cargo loading.
Cargo handlers should not touch or stand on or inside the vehicle or vehicles
unless absolutely necessary.
14.6.4.1.8.2.6. If they touch or stand on or inside the vehicle, they should use
decontamination troughs containing 5-percent chlorine solutions to
decontaminate their gloves and boots after they make contact.
14.6.4.1.8.2.7. Check the pallet or pallets for evidence of cross-contamination
and decontaminate with the M295 IEDK if contamination is present.
14.6.4.1.8.2.8. Appropriately mark the vehicle to clearly identify the
associated hazard.
WARREN D. BERRY, Lieutenant General, USAF
DCS/Logistics, Engineering & Force Protection
AFMAN24-306 30 JULY 2020 145
Attachment 1
GLOSSARY OF REFERENCES AND SUPPORTING INFORMATION
References
AFTTP(I) 3-2.58, Multi-Service Tactics, Techniques, and Procedures for Tactical Convoy
Operations, 1 Feb 17
AFTTP(I) 3-2.60, Multi-Service Tactics, Techniques, and Procedures for Chemical, Biological,
Radiological and Nuclear Decontamination, 1 Apr 06
AFTTP(I) 3-4, Airman’s Manual, 11 Jan 19
AFPD 24-3, Management, Operation and Use of Transportation Vehicles, 14 Dec 17
AFI 10-2701, Organization and Function of the Civil Air Patrol, 07 Aug 18
AFI 13-213, Airfield Driving, 4 Feb 20
AFI 24-301, Ground Transportation, 22 Oct 19
AFI 24-302, Vehicle Management, 21 Feb 20
AFI 32-6003, General Officer Quarters (GOQ) Management, 30 Sept 19
AFI 33-322, Records Management and Information Governance Program, 22 Mar 20
AFI 33-360, Publications and Forms Management, 1 Dec 15
AFI 34-501, Mortuary Affairs Program, 16 Apr 19
AFI 36-2670, Total Force Development, 25 Jun 20
AFI 84-103, United States Air Force Heritage Program, 22 May 15
AFI 90-301, The Inspector General Complaints Resolution, 28 Dec 18
AFI 91-202, The US Air Force Mishap Prevention Program, 12 Mar 20
AFMAN 91-203, Air Force Occupational Safety, Fire, and Health Standards, 11 Dec 18
AFI 91-207, The US Air Force Traffic Safety Program, 26 Jul 19
AFMAN 10-2503, Operations in a Chemical, Biological, Radiological and Nuclear,
Environment, 14 May 19
AFMAN 24-204, Preparing Hazardous Materials for Military Air Shipments, 13 Jul 18
AFMAN 31-116, Air Force Motor Vehicle Traffic Supervision, 22 Jun 17
AFMAN 33-363, Management of Records, 1 Mar 08
AFMAN 91-201, Explosives Safety Standards, 21 Mar 17
AI 109, Use of Motor Transportation and Scheduled DoD Shuttle Service in the Pentagon Area,
22 May 17
AFI 24-602, Cargo Movement, 12 Jun 19
NFPA 10, Standard for Portable Fire Extinguishers, 2018 Edition
146 AFMAN24-306 30 JULY 2020
TO 00-35A-39, Instructions for Procurement, Issue, Use and Maintenance of Medical Kits, 1
Mar 17
TO 36-1-191, Technical and Managerial Reference for Motor Vehicle Maintenance, 7 Feb 19
TO 36M-1-141, 463 L Material Handling Equipment System, 1 June 18
NGR 5-1, National Guard Grants and Cooperative Agreements, 28 May 10
ADRP 1-02, Terms and Military Symbols, 16 Nov 16
ATP 4-11, Army Motor Transport Operations, 5 Jul 13
ATP 4-16, Movement Control, 5 Apr 13
Department of Defense Regulations, Directives, and Instructions
AI 109, Use of Motor Transportation and Scheduled DoD Shuttle Service in the Pentagon Area,
22 May 17
DoDI 6055.04, DoD Traffic Safety Program, 31 Aug 18
DoDI 7250.13, Use of Appropriated Funds for Official Representation Purposes, 27 Sept 17
DoDM 4500.36, Acquisition, Management, and Use of DoD Non-Tactical Vehicles, 20 Dec 18
DoDIO-2000.16V1_AFI 10245-0AFI 10-245, Antiterrorism (AT) Program Implementation, 18
Jul 17
Public Law (P.L.)
Public Law 99-570, Title XI, The Federal Employee Substance Abuse Education and Treatment
Act of 1986
Public Law 99-570, Title XII, The Commercial Motor Vehicle Safety Act of 1986
Code of Federal Regulations (CFR)
Title 5 CFR, Part 930, Subpart A, Motor Vehicle Operators
Title 29 CFR, Part 1910.178, Power Industrial Trucks
Title 29 CFR, Part 1926.902, Surface Transportation of Explosives
Title 49 CFR, Subchapter C, Hazardous Materials Regulation, Parts 171-179
Title 49 CFR, Subpart 173.52, Classification Codes and Compatibility Groups of Explosives
Title 49 CFR, Subpart 175.78, Stowage Compatibility of Cargo
Title 49 CFR, Subpart 177.817, Shipping Papers
Title 49 CFR, Subpart 382.103, Controlled Substances and Alcohol Use and Testing
Title 49 CFR, Subpart 383.3, Commercial Driver’s License Standards; Requirements and
Penalties
Title 49 CFR, Subchapter B, Federal Motor Carriers Safety Regulations, Parts 390-397
SDDCTEA Pamphlet 55-20, Tie-down Handbook for Truck Movements, May 09
DTR 4500.9-R Part II, Cargo Movement, May 14
AFMAN24-306 30 JULY 2020 147
DoT-SP 3498, Driver Exemption Programs, 16 Oct 18
United States Code (U.S.C.)
Title 10 U.S.C. § 9442, Status as Volunteer Civilian Auxiliary of the Air Force
Title 31 U.S.C. § 1344, Passenger Carrier Use
Title 40 U.S.C. § 601-611, Motor Vehicle Pools and Transportation Systems
Title 49 U.S.C. § 31302, Commercial Driver’s License Requirement
Adopted Forms
AF Form 171, Request for Driver’s Training and Addition to U.S. Government Driver’s License
AF Form 483, Certificate of Competency
AF Form 847, Recommendation for Change of Publication
AF Form 1800, Operator’s Inspection Guide and Trouble Report
AF Form 2293, U.S. Air Force Motor Vehicle Operator Identification Card
AF Form 2296, Operator Qualification Record
DD Form 518, Accident Identification Card
DD Form 626, Motor Vehicle Inspection (Transporting Hazardous Materials)
DD Form 2890, DOD Multimodal Dangerous Goods Declaration
OF 345, Physical Fitness Inquiry for Motor Vehicle Operators
OF 346, U.S. Government Motor Vehicle Operator’s Identification Card
SF 91, Motor Vehicle Accident Report
SF 94, Statement of Witness
Abbreviations and Acronyms
AAFES—Army and Air Force Exchange Service
AFI—Air Force Instruction
AFIMSC—Air Force Installation and Mission Support Center
AFMAN—Air Force Manual
AFPD—Air Force Policy Directive
AFTTP—Air Force Tactics, Techniques and Procedures
BO—Blackout
CBRN—Chemical, Biological, Radiological, and Nuclear
CBRNE—Chemical, Biological, Radiological, and Nuclear and High-Yield Explosives
CCA—Contamination Control Area
CDL—Commercial Driver’s License
148 AFMAN24-306 30 JULY 2020
CONUS—Continental United States
DAGR—Defense Advanced GPS Receiver
DGR—Dangerous Goods Regulation
DoD—Department of Defense
DoDI—Department of Defense Instruction
DoT—Department of Transportation
DV—Distinguished Visitor
EOC—Emergency Operations Center
GMV—Government Motor Vehicle
GOQ—General Officer Quarters
GSA—General Services Administration
GTOC—Ground Transportation Operations Center
GVWR—Gross Vehicle Weight Rating
HAZMAT—Hazardous Material
IAW—In Accordance With
ICAO—International Civil Aviation Organization
IEDK—Individual Equipment Decontamination Kit
IMDG—International Maritime Dangerous Goods
JROTC—Junior Reserve Officer Training Candidate
LRS—Logistics Readiness Squadron
MAJCOM—Major Command
MHE—Material Handling Equipment
MOPP—Mission Oriented Protective Posture
MPH—Miles per Hour
NATO—North Atlantic Treaty Organization
NCOIC—Non Commissioned Officer in Charge
NVG—Night Vision Goggles
OCONUS—Outside the Continental United States
OF—Optional Form
OLVIMS—Online Vehicle Interactive Management System
OPM—Office of Personnel Management
OPR—Office of Primary Responsibility
AFMAN24-306 30 JULY 2020 149
OR&L—Operator Records and Licensing
OSHA—Occupational Safety and Health Administration
PA—Privacy Act
PCS—Permanent Change of Station
PLGR—Precision Lightweight GPS Receiver
POC—Point-of-Contact
RDS—Records Disposition Schedule
ROTC—Reserve Officer Training Candidate
SABC—Self-Aid and Buddy Care
SCP—Special Command Position
SDDC—Surface Deployment and Distribution Command
SF—Standard Form
SORN—Status of Record Notice
TDY—Temporary Duty
TEA—Transportation Engineering Agency
TVO—Training Validation and Operations
USC—United States Code
VCO—Vehicle Control Official
Terms
Direct Mission Support—Commercial design vehicles used by military activities directly
supporting combat, non-combat, tactical units or for training of personnel for such activities.
Activities include Taxi, Aircrew Transportation, General Freight Support, Shuttle Service(s),
MHE Service, Doc Cargo Priority Service, Doc Cargo Routine Service and Protocol DV Service.
The activities listed in this paragraph are examples and do not constitute an all-inclusive list.
Distinguished Visitor (DV). —A DV is defined as (1) any general or flag officer; (2) any
government official with rank equivalent to a brigadier general or higher; or (3) any foreign
military officer or civilian designated a DV by the Deputy Under Secretary of the Air Force for
International Affairs (SAF/ IA). At times, persons of lower rank but appointed to or filling
certain positions, may be accorded DV status. The purpose of the visit will determine if the
distinction of DV should be accorded. The commander determines the DV distinction on an
individual basis
Domicile—A place of residence, regardless of where located, excluding TDY residences.
Emergency Response Forces—A group organized or available for a certain purpose with
specialized vehicles to support the Air Force mission. Example would be Fire Department
personnel and assigned fire truck or Security Forces personnel and assigned patrol vehicles.
150 AFMAN24-306 30 JULY 2020
Employee—An employee of an agency in either the competitive or excepted service or an
enrollee of the Job Corps established by Title 42 U.S.C § 102.
Gross Vehicle Weight Rating (GVWR)—Is normally found on the vehicle/equipment data
plate as GVWR. The gross vehicle weight rating or gross vehicle mass (GVM) is the maximum
operating weight/mass of a vehicle as specified by the manufacturer including the vehicle's
chassis, body, engine, engine fluids, fuel, accessories, operator, passengers and cargo.
Installation—Real property owned or leased by the United States and under the jurisdiction of
one of the DoD Components, including family housing designed for rent for residential use by
civilian or military personnel of the Army, Navy, Marine Corps or Air Force, and constructed
under the National Housing Act.
Mass Transportation Services—Service for which a fare is normally charged, meeting
requirements beyond shuttle bus services by providing "non-duty" types of transportation within
a DoD installation or between sub-installations.
Motor Vehicle Accident—An occurrence involving a motor vehicle resulting from a collision
with another moving or stationary objects. Mechanical failures resulting from operator abuse or
negligence are not accidents under this definition.
Official Purposes—Any application of a motor vehicle in support of authorized DoD functions,
activities or operations.
Official Use—GMVs are closely controlled because of their easy accessibility, high visibility
and potential for misuse. DoDM 4500.36 implements federal law (e.g., 31 U.S.C. §1344
Passenger Carrier Use and 40 U.S.C. §§601-611, Motor Vehicle Pools and Transportation
Systems) and prescribes the limited use of GMVs to official governmental purposes.
Operations—Those functions associated with the organization responsible for administering,
planning, directing and controlling the assignment and movement of transportation equipment
and operators in the transporting of personnel and cargo.
Operator’s Inspection and Service—Those maintenance inspections and functions performed
by the operator, before, during and after operation to ensure the vehicle is safe and serviceable.
Reputable Establishment—An establishment that will not create a perception that will reflect
unfavorably on the DoD or Air Force or cause public criticism no matter what the venue is.
Service Animal—Service animals are not considered pets. They are trained to perform tasks for
people with disabilities, either physical or psychological in nature.
Shuttle Service—This fare-free service is established to meet DoD requirements and operates
only in duty areas.
Space-Available (Space A)—Any seating available after accommodating space required
passengers. The vehicle size or contract cost will not be increased to accommodate space-
available personnel (i.e., if space is required for three passengers to attend an official function a
bus cannot be scheduled for use to transport additional Space-A passengers desiring transport to
the same or nearby destination). (T-0).
AFMAN24-306 30 JULY 2020 151
U-Drive-It (UDI)—Vehicles available to using organizations and activities of the installation for
temporary support of official functions and operated by personnel assigned to the using agency
in support of home-station missions, contingencies, TDY support and combat service support
operations. Support is normally limited to 72 hours, but can be approved for up to 60 days. A
UDI dispatch should not exceed 60 days total duration, IAW AFI 24-301 Para 3.16.3 Back-to-
back dispatches are not authorized in order to circumvent 60 consecutive days.
Vehicle Abuse—Damage caused by neglect or willful acts of improper operation or care.
Vehicle Misuse—Use of GMVs, including those rented or leased, for any purpose other than
that of official purposes only (e.g., in support of authorized DoD functions, activities, or
operations). Vehicle misuse includes, but is not limited to, use of a GMV solely to enhance the
comfort or convenience of member(s), or transportation by a GMV for reasons of rank, position,
prestige or personal convenience.
Vehicle Fleet—Vehicles assigned to provide transportation services and for temporary use by
other organizations.
